
Registration
The patient journey most often that not begins when the patient meets a healthcare provider or as soon as they step at the front desk of a healthcare institution. Accurate collection of information about the patient is the very important first step to ensure high quality healthcare is delivered.
The records personnel are usually the first point of contact for the patient. Their primary role is to register the patient into the system as accurately as practically possible, schedule them to the healthcare practitioners and determine modes of payments (in consultation with the finance department).
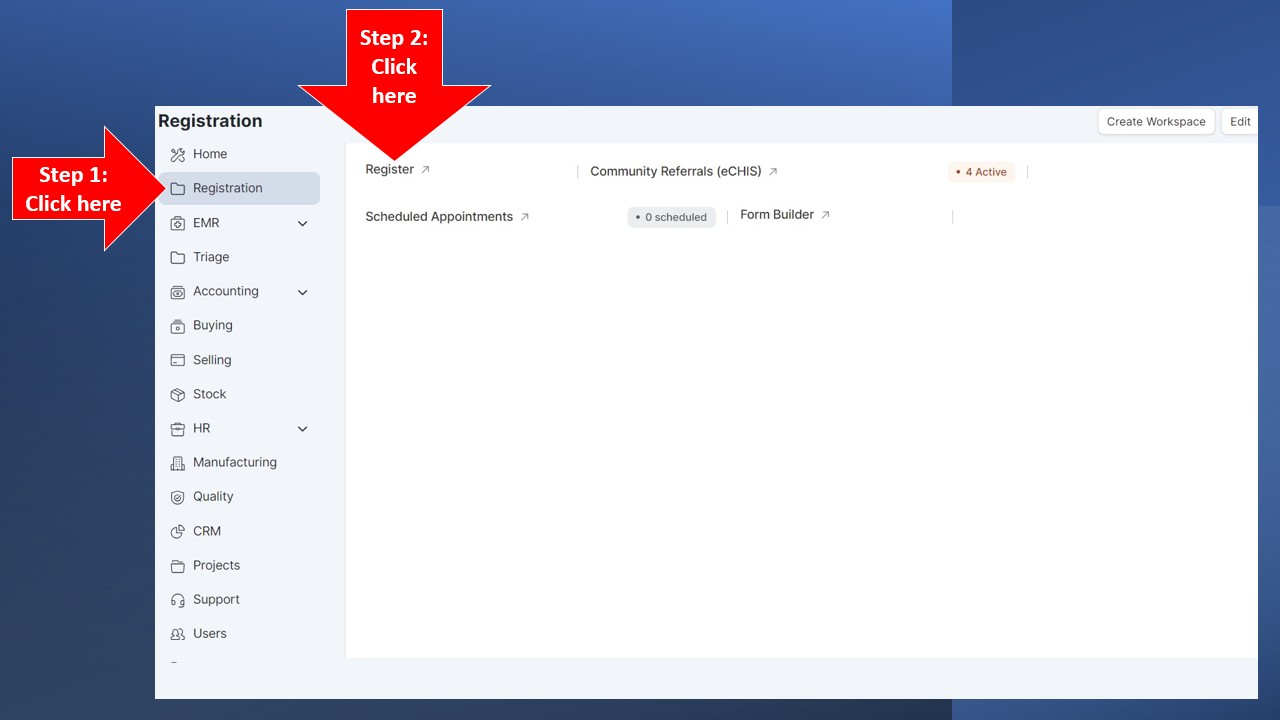
After successful login to Tiberbu, the following Homepage will be presented to you, depending with your user roles. Navigate to the Registration icon as shown below to begin registering a patient
Registration of a patient is only done after it has been reasonably determined that the patient does not exist either in the Client Registry or in Tiberbu.
Step 1: Searching the Patient's Existence
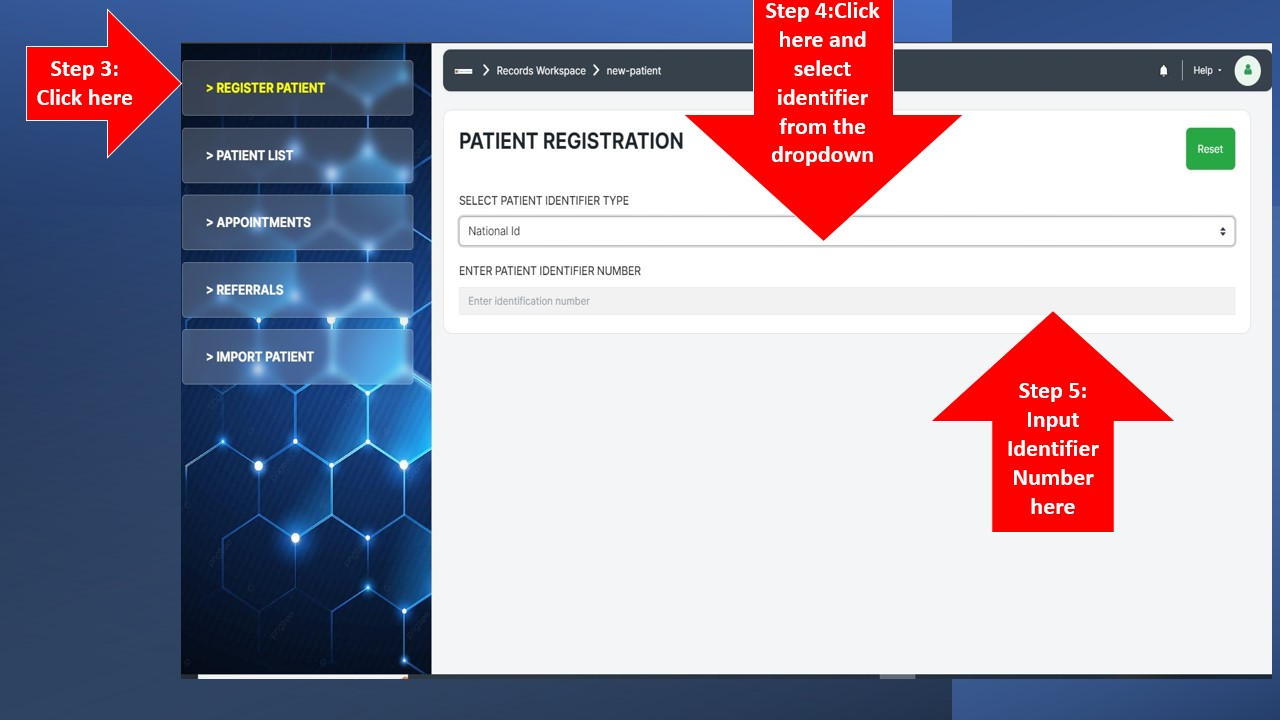
A Unique Identifier is used to search a client in the Client Registry or Tiberbu. This is either the patient's ID Number, Birth Certificate Number or Passport Number
The Patients Records page will be loaded. On the left hand side, click on 'Register Patient' ,
Go to Register Patient > Select Patient Identifier Type > Input Selected Identifier Number
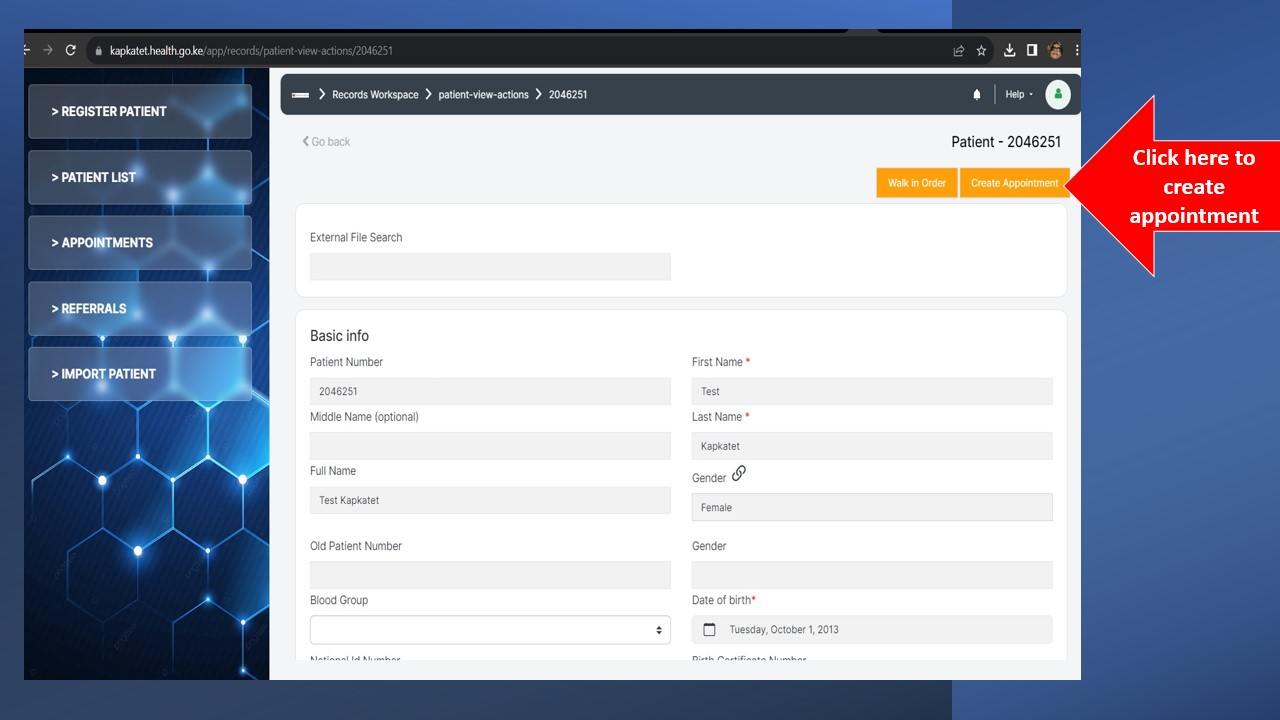
If the patient is found in the system, click on their details and proceed to create appointment for the patient
If the patient is not found on the system, register them as new patient following the process described below
Step 2: Registering a New Patient
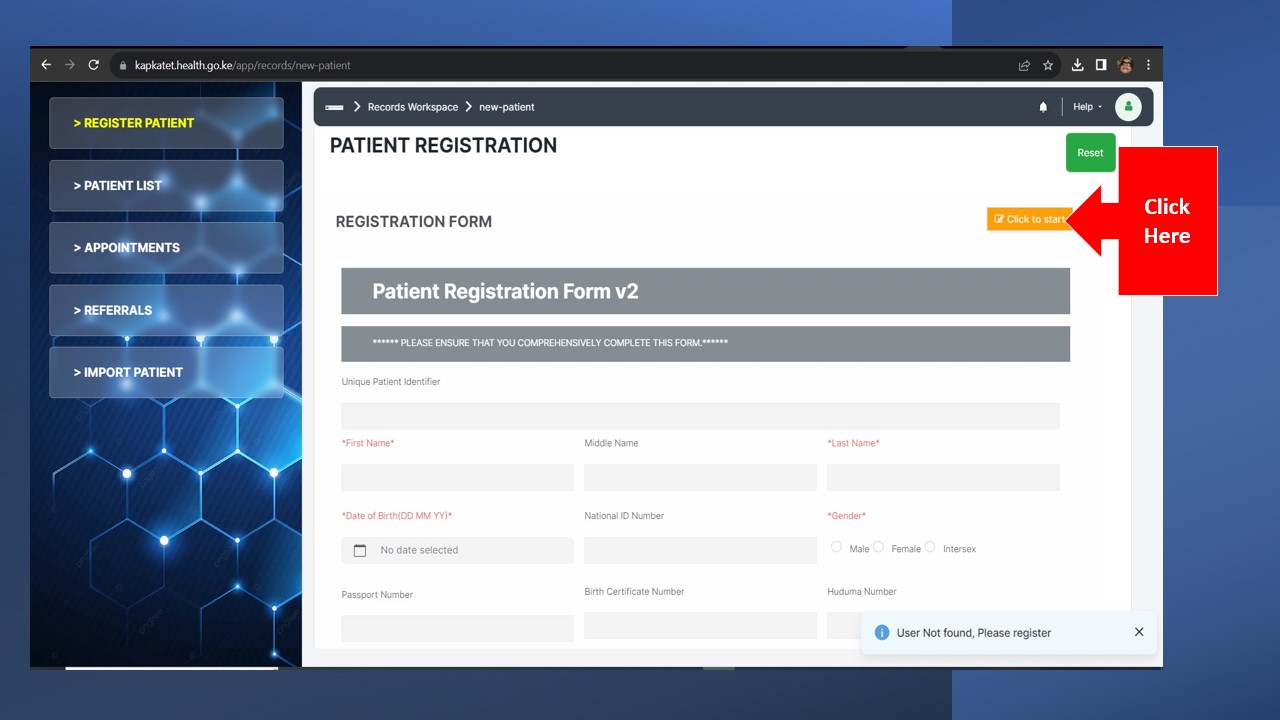
After searching the patient in the system using the unique identifier and they are not found , the system automatically opens the "Register New Patient" Page and a registration form is presented. This normally happens if the patient is visiting the facility for the first time.
To begin Registering the patient, click on the "Click to Start" button as shown below:
Start Filing the form by providing accurate information in the fields presented.
All fields marked * and highlighted in Red are Mandatory. The form will not allow you to save until you fill the fields
Under the 'Insurance Schemes' section, add the payer of the patient and remember to set the relevant amount balances. If this section is left empty the system will default to cash payer mode for the patient by default.
Once you complete filling the fields, click on the "Save" Button found either at the top or bottom of the form.
Successfully Saving the form will take you to the next step: Creating an appointment for the Patient
Step 3a: Creating Appointment For A Patient
Creating an appointment enables you to schedule the patient to a service point.
All registered patients can be accessed by clicking on the 'Patients' link on the left hand menu and a list will be displayed on the right as shown below.
You can search for a specific Patient using a number of parameters namely the patient ID, patient names, phone number or even their email. The parameters to be used for search can be configured elsewhere.
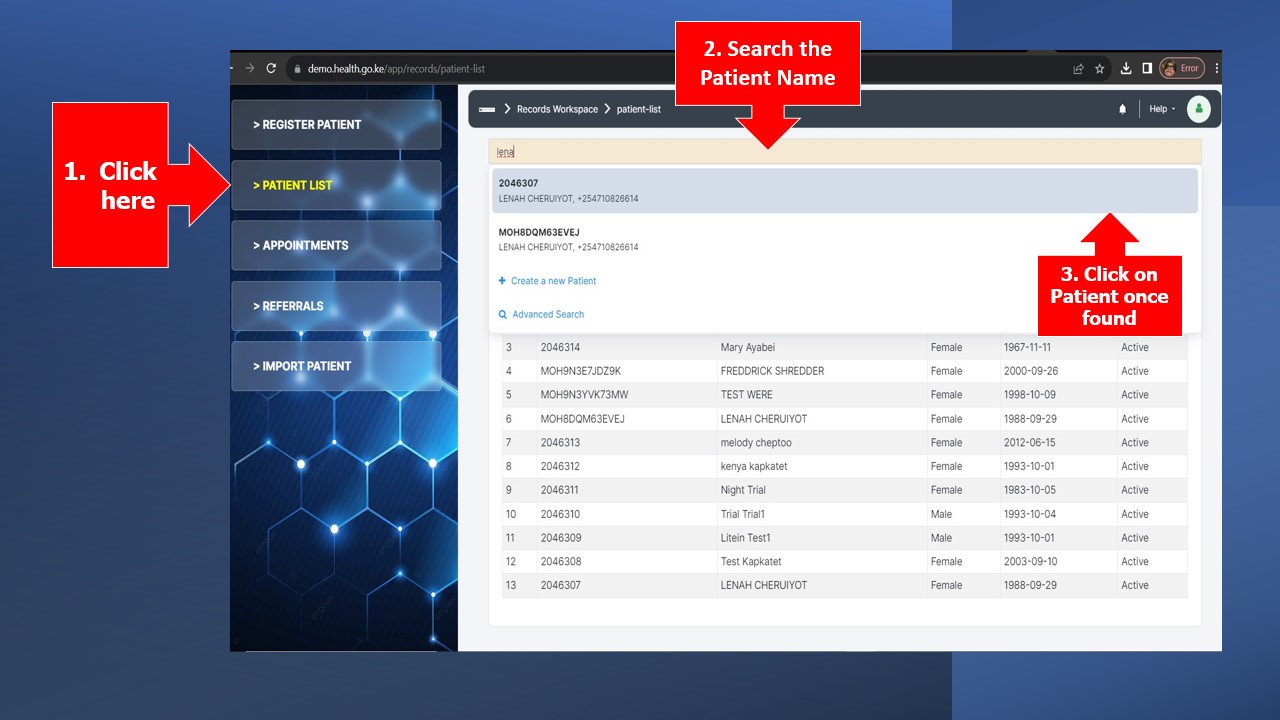
Proceed to create an appointment for the patient. Once you click on the specific patient as shown above, you will be presented with a screen as shown below. Click on the 'Create Appointment' button.
You will be presented with the screen as shown below. The first section of the form is 'Availability' shown in blue.
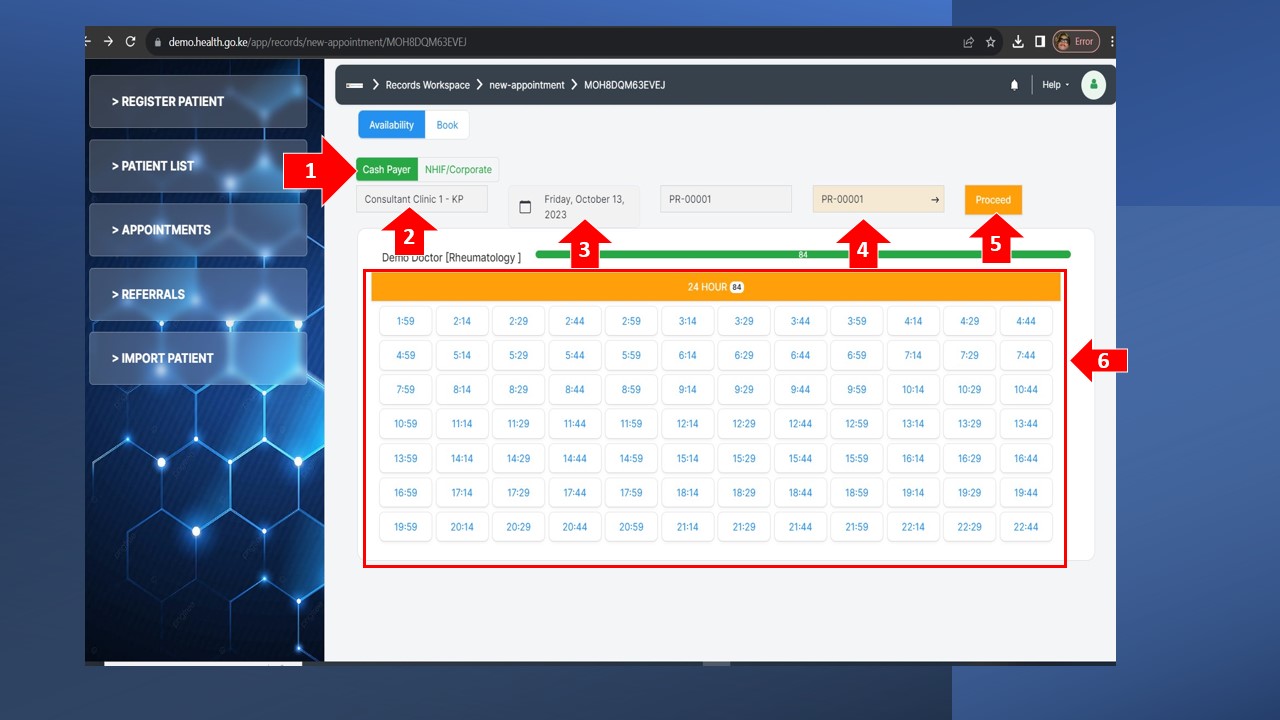
- The first step is to select whether the patient will pay using cash or being covered by an insurance (Step 1).
- Next pick the specific clinic that you want to book the patient to. Click and select from the dropdown list(Step 2).
- Pick the date of the clinic appointment. It defaults to todays date for patients who have just walked in for example (Step 3)
- Select the clinician/doctor who is going to see the patient (Step 4).
- Either click on 'Proceed' (Step 5) so that the system automatically assigns a time to the appointment or pick from any of the time slots in the list (Step 6).
You will then be directed to the second part of the same screen: 'Book' . Confirm the booking details, click on 'Click to Start' and Save the form when prompted.
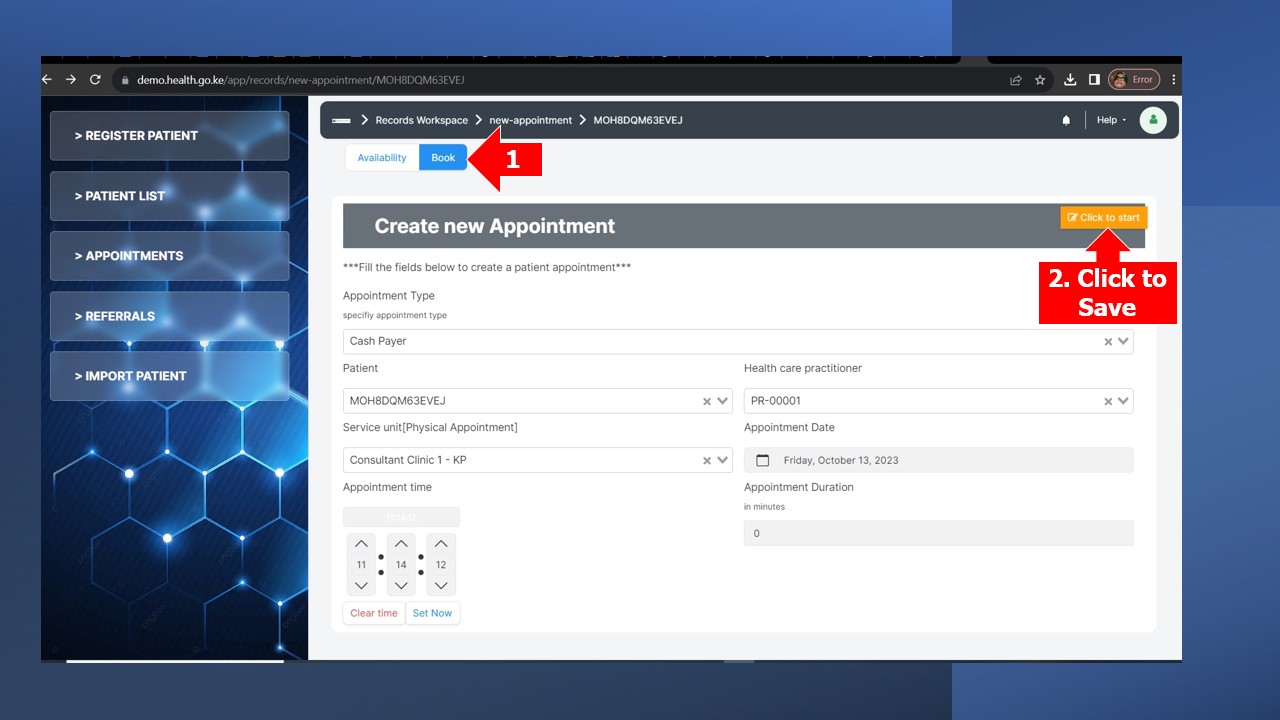
Once you save this form, the scheduling of the appointment is complete. The system displays the amount of cash needed to be paid for the patient to proceed to the appointment. If the schedule is for a future date, the patient will get an SMS confirmation of the same details and a reminder may be scheduled as well.
After successfully booking an appointment, ask the patient to go to Billing and make the payment
Remember, the clinician that you book a patient to does not necessarily need to be the same one that actually has the encounter with the patient. Encounters will be tracked differently by the system.
Step 3b: Retrieving An Appointment
To get a list of all appointments scheduled click on 'Appointments' on the left hand menu as shown below (Step 1). You will be presented with a screen as shown below.
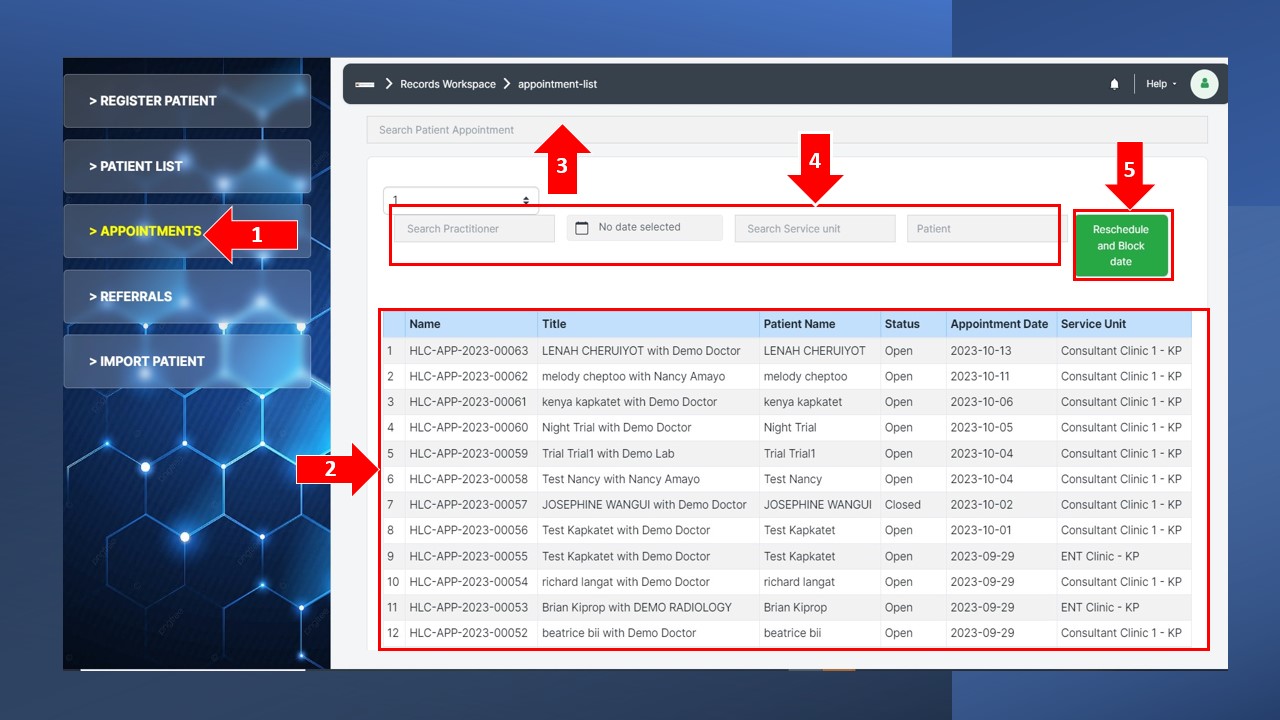
- A list of all recently booked appointments will be displayed with details (Step 2).
- You can search for the appointment using the appointment number, patient number or clinician (Step 3)
- You can also use other parameter to filter for all appointments e.g. appointments for a specific date, practitioner, service unit or patient (Step 4)
- In cases where you want to move all appointment fitting any criteria, you can use the green button (Step 5). This could be in scenarios where appointments for patient fall on a newly declared holiday . When this is done, the system will automatically alert all patients of the new change in their schedule.
After successfully retrieving an appointment, ask the patient to go to Billing and make the payment
No Comments