
Triage
Triage permits users to prioritize patients or cases according to the severity of their medical condition and the urgency of their need for medical care.
The system collects vital patient information, including vital signs, concise interviews, and symptom evaluations.
The triage function is accessible to Nurses and Doctors.
To access Triage, Login as a nurse or doctor, on the homepage, navigate to Triage on the Left hand side Menu, then click on "Triage link" as shown below
go to Homepage >Triage > Triage Link
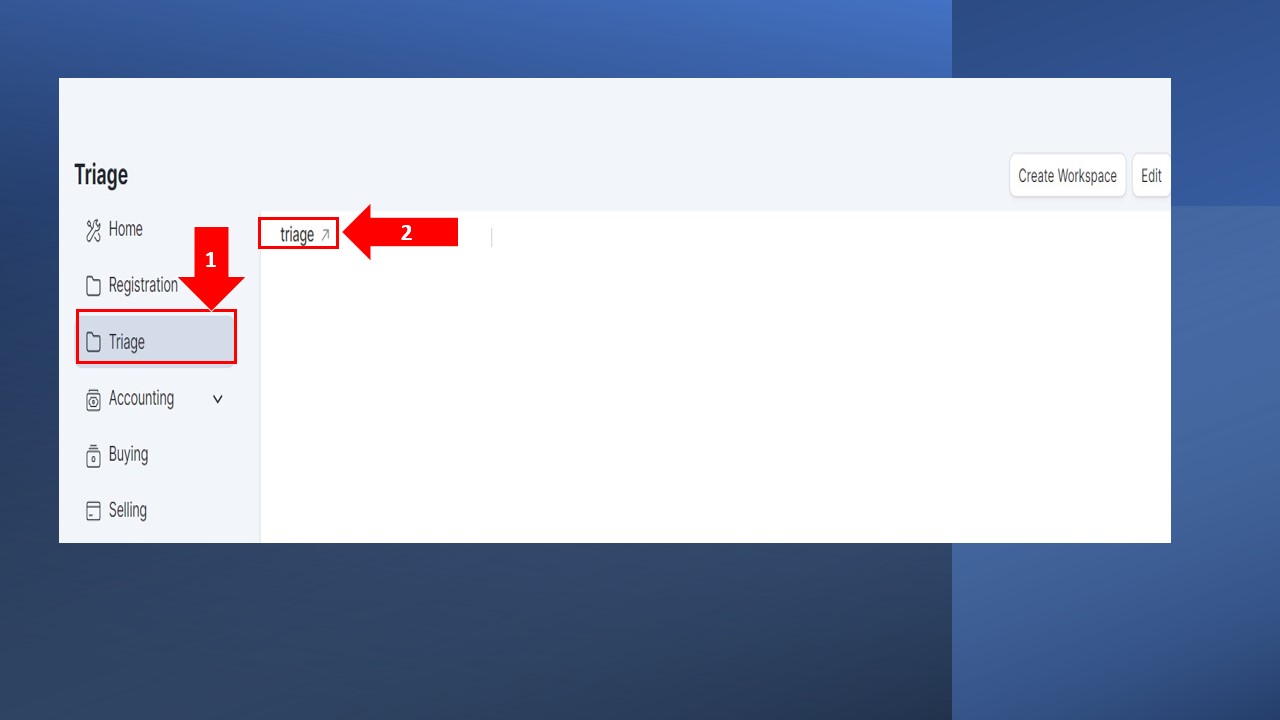
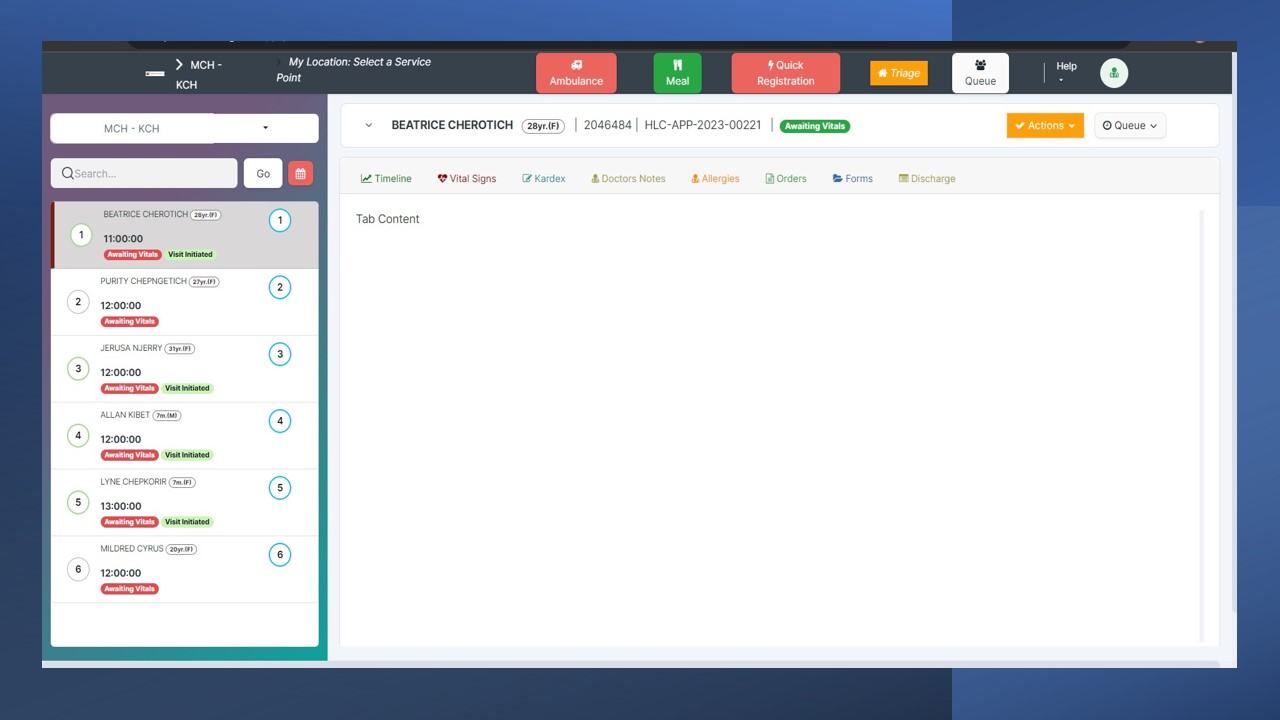
Clicking on the Triage Link will open the window below, showing the patient chart, depending with which Service Point you have selected. In our case, we use MCH service point.
Patient Chart
The patient chart serves as the primary user interface (UI) through which healthcare practitioners interact with patient information within the system. It comprises three main sections: the top header, sidebar, and working area. These components collectively facilitate seamless communication and efficient management of patient data.
The following information is important in a facility where the nurse also functions as the doctor: Otherwise it is the work of a nurse to do triage
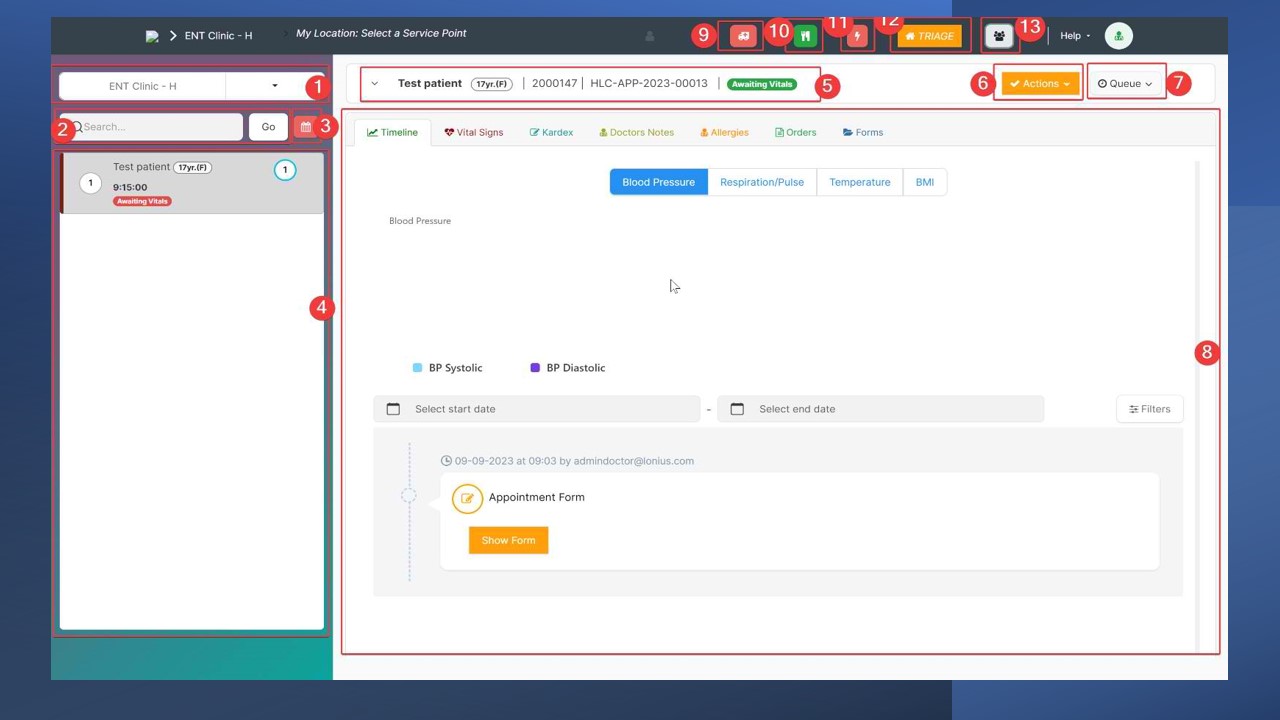
- Top Header Overview:
- The top header of the patient chart provides critical information and quick access to essential actions. In the illustration above, the section at the top of the screen, which includes pointers 9-13, is the top header. It prominently displays:
- The currently selected healthcare service unit.
- The current service point.
Next to this information, you'll find several critical quick actions:
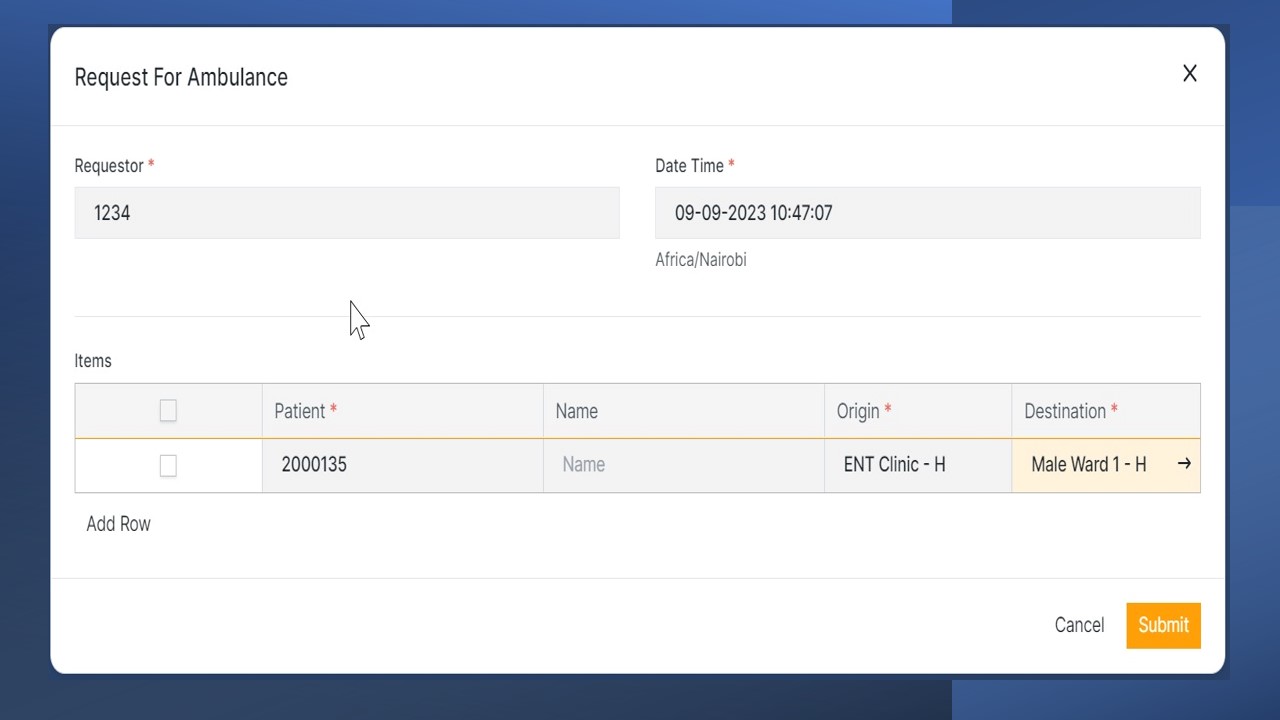
a) Ambulance Request: (Pointer 9)
- This feature empowers healthcare practitioners to request ambulances for either individual patients or multiple patients.
- Practitioners can specify the ambulance's origin and destination, ensuring efficient and timely patient transportation.
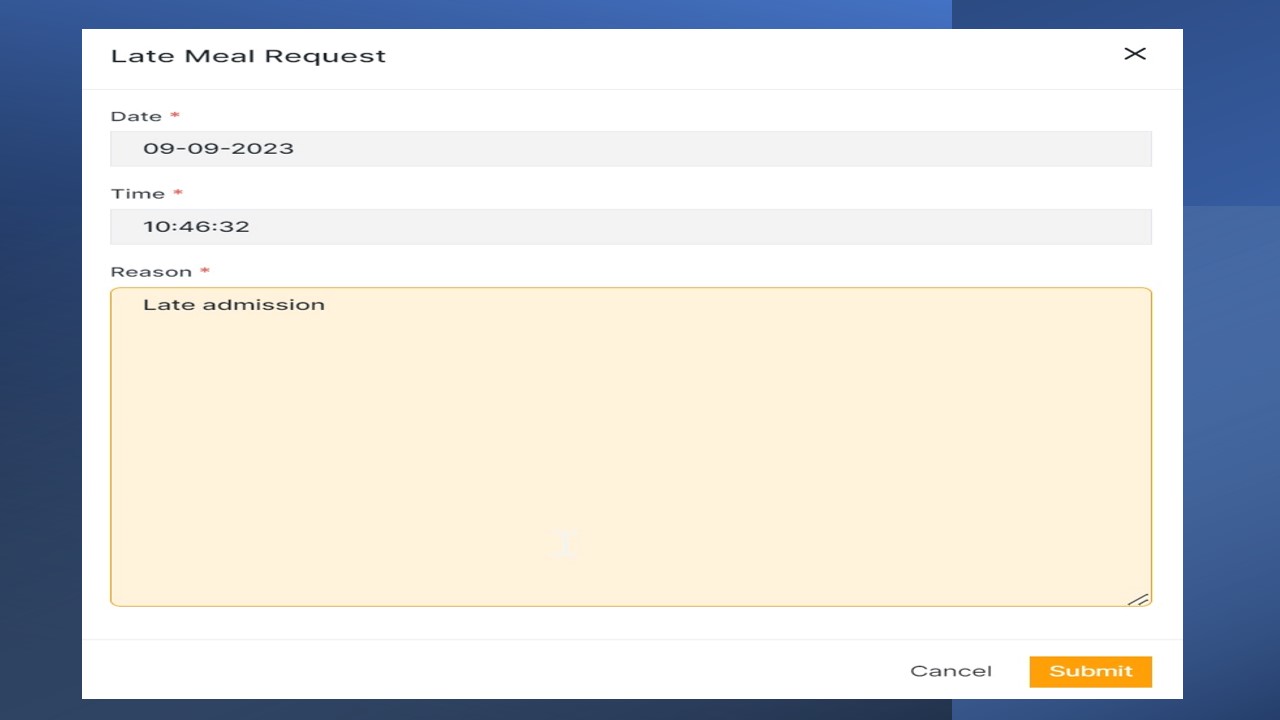
b) Late Meal Request: (Pointer 10)
- Healthcare practitioners can use this function to request late meals for specific patients.
- This ensures that patients receive meals at appropriate times, even if their meal schedules have been delayed.
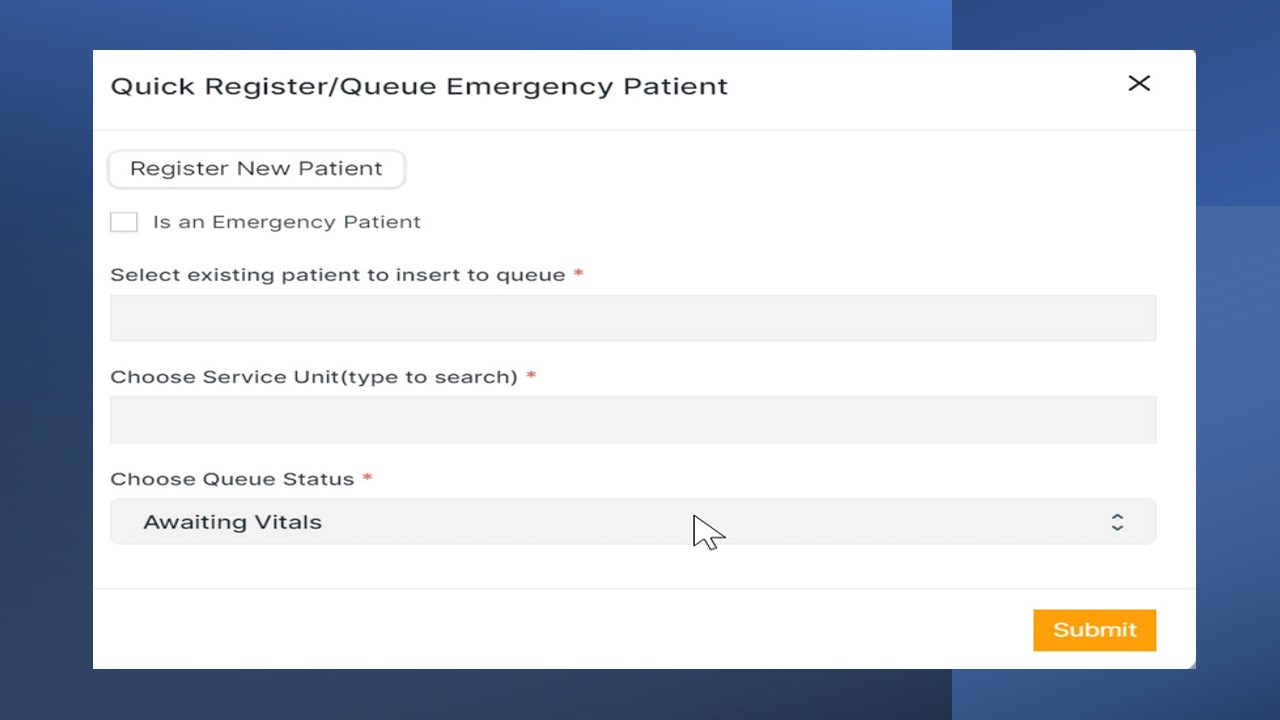
c) Quick Register/Queue Emergency Patient : (Pointer 11)
- This feature enables records personnel to efficiently register new emergency patients and promptly place them in the queue for assessment by the appropriate healthcare practitioner, bypassing the need for the complete registration process.
d) Service Point Manager: (Pointer 12)
- The Service Point Manager allows healthcare practitioners to switch between service points.
- This functionality proves invaluable for managing patient queues effectively.
e) Queue Filters: (Pointer 13)
- Queue Filters enable practitioners to filter and display patients on the patient list based on their queue status.
- Various queue statuses are available, including 'Awaiting Vitals,' 'Awaiting Consultation,' 'Awaiting Investigation,' 'Visit Completed,' 'Awaiting Specialist Review,' and 'Scheduled For Admission.'
- This feature aids in organizing and prioritizing patient care based on their current status and needs.
The top header's design and quick actions ensure that healthcare practitioners can access critical information and perform essential tasks efficiently, enhancing the overall patient care experience within the system.
a) Healthcare Service Unit: (Pointer 1)
- This section displays the name of the current healthcare service unit that the logged-in practitioner is currently viewing.
- It provides immediate context, ensuring practitioners are aware of the service unit they are working with, contributing to effective patient care management.
b) Search Bar: (Pointer 2)
- The search bar offers healthcare practitioners a powerful tool to search for patients swiftly.
- Practitioners can search for patients using either the patient's name or their unique patient number, simplifying the process of locating specific patient records.
c) Calendar: (Pointer 3)
- The calendar component allows practitioners to access patient data from the past by selecting a specific date.
- This feature facilitates historical patient queue retrieval, offering insights into a patient's queue history and previous interactions with the healthcare system.
d) Patient List: (Pointer 4)
- In the patient list section, practitioners find a comprehensive list of all patients relevant to the selected healthcare service unit, the currently logged-in practitioner, and the relevant date.
- This patient list provides a quick overview of the patients currently under the practitioner's care.
The organization of these sidebar components ensures that healthcare practitioners have efficient access to essential patient information and tools necessary for providing high-quality care within the healthcare system.
3. Working Area Components:
The working area of the patient chart interface is divided into two primary sections: Patient Information and Tabs Section, each serving distinct purposes.
a) Patient Information: (Pointer 5)
- The Patient Information section is dedicated to presenting essential patient details and contextual information, including patient biographical data, appointment information, and admission status.
- Additionally, this section provides contextual actions for healthcare practitioners: (Pointer 6)
i) Sign Off:
- The Sign Off action is performed by healthcare practitioners to conclude a patient encounter.
- It typically includes activities such as signing off doctor's notes, kardex notes, and orders like drug prescriptions and clinical procedures.
- The practitioner inputs their PR (practitioner) number and submits to complete the sign-off process.
ii) Request Patient Transfer:
- This feature applies primarily to inpatients and facilitates the transfer of a patient from one medical ward to another.
- Practitioners must specify the target medical department, the target Healthcare Service Unit, and the target bed.
iii) Accept/Reject Transfer:
- This functionality is used to respond to transfer requests made by other healthcare practitioners.
- Practitioners can either accept and assign a bed for admission or reject the transfer request entirely.
iv) Schedule Admission:
- Healthcare practitioners utilize this feature to schedule patient admissions.
- The admission is scheduled to a specific medical department or ward, and practitioners provide admission instructions needed.
Queue Actions for Outpatients: (Pointer 7)
- For outpatient management, there are specific Queue Actions available:
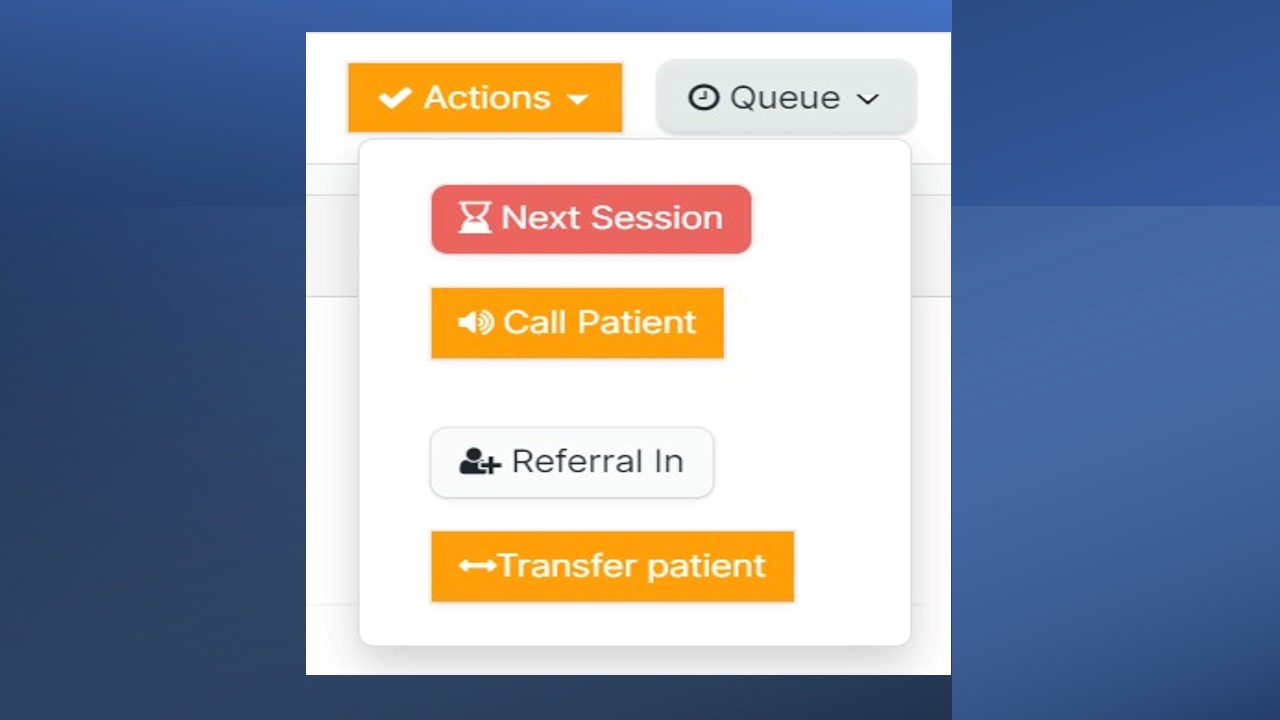
i) Next Session:
- This action allows practitioners to transfer patients from one queue status to another.
- For instance, patients can be moved from 'Awaiting Vitals' to 'Awaiting Consultation.'
- Practitioners can also book follow-up appointments during this process.
ii) Call Patient:
- Integrated with the queue system, this function is used to initiate the call for the next patient in the queue, streamlining the patient flow.
iii) Referral In:
- Practitioners can mark a patient as a referral in, indicating that the patient has been referred from another healthcare provider or department.
iv) Transfer Patient:
- This feature applies to outpatients and facilitates the transfer of patients from one service unit to another, ensuring efficient care coordination.
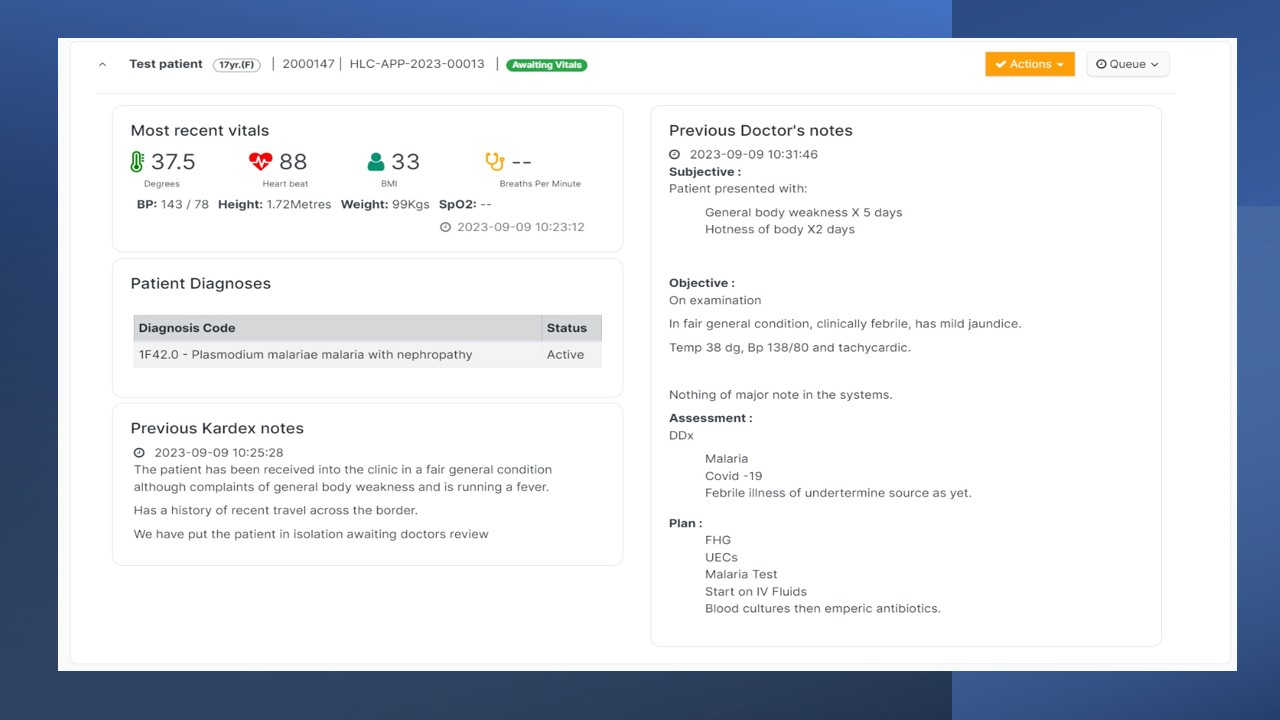
When the patient information section is clicked, it will be expanded, and important information such as the most recent vital signs, kardex notes, patient diagnoses and doctor's notes can be viewed.
These components within the working area empower healthcare practitioners with the tools and actions necessary to manage patient encounters, transfers, and queue activities effectively, ultimately enhancing the quality of patient care within the system.
b) Tabs Section: (Pointer 8)
The Tabs Section in the patient chart interface contains a variety of relevant tabs, each serving specific purposes to facilitate comprehensive patient care management:
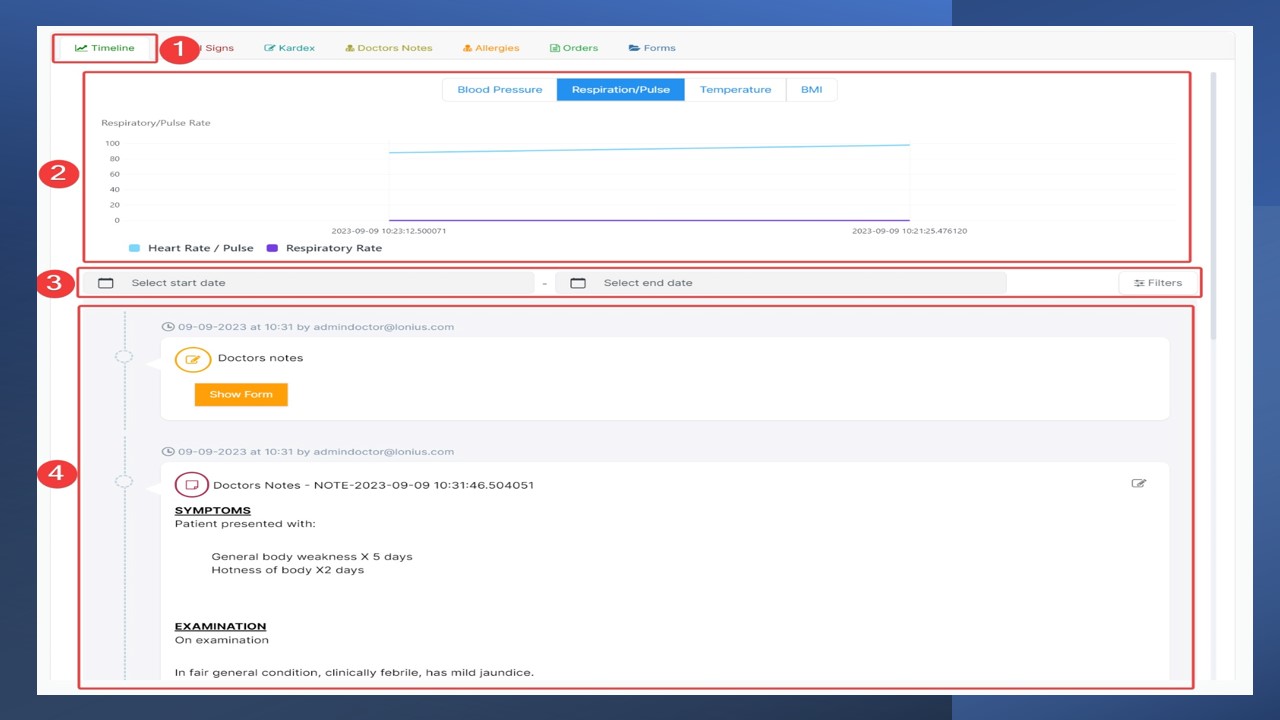
i) Timeline:
- The Timeline tab serves as an electronic patient file, encompassing all pertinent patient information and past activities.
- It archives scanned files, vital signs, clinical procedures, patient appointments, encounters, drug prescriptions, lab tests, and more.
- Appropriate filters are available to refine the displayed information, allowing healthcare practitioners to access only the data they require.
The image below divides the timeline into three distinct sections
- The vital signs graphical depiction, designed for healthcare practitioners' analysis. (Pointer 2)
- Filters, encompassing date ranges and content filters to control the displayed information in the section. (Pointer 3)
- The information section, serving as an interface to view all patient-related data, filtered based on the criteria provided. (Pointer 4)
ii) Drug Administration:
- Designed for inpatient drug administration, this tab enables practitioners to administer medications at the prescribed times.
- It helps ensure accurate medication management for hospitalized patients.
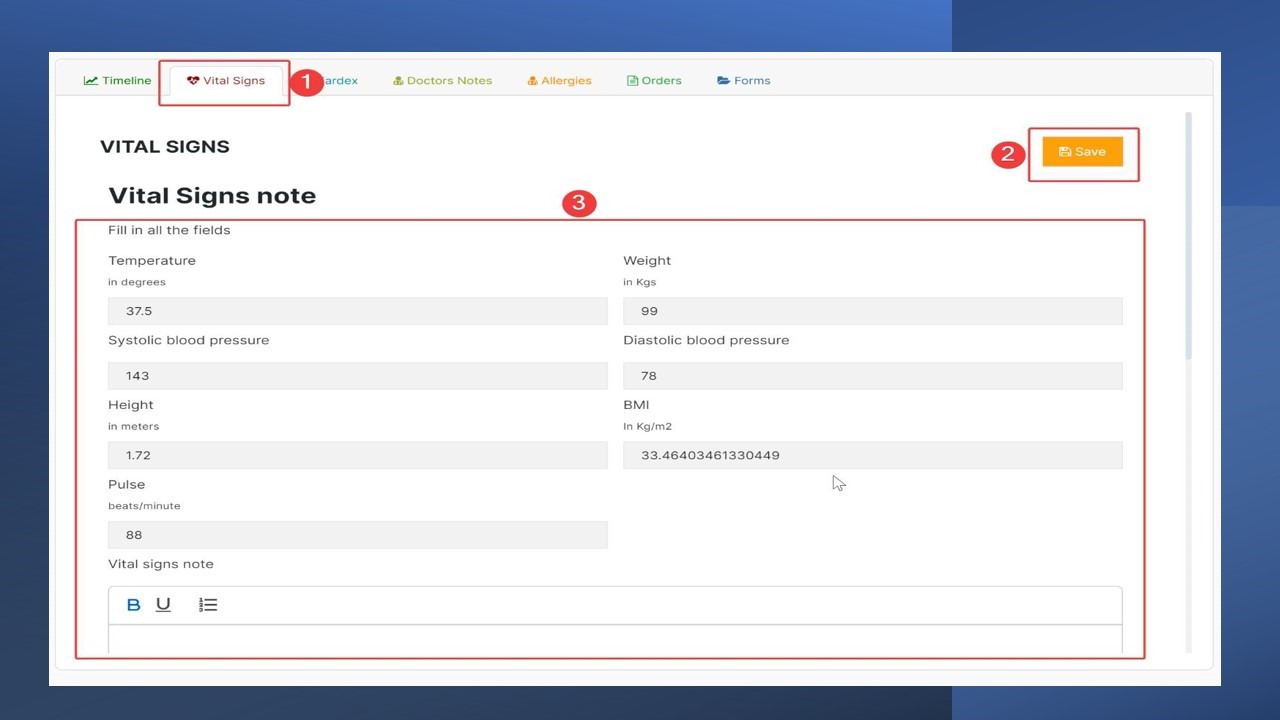
iii) Vital Signs:
- In this tab, practitioners can record and input a patient's vital signs data.
- By clicking "click to start" and filling in the required fields and then clicking "Save" (Step 2), vital signs data can be entered and saved for comprehensive patient monitoring.
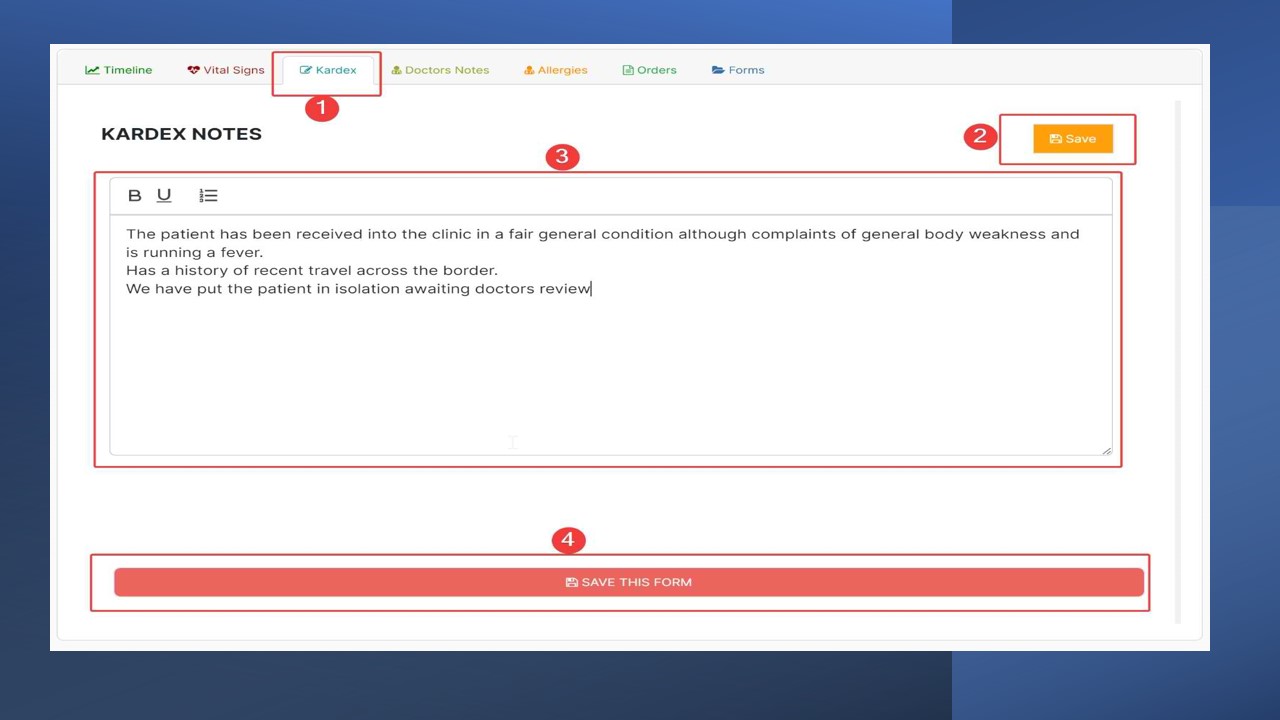
iv) Kardex:
- The Kardex tab is used for recording kardex notes, which provide essential patient care information.(Step 3)
- Practitioners can initiate notes by clicking "click to start," filling in the necessary details, and saving the information. (Steps 2 & 4)
Sometimes the save button at the top has been used interchangeably with "start" button
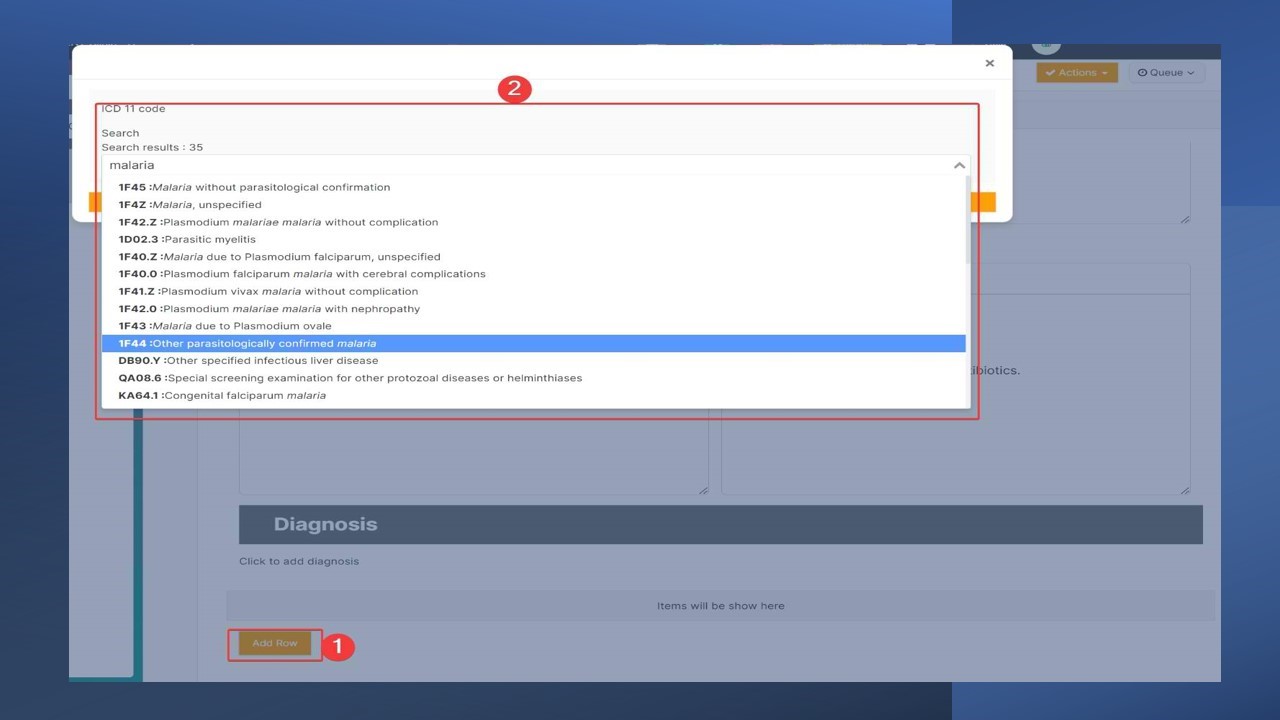
v) Doctors Notes:
- This tab allows healthcare practitioners to input doctor's notes and select the appropriate ICD-11 diagnosis.
- By clicking "click to start" and completing the required fields, practitioners can record detailed clinical notes and diagnoses. (Steps 2 & 3)

To input a diagnosis, follow these steps:
- Click on "Add Row." (Step 1)
- Search for and select the relevant ICD-11 code. (Step 2)
vi) Allergies:
- In this section, practitioners can create and add known allergies for the patient.
- The process involves clicking "Create," then "Add," and saving the allergy information.
vii) Orders:
- The Orders tab offers multiple order types:
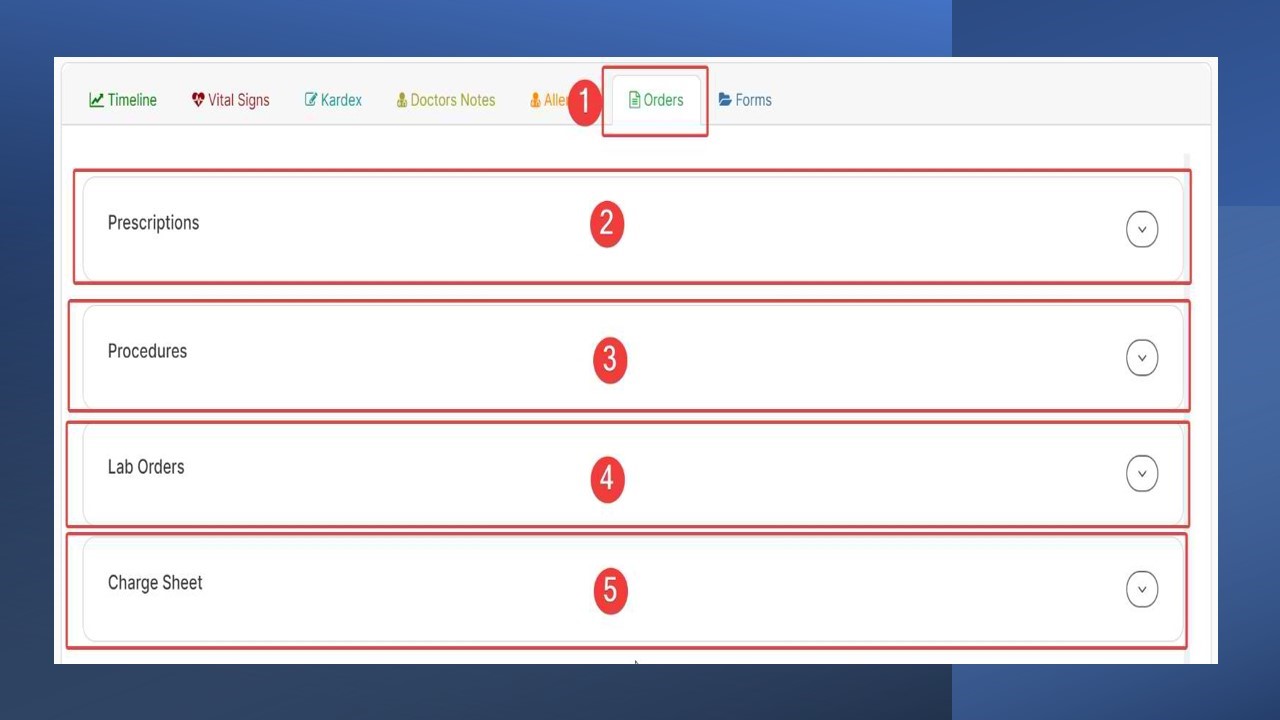
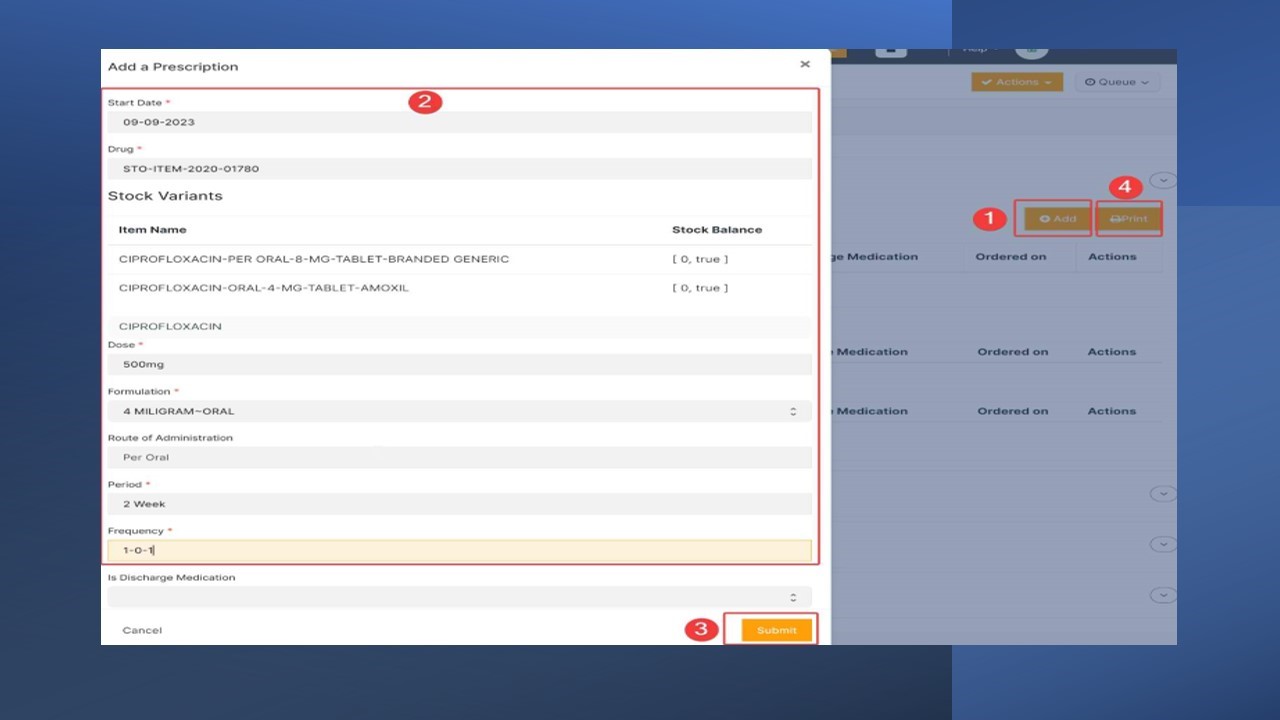
- Prescriptions: (Pointer 2) This function enables practitioners to create drug prescriptions for patients, which are then handled by the pharmacy.
- By clicking "Add," practitioners can enter essential prescription details, including drug name, dose, route of administration, duration, frequency, and any relevant instructions. (Steps 1 & 2)
- Once submitted, this prescription order will then be managed by the pharmacy. (Step 3)
- Prescriptions can be canceled after creation, and a print option is available for hard copies. (Step 4)
- Previous prescriptions are archived, and practitioners can stop prescriptions at any time.
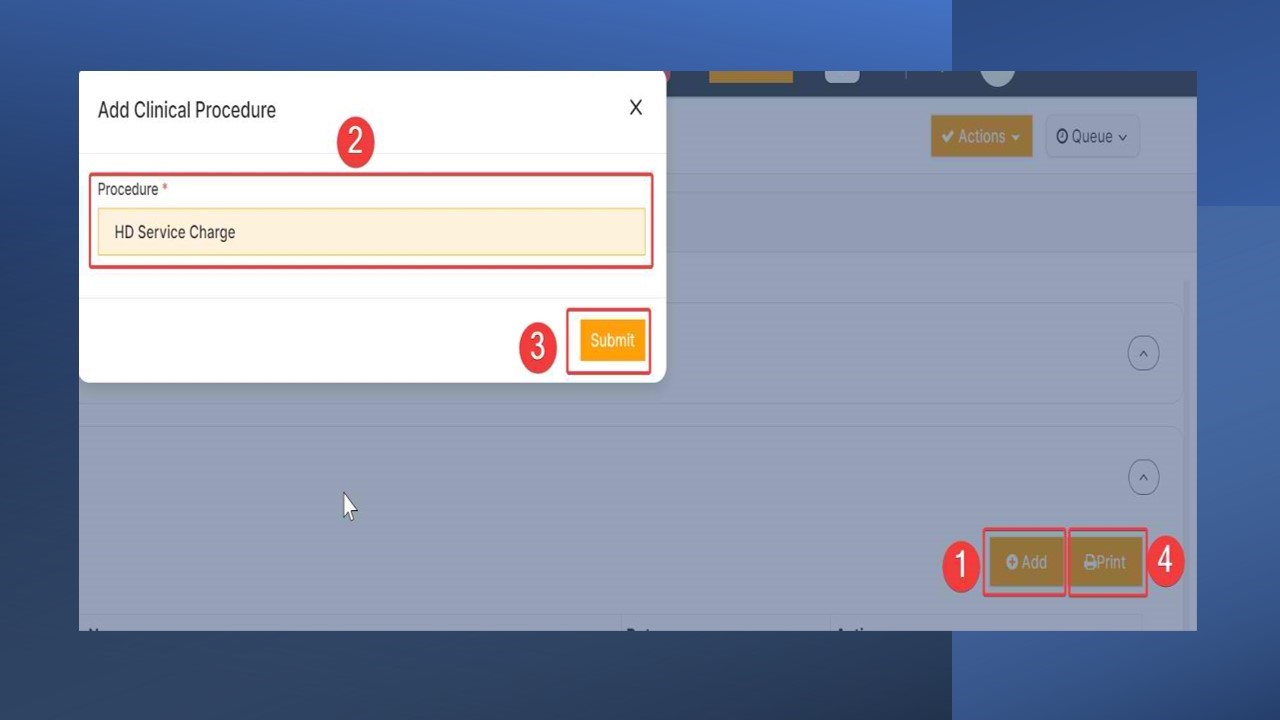
- Procedures: (Pointer 3) This option is used for ordering clinical procedures, both major and minor.
- By clicking "Add," practitioners can select the desired clinical procedure, add relevant comments, and submit the order. (Steps 2 & 3)
- A print option is available for procedure documentation (Step 4), and previous procedures can be canceled or have deposit requirements waived.
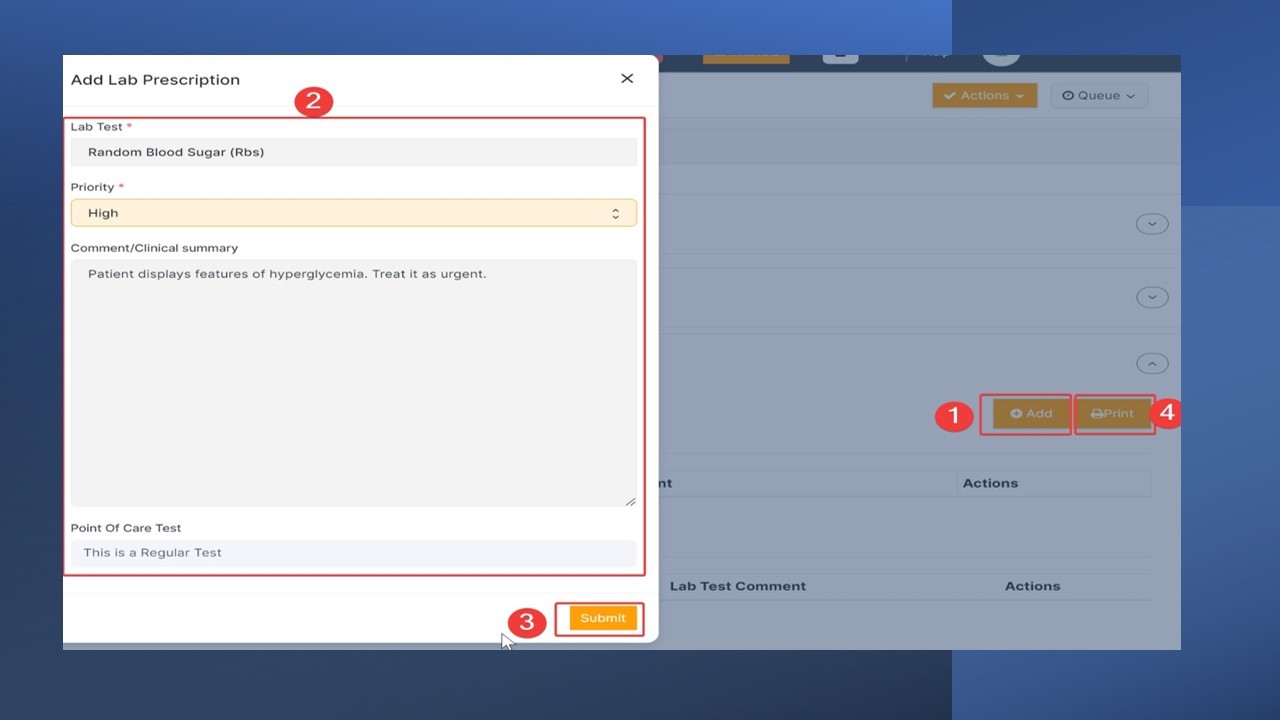
-Lab Orders (Pointer 4): Practitioners can use this feature to order lab tests.
- By clicking "Add," they can select the lab test, specify priority (normal or high), and provide comments or clinical summaries before submission. (Steps 1,2&3)
- Lab orders can be removed if necessary, and a print option is available. (Step 4)
- Previous lab test orders are archived, allowing for cancellations.
- Charge Sheet (Pointer 5): This tab replicates the charge sheet from the accounts page, enabling practitioners to bill patients for consumables or services. More information can be found in accounts/billing documentation.
viii) Forms:
- The Forms section contains flexible built-in forms that streamline data entry and documentation. Detailed instructions can be found in the forms documentation.
ix) Discharge:
- The Discharge tab serves the purpose of scheduling patient discharges and storing recent patient clinical activities.
- It includes discharge notes, inpatient medications, clinical procedures, and lab tests.
- A print option is available for this information.
- To schedule discharge, practitioners select the discharge status, book follow-up appointments if necessary, provide discharge notes, and submit the details.
These tabs collectively provide a comprehensive and structured approach to patient care management, covering various aspects of patient information, medication, documentation, and order management within the healthcare system.