Tutorials - An Implementers Guide
- Tiberbu User Guide Introduction
- Tiberbu HMIS Overview
- Get Started/Log in
- Registration
- Billing
- Triage
- The Laboratory Workflow
- Pharmacy / Drug management / Inventory
- Forms - Design & Implementation
- Billing, Charge Sheets & Consumables Management
- Inventory / Warehousing (Stock Ledger, Stock Movement, Stock Reconciliations)
- Accounts / Invoicing (Patient Bill Management)
Tiberbu User Guide Introduction
Background
This user guide provides directions for access and use of the HIMS system deployed in health facilities in Kenya. It details clinical workflows by a provider using HMIS to facilitate efficient service delivery. HMIS covers various service points including:
Registration, Triage, Out-Patient Department (OPD), In-Patient Department (IPD),
Specialist Clinics and other support services like billing,inventory. The guide also details how a user may retrieve various reports from the system for efficient clinical decision making.
Target Users
This user guide targets all users of HMIS system including but not limited to the following;
-
Sub- County and county Human Resources for Health (HRH) (including Health Records Information Officers (HRIOs), Medical Superintendents, Doctors, Nurses, Clinical Officers, Pharmacists, Radiologists, Lab technicians).
-
County staff ICT officers, records officers, cashiers, accountants,
-
NGOs working in the health industry.
-
Ministry of Health.
Organization of HIMS User guide
This user guide is organised in four sections below;
Section 1: Overview of the HMIS system,
Section 2: Getting Started on HMIS
Section 3: HMIS modules and their features
Section 4: HMIS reporting.
Tiberbu HMIS Overview
The purpose of the HMIS is to generate quality health information that provides specific information support for the decision making to monitor and improve performance of the health sector.
HIS is more than a system for data collection and generating quality information, and encompasses the continued use of the information for decision making as well.
A well-functioning health information system is one that ensures the production, analysis, dissemination and use of reliable and timely information on health determinants, health systems performance and health status.
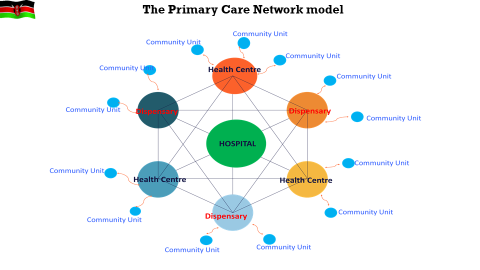
Tiberbu HMIS supports the PCN model towards Universal Health Coverage(UHC)
Tiberbu HMIS Modules
Tiberbu has the following modules, which are integrated together to see a successful journey of a patient from the moment they walk into a facility to the time they leave.
- Patient Registration
- Triage
- Billing
- Clinical Encounter( Consultation, MCH, ANC, FP, Special Clinics, etc)
- Laboratory
- Pharmacy
- Inventory
- User Management
Get Started/Log in
Sections below detail how to access and log in into HIMS
To access the system functionalities, the user will be required to click on the "Get Started icon

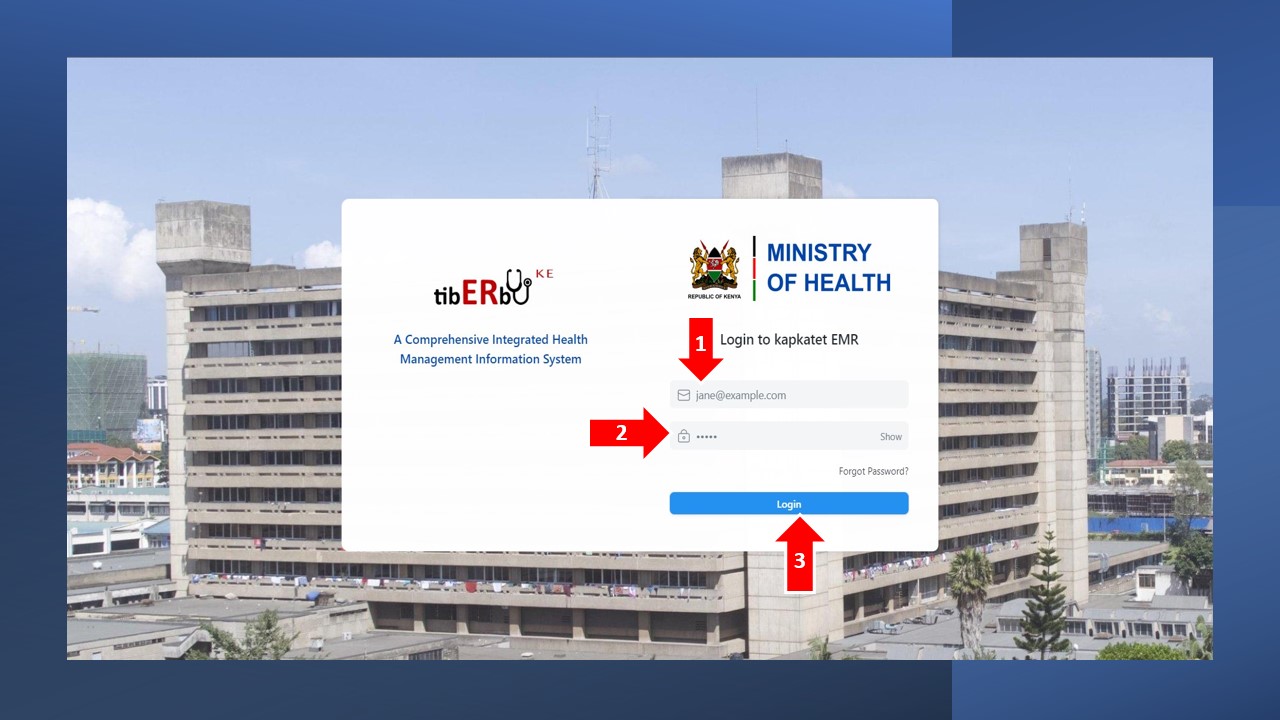
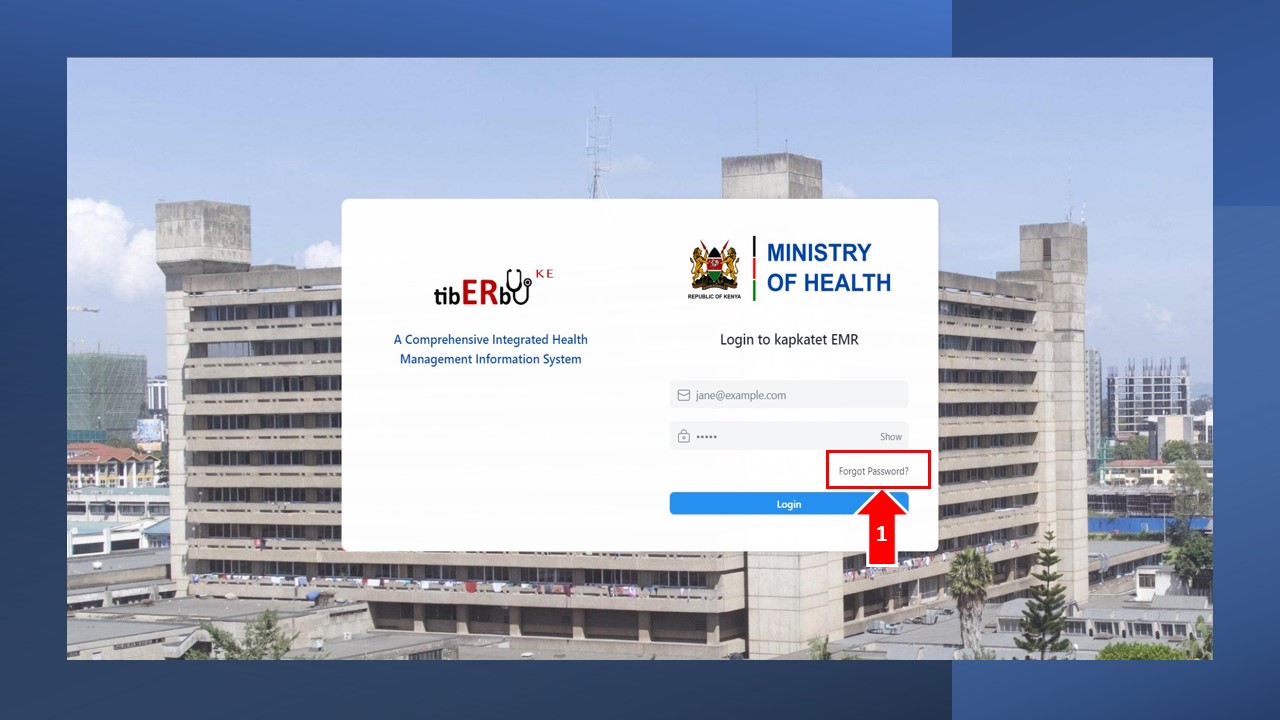
Login-screen features
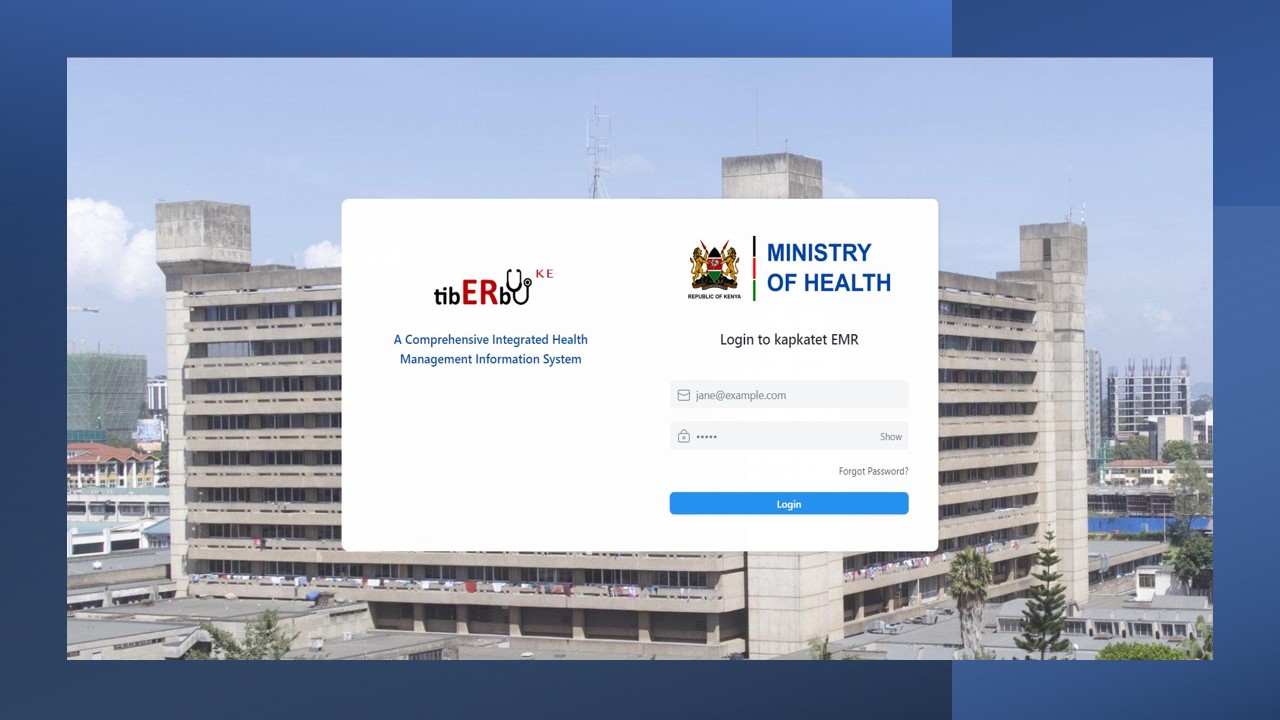
HMIS Login screen appears as below.
-
Username - click here and input the username provided by your supervisor
-
Password - click here and input the password provided by your supervisor
-
Show Password - you will click here to see the password you are inputting
-
Reset password - you will click here to reset/recover your password if you have forgotten it
-
Login Button - click here to login to the system
Login Credentials
The login credentials will be provided to you by your supervisor.
If you do not have login credentials, talk to your supervisor for the credentials
Login steps
To log into the HIMS system, follow the steps below;
-
Enter your username
-
Enter your password
-
Click on ‘Login’ button
Reset Password
If you have forgotten your password, click on ‘Forgot password?’ on the Login screen and follow prompts to reset it.
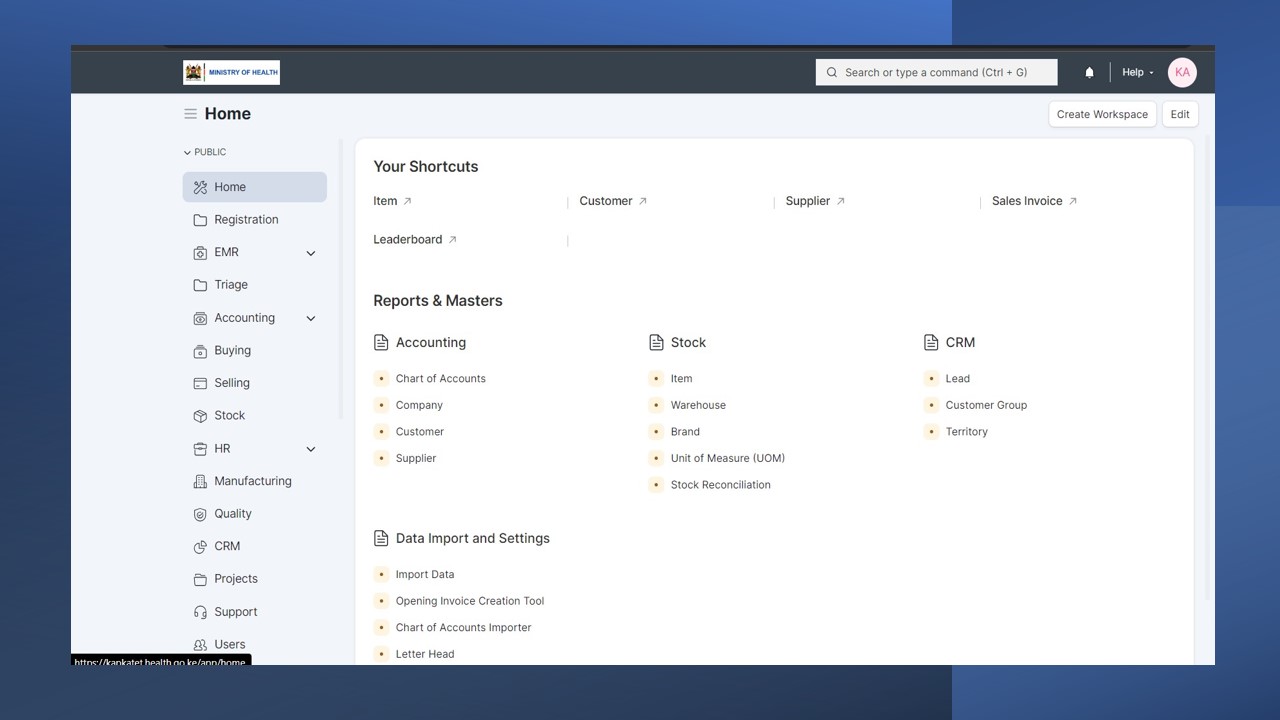
Home Page
This page consists of all the modules available within the system. Each module can be accessed by clicking on its respective icon. Users will be able to only view and access the modules which they have been granted rights to access. The home page screen appears as below only showing modules a user has been granted access to.
Registration
The patient journey most often that not begins when the patient meets a healthcare provider or as soon as they step at the front desk of a healthcare institution. Accurate collection of information about the patient is the very important first step to ensure high quality healthcare is delivered.
The records personnel are usually the first point of contact for the patient. Their primary role is to register the patient into the system as accurately as practically possible, schedule them to the healthcare practitioners and determine modes of payments (in consultation with the finance department).
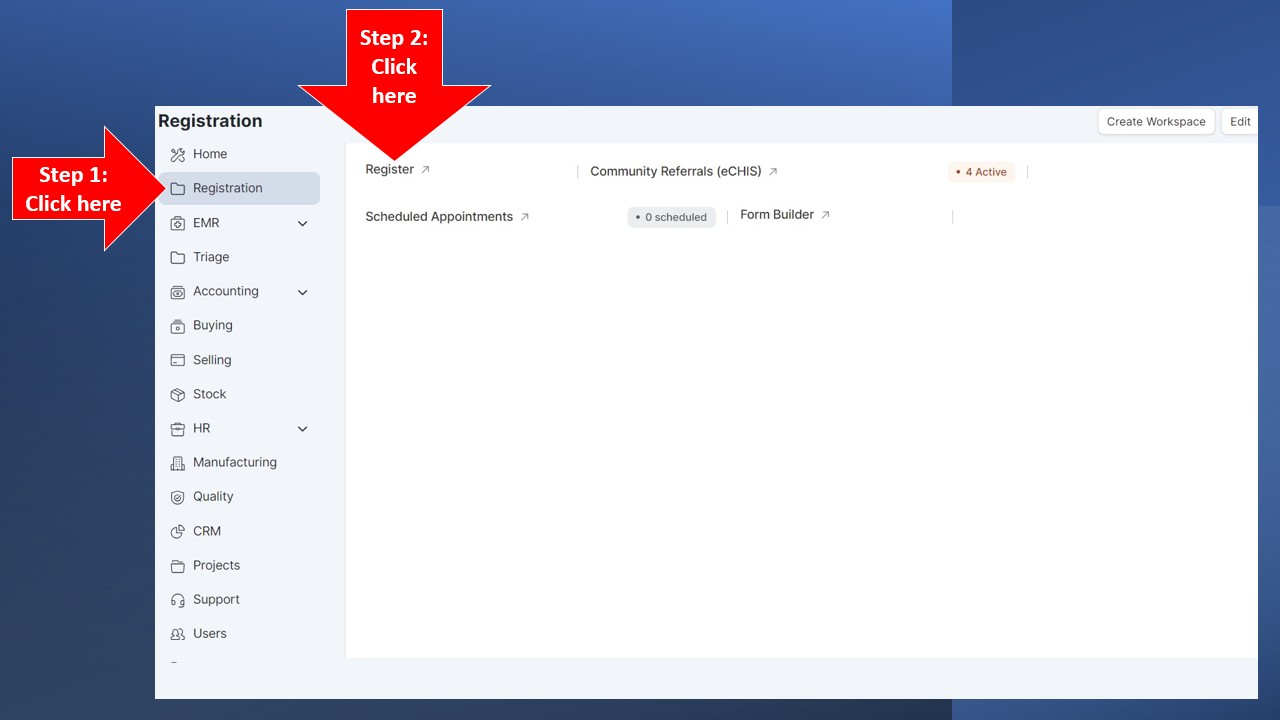
After successful login to Tiberbu, the following Homepage will be presented to you, depending with your user roles. Navigate to the Registration icon as shown below to begin registering a patient
Registration of a patient is only done after it has been reasonably determined that the patient does not exist either in the Client Registry or in Tiberbu.
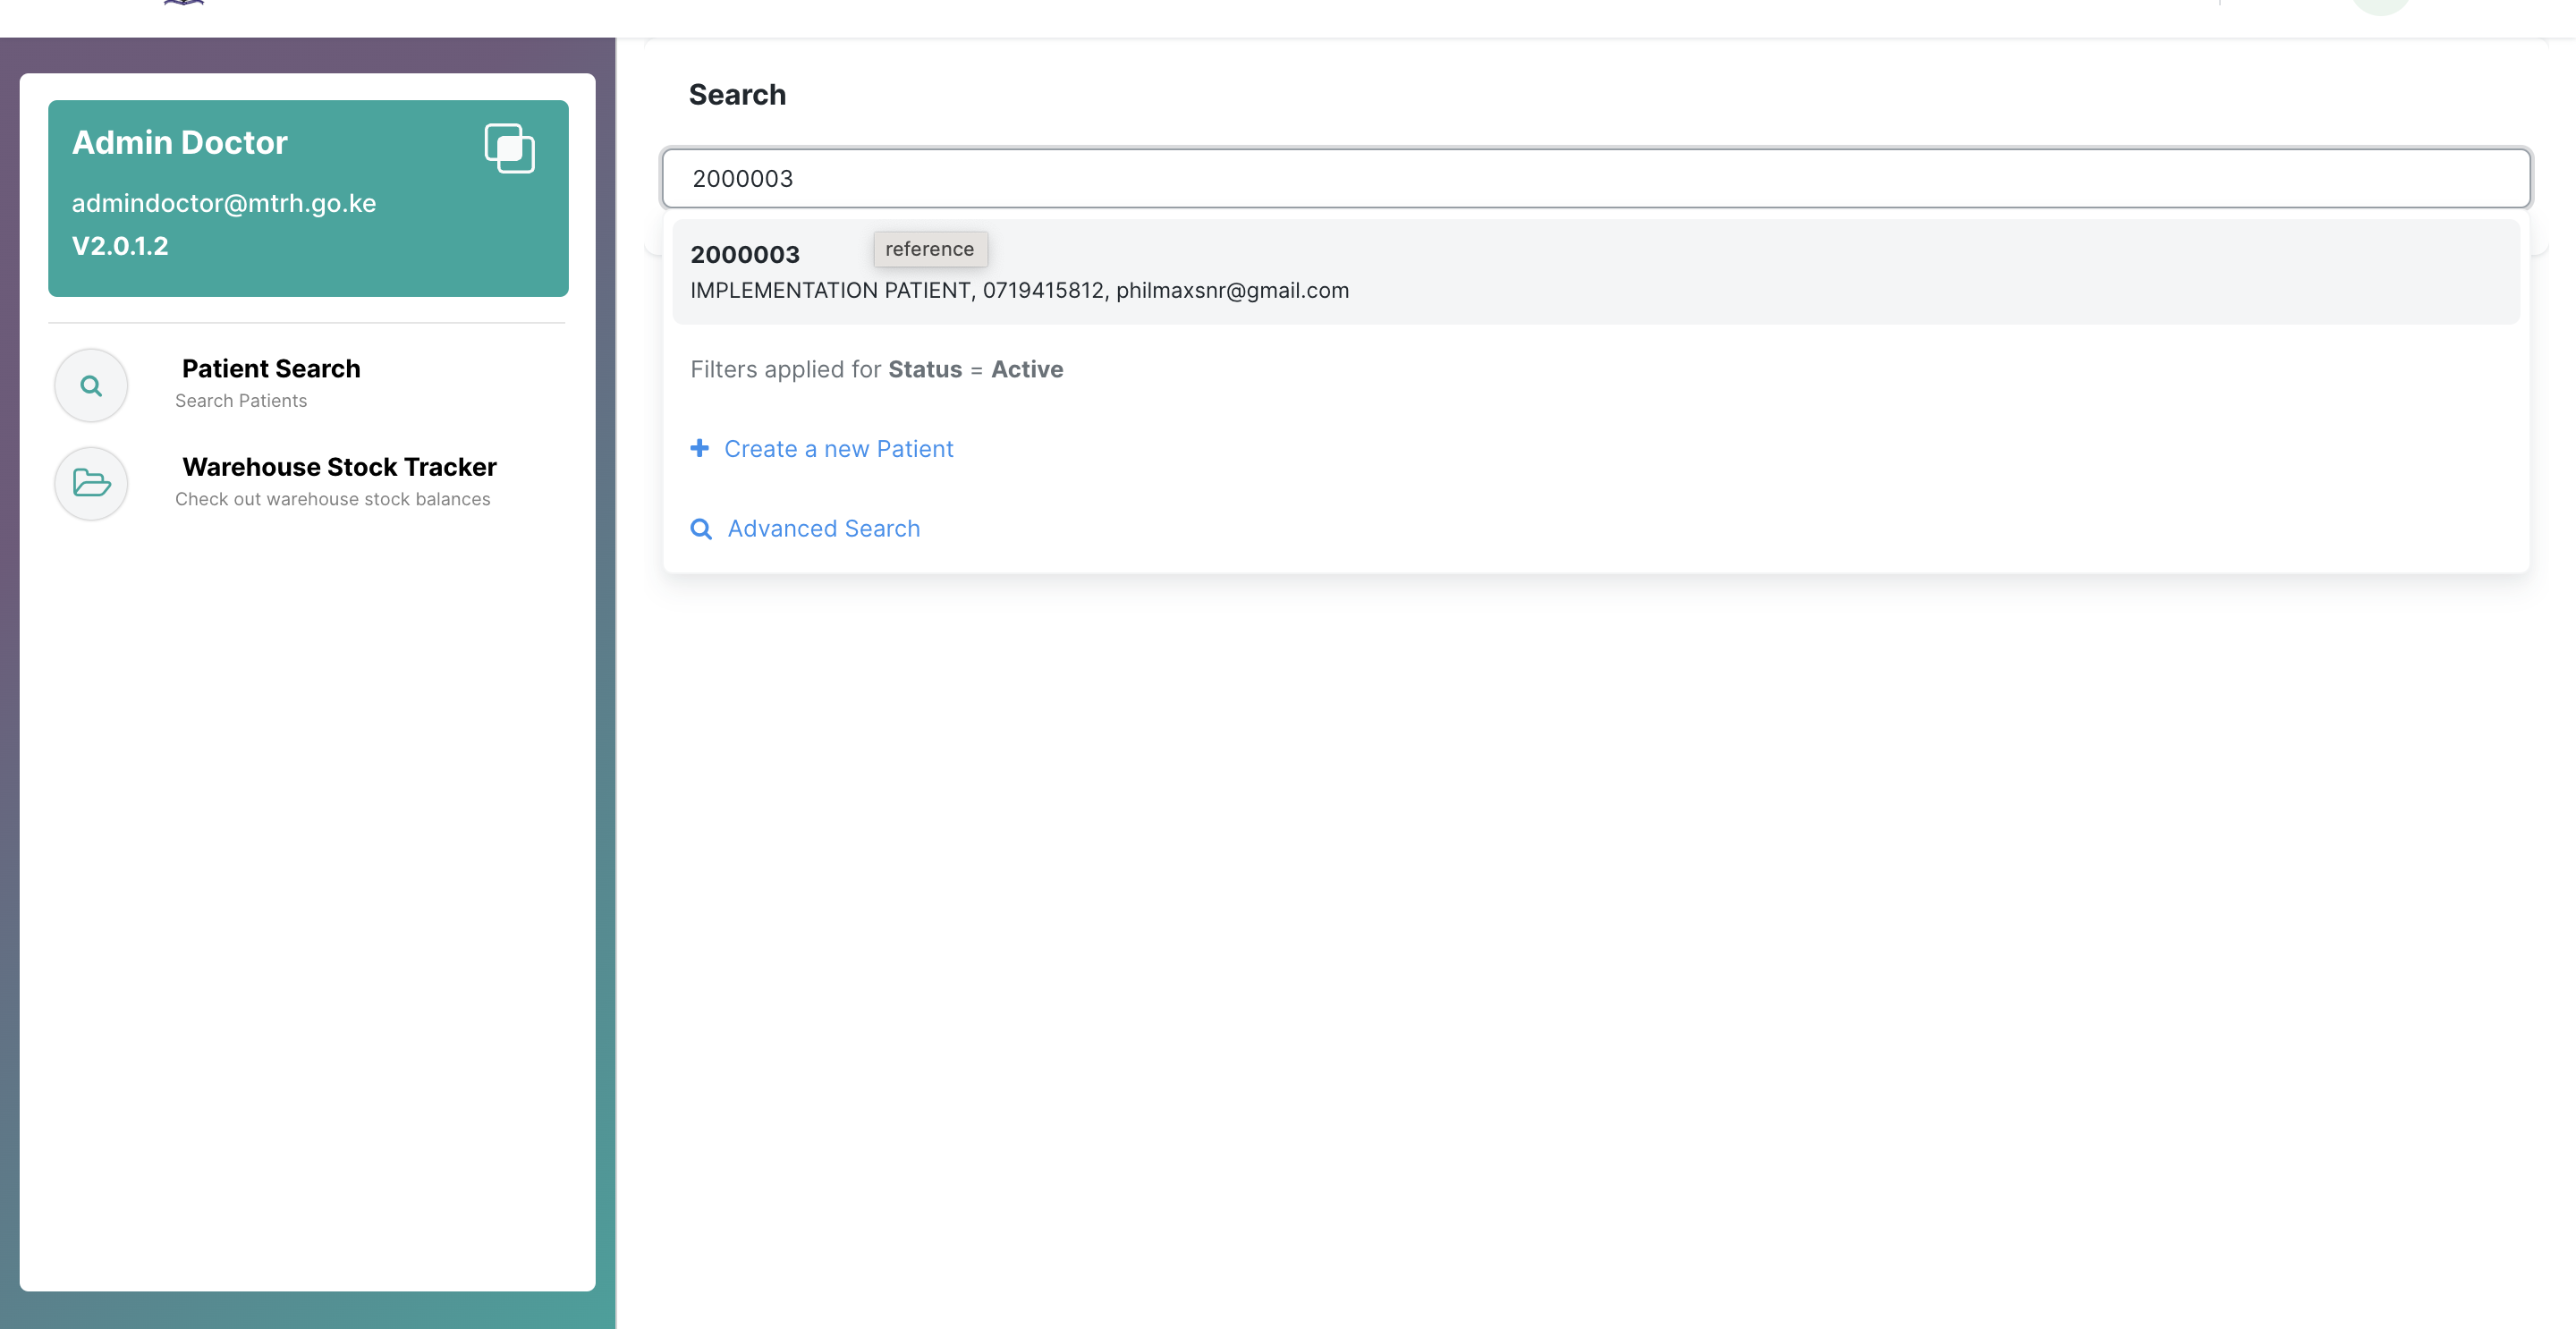
Step 1: Searching the Patient's Existence
A Unique Identifier is used to search a client in the Client Registry or Tiberbu. This is either the patient's ID Number, Birth Certificate Number or Passport Number
The Patients Records page will be loaded. On the left hand side, click on 'Register Patient' ,
Go to Register Patient > Select Patient Identifier Type > Input Selected Identifier Number
If the patient is found in the system, click on their details and proceed to create appointment for the patient
If the patient is not found on the system, register them as new patient following the process described below
Step 2: Registering a New Patient
After searching the patient in the system using the unique identifier and they are not found , the system automatically opens the "Register New Patient" Page and a registration form is presented. This normally happens if the patient is visiting the facility for the first time.
To begin Registering the patient, click on the "Click to Start" button as shown below:
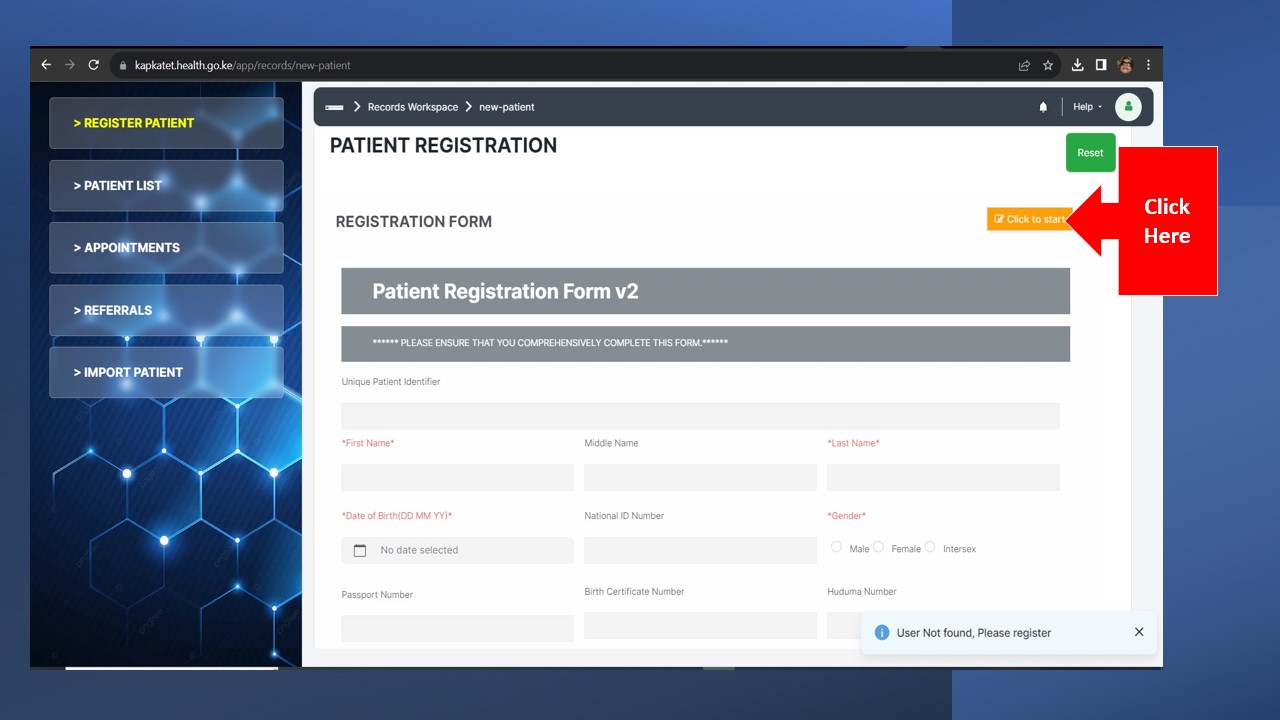
Start Filing the form by providing accurate information in the fields presented.
All fields marked * and highlighted in Red are Mandatory. The form will not allow you to save until you fill the fields
Under the 'Insurance Schemes' section, add the payer of the patient and remember to set the relevant amount balances. If this section is left empty the system will default to cash payer mode for the patient by default.
Once you complete filling the fields, click on the "Save" Button found either at the top or bottom of the form.
Successfully Saving the form will take you to the next step: Creating an appointment for the Patient
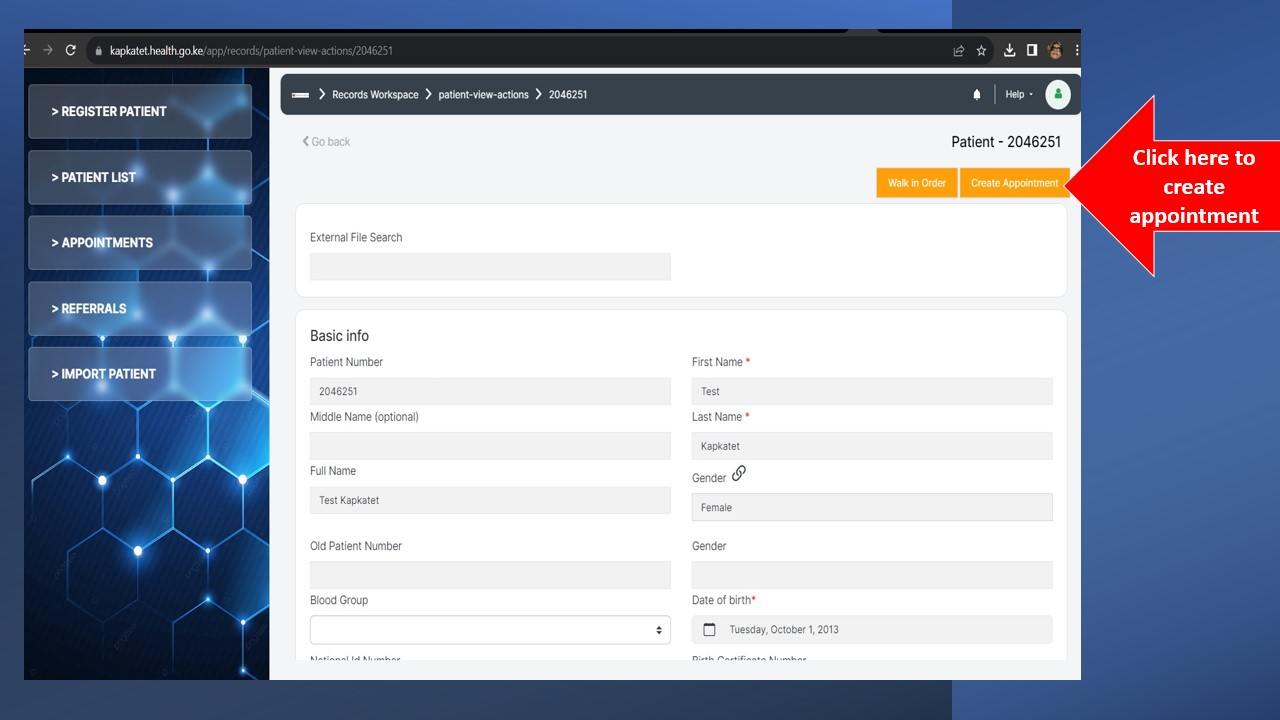
Step 3a: Creating Appointment For A Patient
Creating an appointment enables you to schedule the patient to a service point.
All registered patients can be accessed by clicking on the 'Patients' link on the left hand menu and a list will be displayed on the right as shown below.
You can search for a specific Patient using a number of parameters namely the patient ID, patient names, phone number or even their email. The parameters to be used for search can be configured elsewhere.
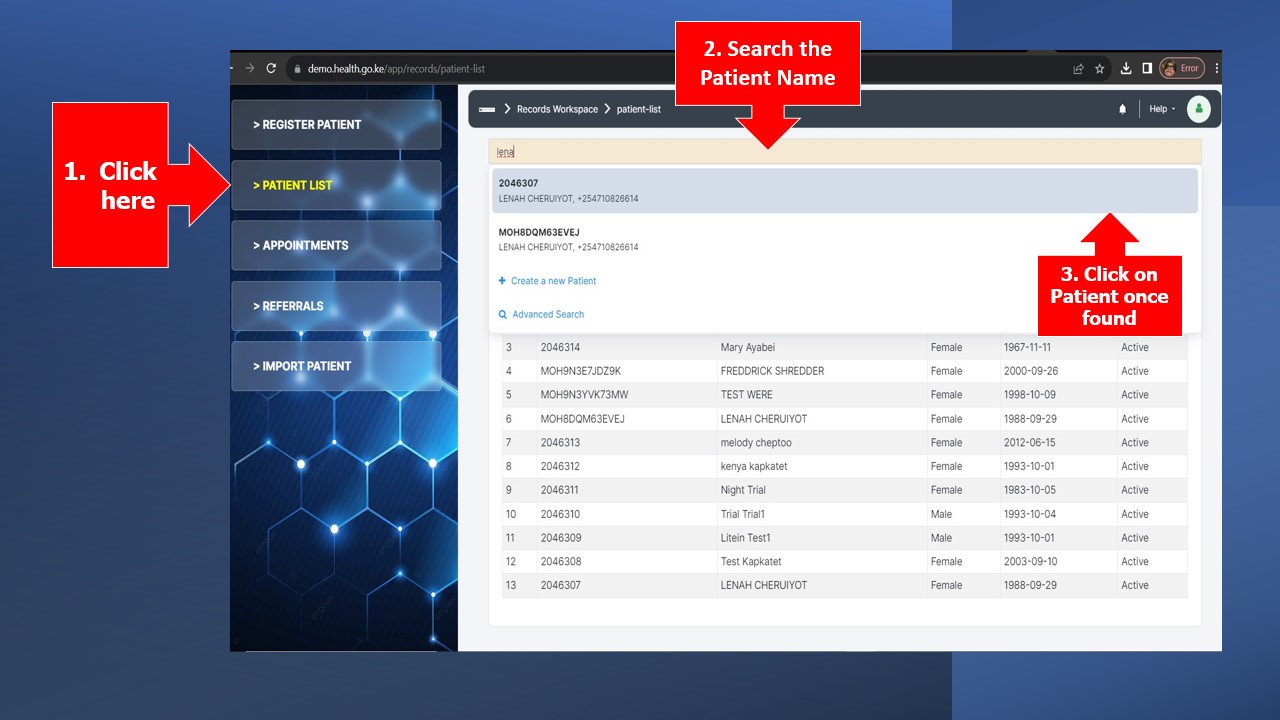
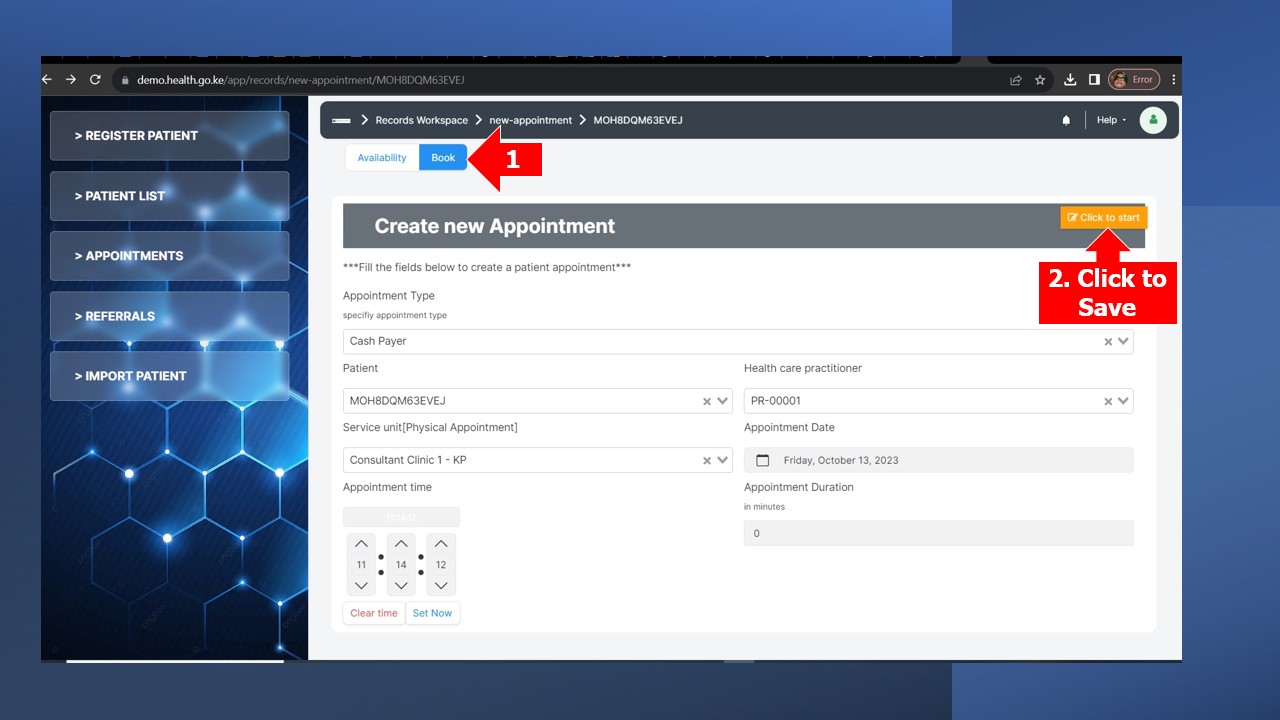
Proceed to create an appointment for the patient. Once you click on the specific patient as shown above, you will be presented with a screen as shown below. Click on the 'Create Appointment' button.
You will be presented with the screen as shown below. The first section of the form is 'Availability' shown in blue.
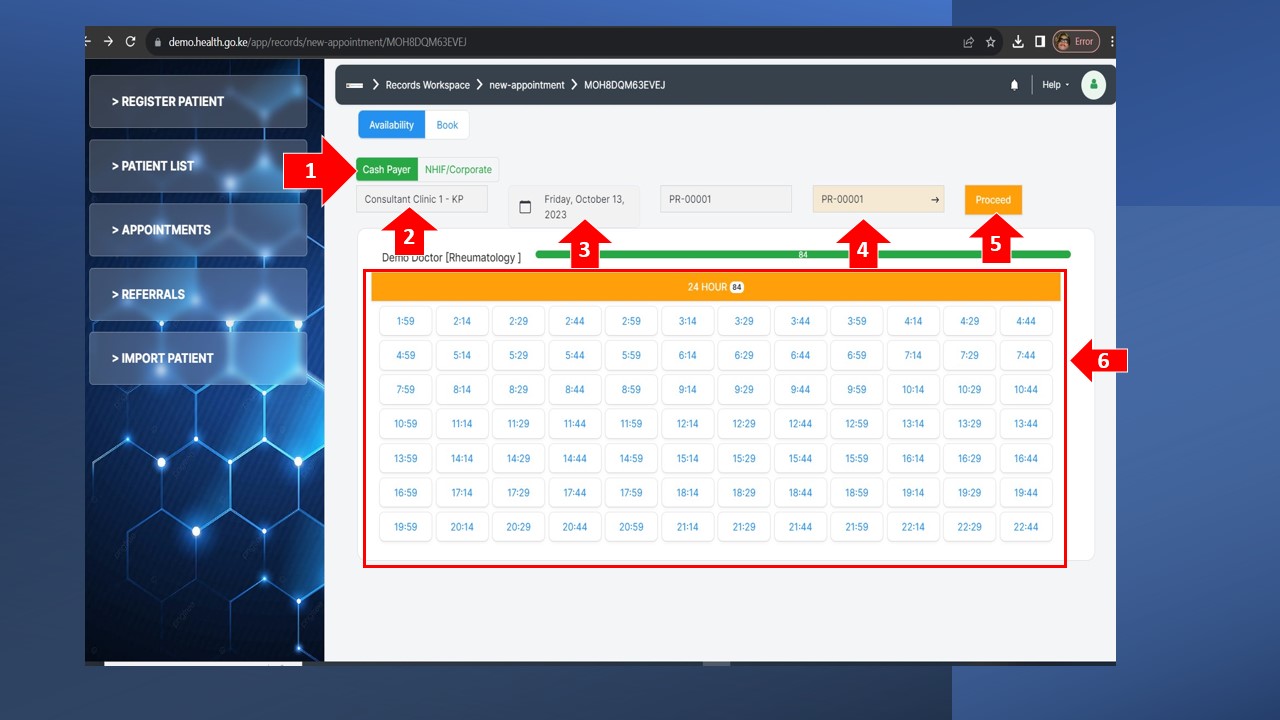
- The first step is to select whether the patient will pay using cash or being covered by an insurance (Step 1).
- Next pick the specific clinic that you want to book the patient to. Click and select from the dropdown list(Step 2).
- Pick the date of the clinic appointment. It defaults to todays date for patients who have just walked in for example (Step 3)
- Select the clinician/doctor who is going to see the patient (Step 4).
- Either click on 'Proceed' (Step 5) so that the system automatically assigns a time to the appointment or pick from any of the time slots in the list (Step 6).
You will then be directed to the second part of the same screen: 'Book' . Confirm the booking details, click on 'Click to Start' and Save the form when prompted.
Once you save this form, the scheduling of the appointment is complete. The system displays the amount of cash needed to be paid for the patient to proceed to the appointment. If the schedule is for a future date, the patient will get an SMS confirmation of the same details and a reminder may be scheduled as well.
After successfully booking an appointment, ask the patient to go to Billing and make the payment
Remember, the clinician that you book a patient to does not necessarily need to be the same one that actually has the encounter with the patient. Encounters will be tracked differently by the system.
Step 3b: Retrieving An Appointment
To get a list of all appointments scheduled click on 'Appointments' on the left hand menu as shown below (Step 1). You will be presented with a screen as shown below.
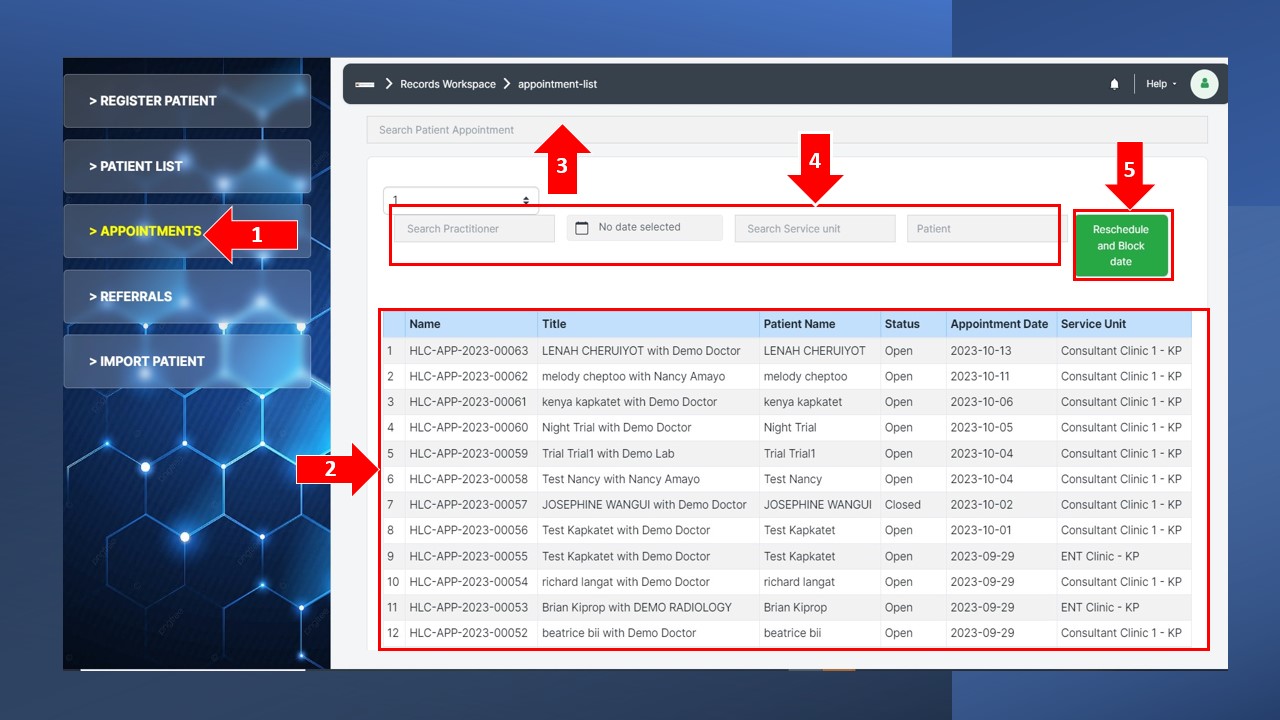
- A list of all recently booked appointments will be displayed with details (Step 2).
- You can search for the appointment using the appointment number, patient number or clinician (Step 3)
- You can also use other parameter to filter for all appointments e.g. appointments for a specific date, practitioner, service unit or patient (Step 4)
- In cases where you want to move all appointment fitting any criteria, you can use the green button (Step 5). This could be in scenarios where appointments for patient fall on a newly declared holiday . When this is done, the system will automatically alert all patients of the new change in their schedule.
After successfully retrieving an appointment, ask the patient to go to Billing and make the payment
Billing
One of the functions of the Billing module is to allow the patient to pay for the services rendered at the facility. At every service point of the facility, the patient will be required to make a payment , if the service is billable, before getting the service.
It bills different sections of the facility like OPD Queue, IPD Queue, Pharmacy, Laboratory, Radiology and Walk-in-Patient
After making the payment and it is verified by the system, the patient will be queued to the next session. For instance, after paying the registration fee, the patient will be queued to triage for vitals collection.
To offer service using the billing module, follow the steps below;
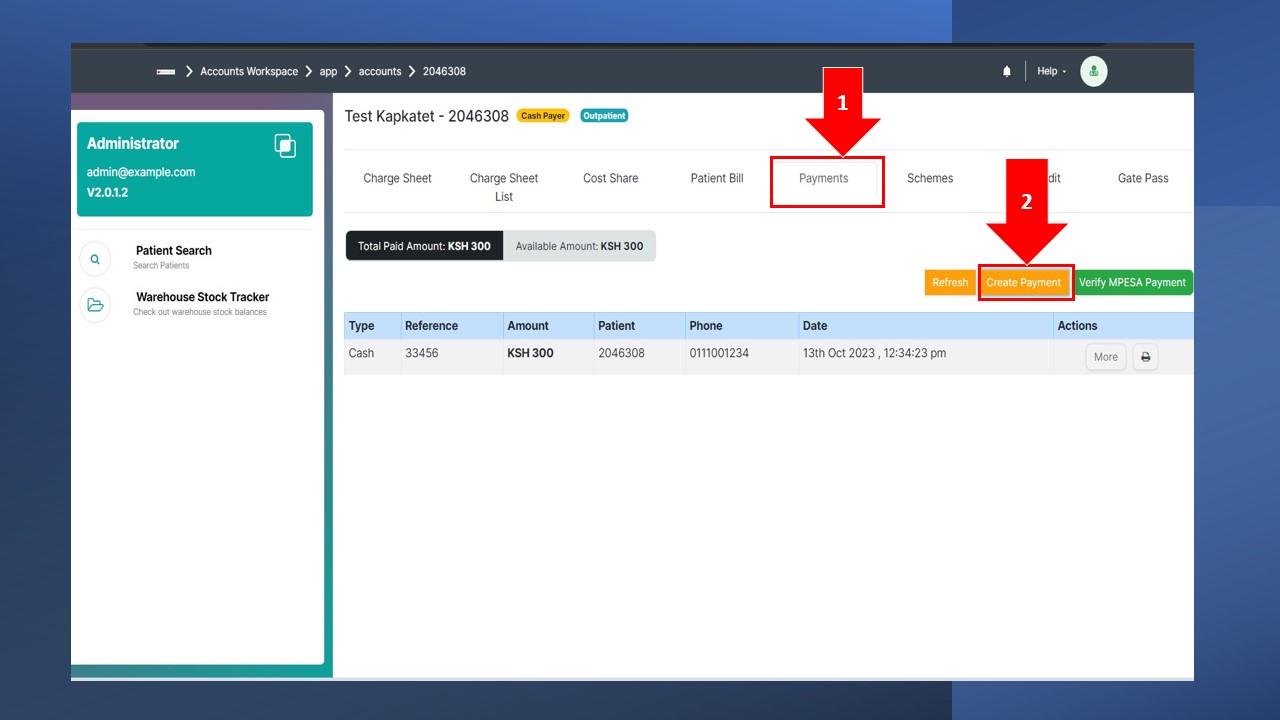
- Click on the billing module icon on the home page. After clicking ‘billing’ module, the screen below will pop up. Click on “Accounts Page” link.
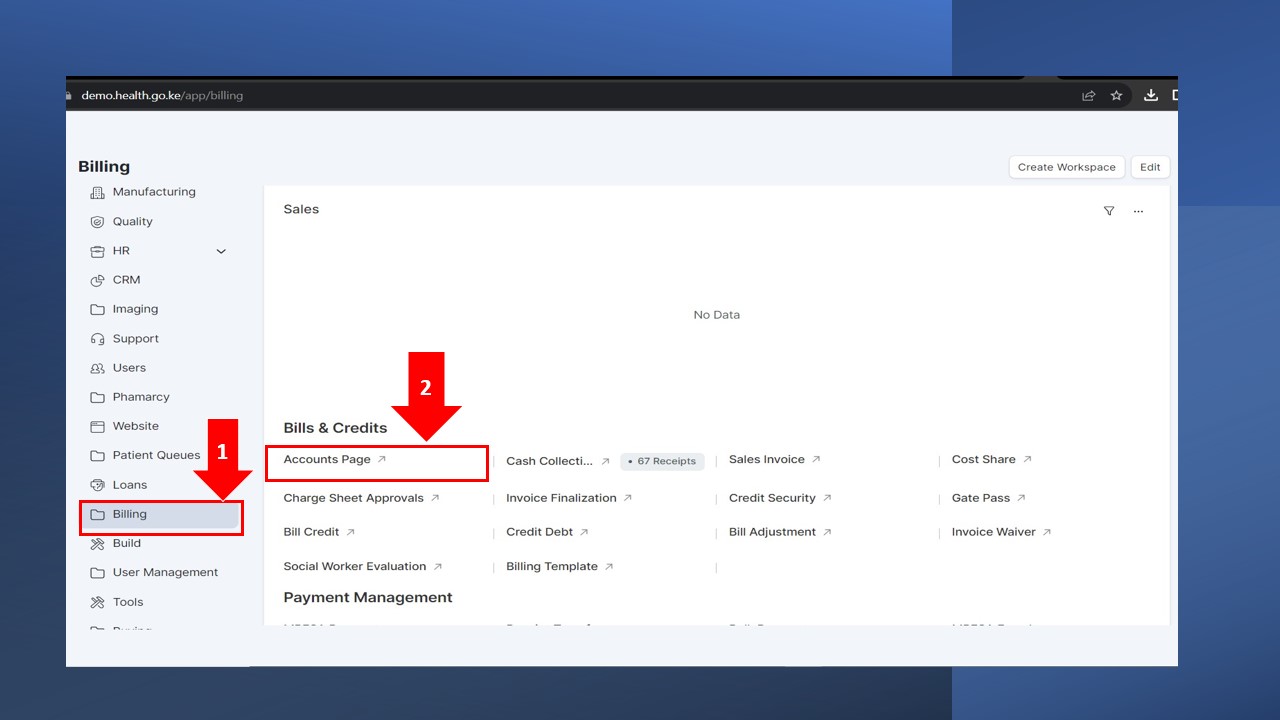
- After clicking on "Accounts Page" link, the following window will open. Follow the steps below to receive payment from the patient.
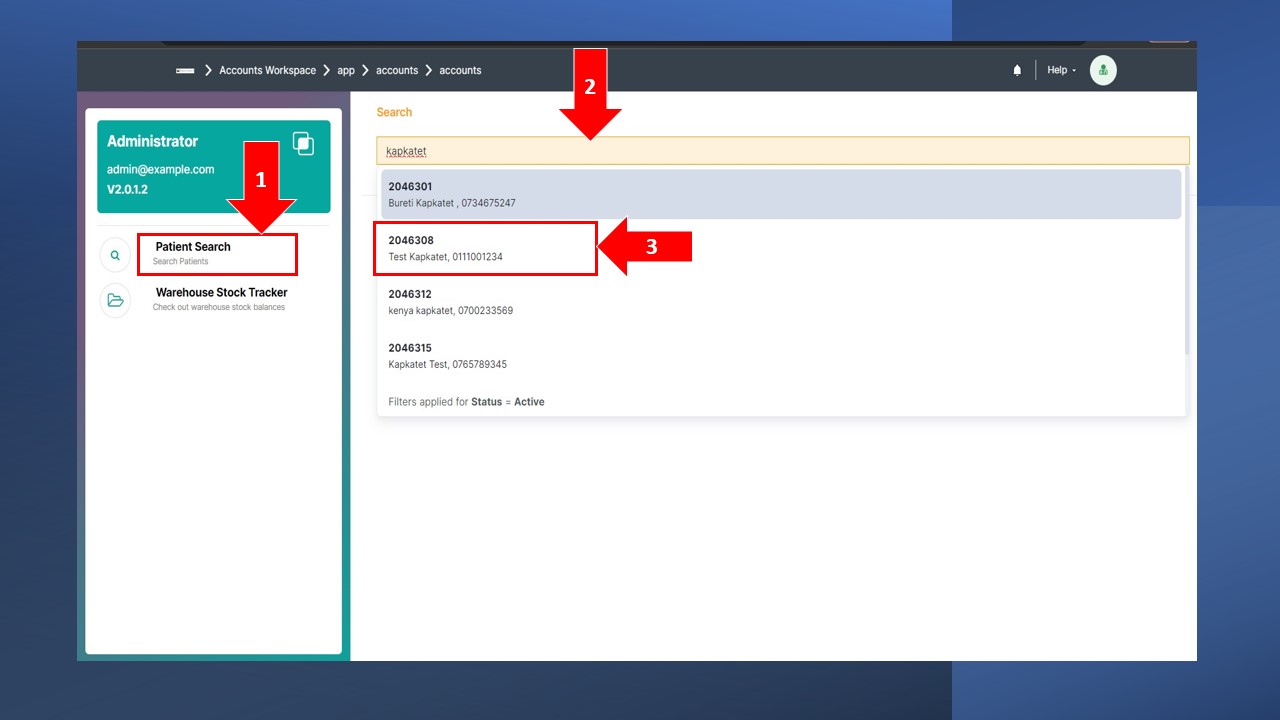
- Click on "Patient Search" to search the specific patient you want to receive payment from (Step 1)
- Click on the search bar and start typing the name of the patient(Step 2)
- Once the name of the patient pops up from the dropdown list, click on it (Step 3). The window below will open. Click on "Payments" then "Create Payment".
After clicking "Create Payment", the following window will open. Follow below steps and fill in the fields as shown to create the payment.
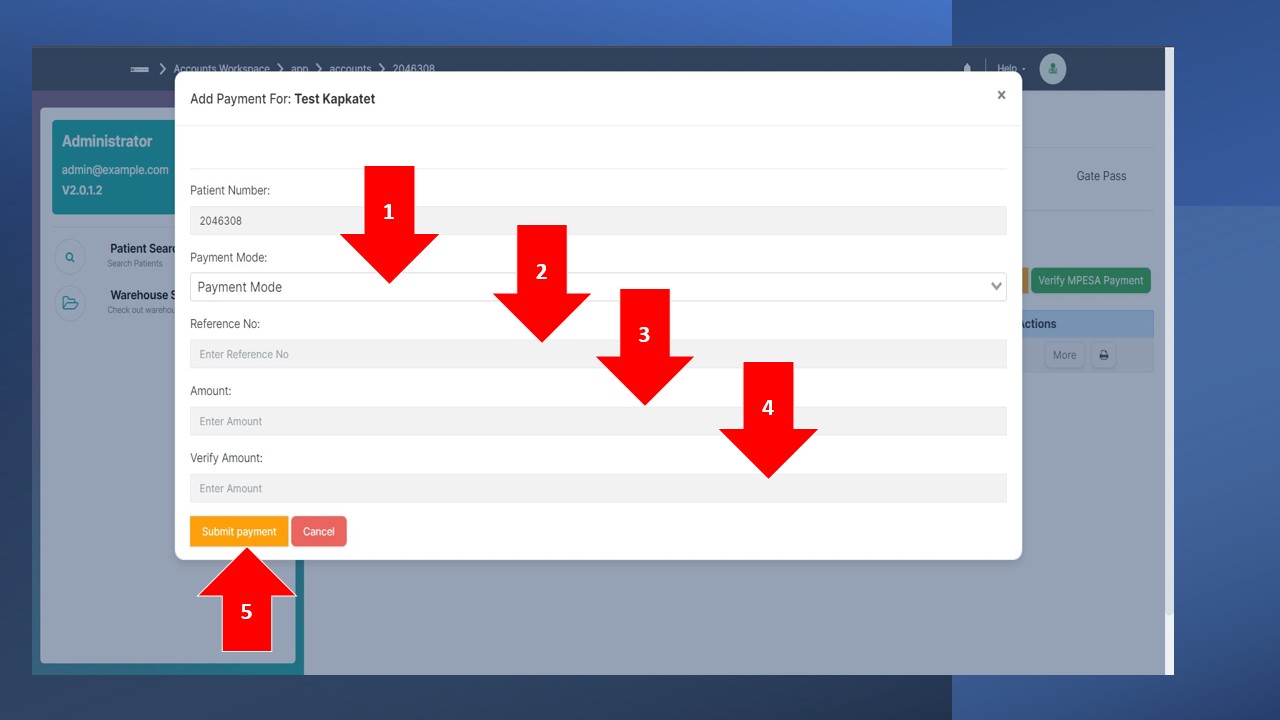
- Click here to select payment mode from the dropdown list. It could be either cash or bank (Mpesa).
- Click here and enter the Mobile Phone number of the patient, or the number used to make the payment , if the payment mode was bank (Mpesa).
- Click here and enter the amount paid.
- Click here and Verify the Amount.
- Next, click 'Submit" button to submit the payment.
After successful payment, the patient is automatically queued to the next session/next service point.
Triage
Triage permits users to prioritize patients or cases according to the severity of their medical condition and the urgency of their need for medical care.
The system collects vital patient information, including vital signs, concise interviews, and symptom evaluations.
The triage function is accessible to Nurses and Doctors.
How to Triage
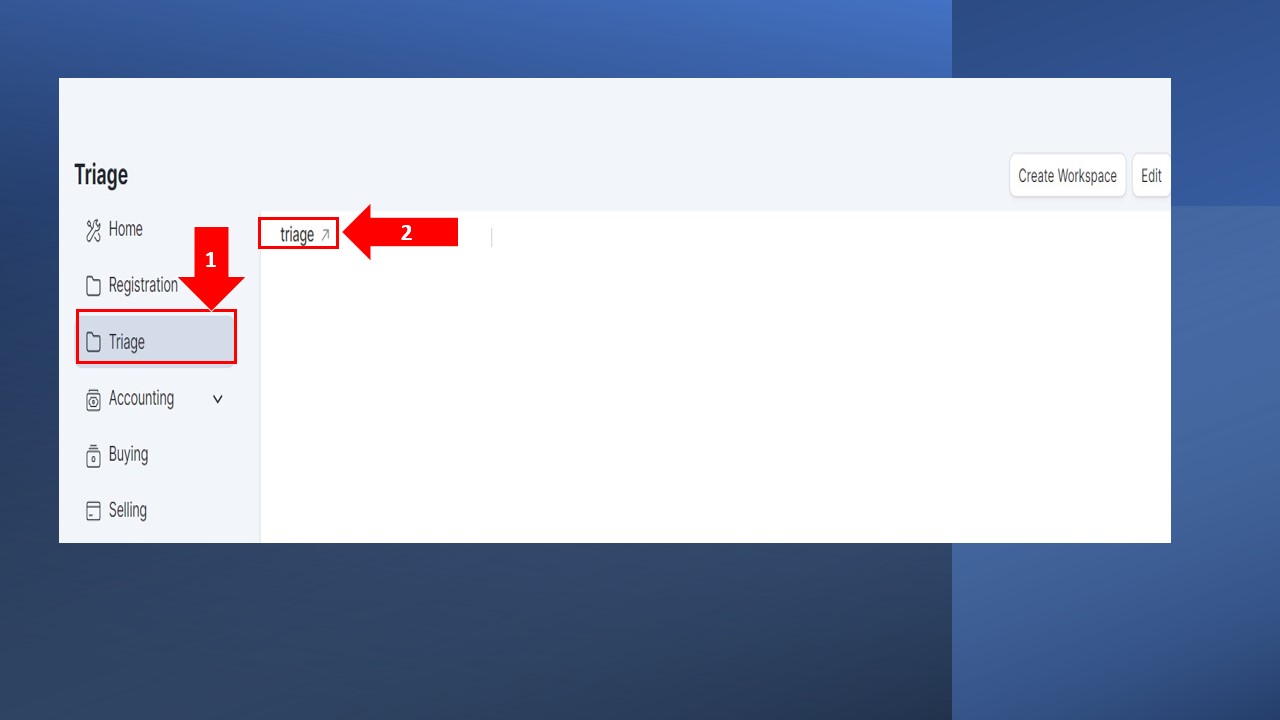
To access Triage, Login as a nurse or doctor.
- On the homepage, navigate to Triage on the Left hand side Menu
- Then click on "Triage link" as shown below
Go to Homepage >Triage > Triage Link
Clicking on the Triage Link will open the window below, showing the patient chart, depending with which Service Point you have selected. In our case, we use MCH service point.
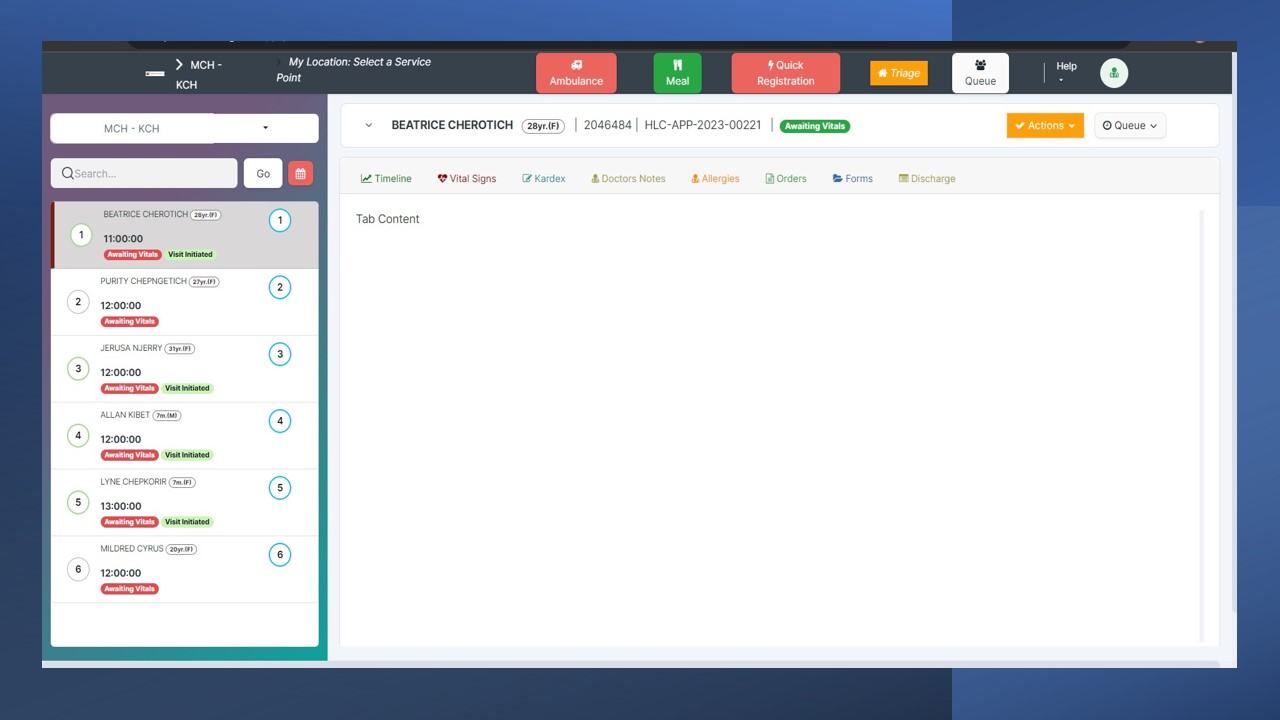
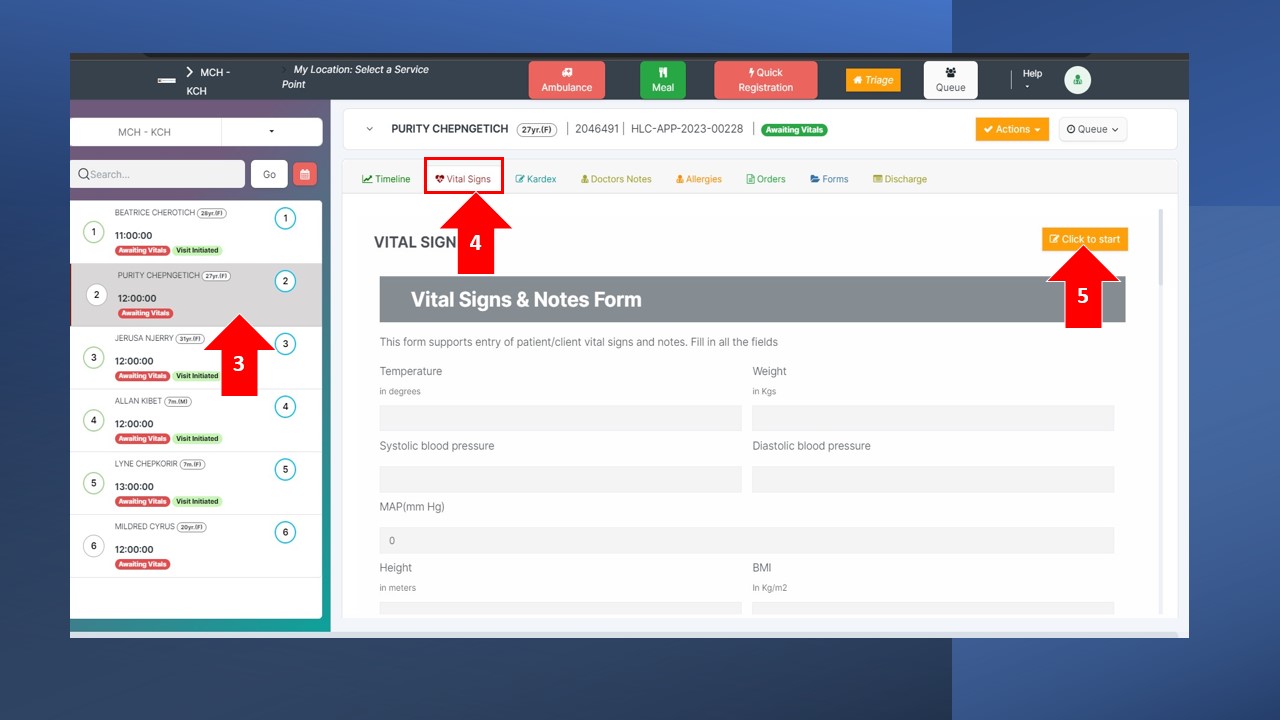
3. On the left side, there is a Patients' List. Click on the name of the Patient you want to triage.
By default, the system will always open the patient on top of the queue, in our case above, Beatrice Cherotich 4. Click on the "Vital Signs" Button. A form for Vitals will open.
4. Click on the "Vitals Sign" Button. A form will open that will allow you to input the values for the vitals.
5. Click on the "Click to Start" Button to allow you input the values as you take them from the patient.
6. Once you have completed taking the vitals, click on "Save" Button and confirm to save the patient vitals.
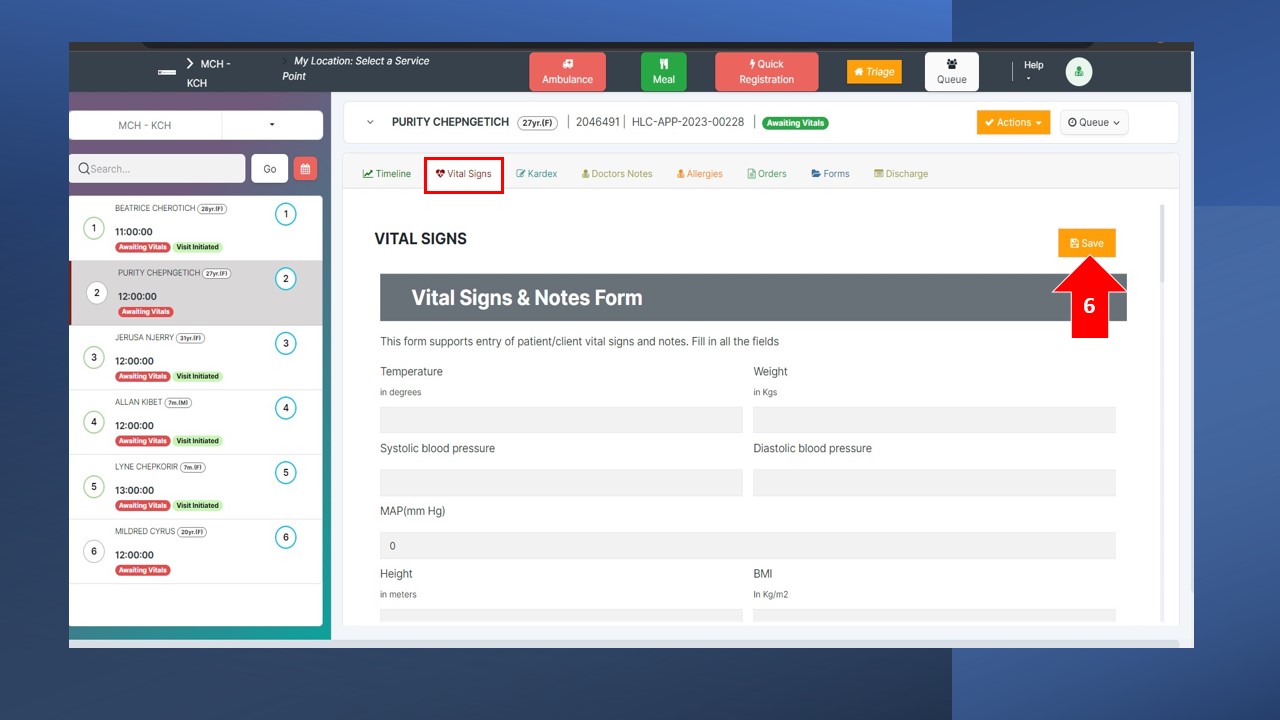
7. Next, click on the "Queue" Button.
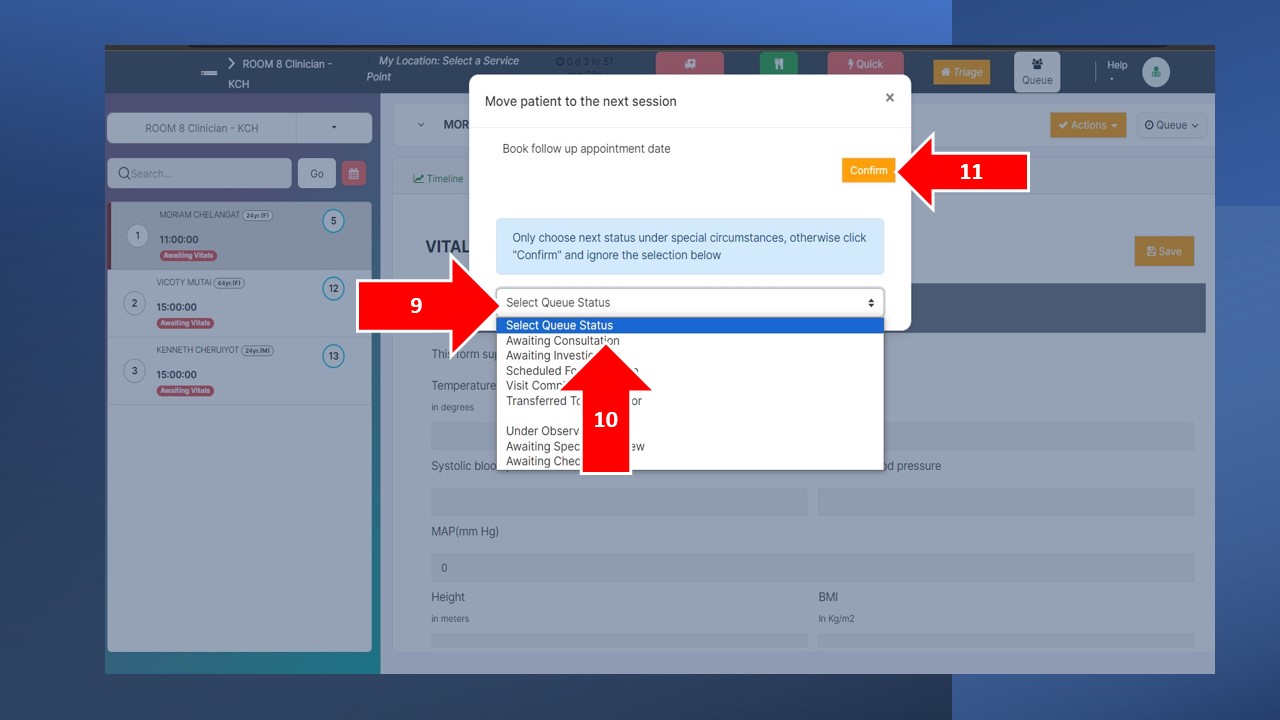
8. Select "Next Session". A new window will Opne.
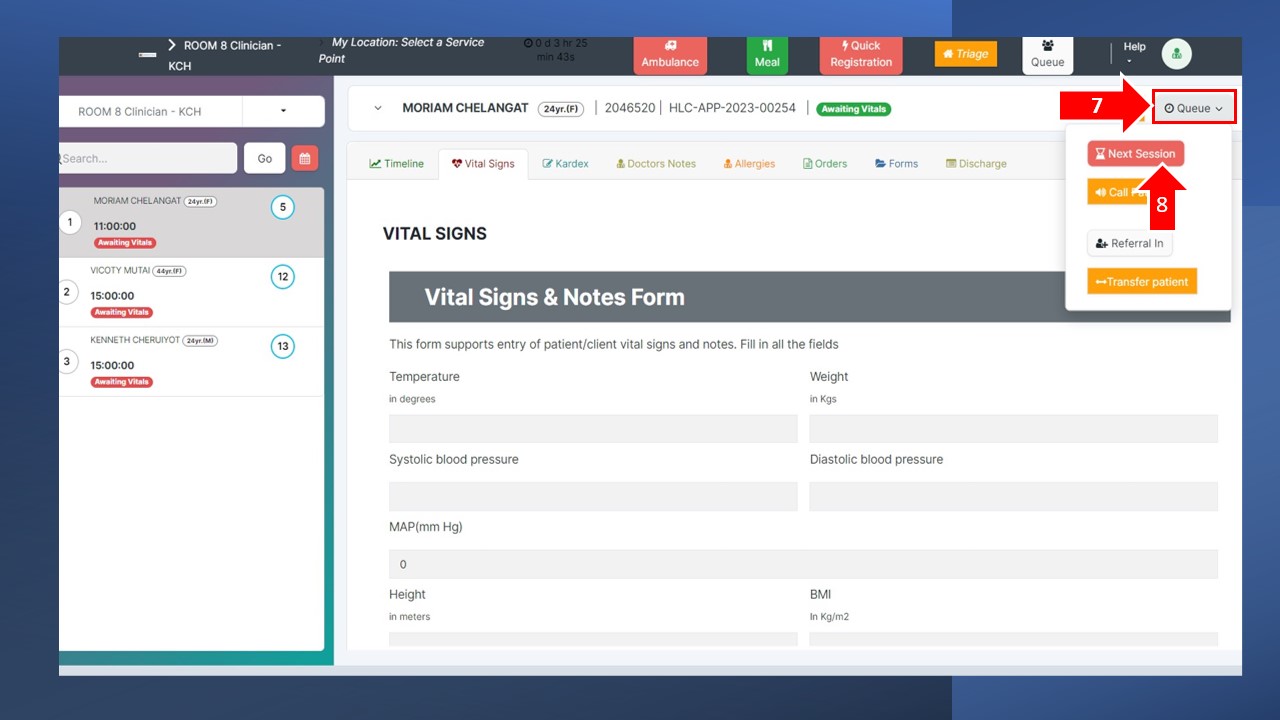
9. Click on "Select Queue Status" as shown in Step 9 below.
10. From the dropdown list, click on the preferred queue you want to send the patient to. In our case, Awaiting Consultation.
11. Click on "Confirm" button to confirm. This will automatically queue the patient to the next service point
Once you have queued the patient for the next session, the system will automatically open next patient's information. Continue the process as before.
To take vitals for a different client, Click on the desired patient name from the patient list on the left. This usually happens in scenarios such as when a patient walks out temporarily or has left.
In a facility where the nurse also functions as the doctor, follow the steps below to triage and conduct a clinical encounter on the patient
Patient Chart
The patient chart serves as the primary user interface (UI) through which healthcare practitioners interact with patient information within the system. It comprises three main sections: the top header, sidebar, and working area. These components collectively facilitate seamless communication and efficient management of patient data.
1. Top Header Overview:
- The top header of the patient chart provides critical information and quick access to essential actions. In the illustration above, the section at the top of the screen, which includes pointers 9-13, is the top header. It prominently displays:
- The currently selected healthcare service unit.
- The current service point.
Next to this information, you'll find several critical quick actions:
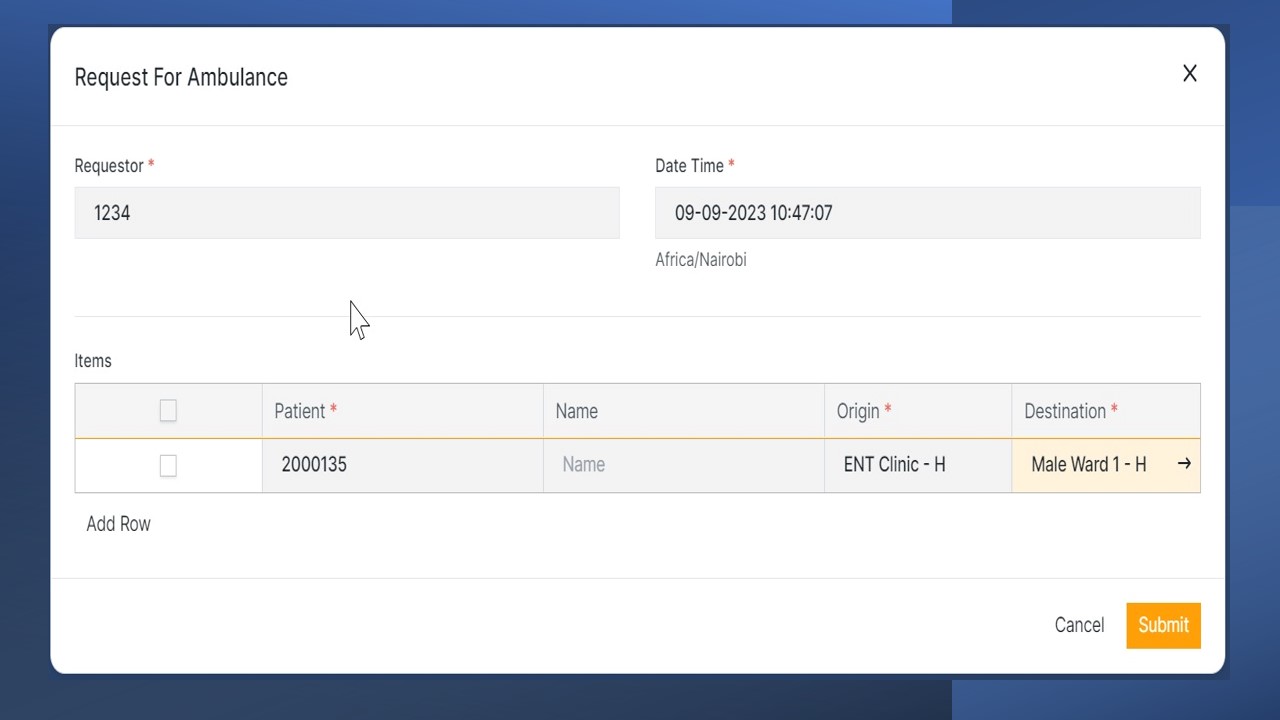
a) Ambulance Request: (Pointer 9)
- This feature empowers healthcare practitioners to request ambulances for either individual patients or multiple patients.
- Practitioners can specify the ambulance's origin and destination, ensuring efficient and timely patient transportation.
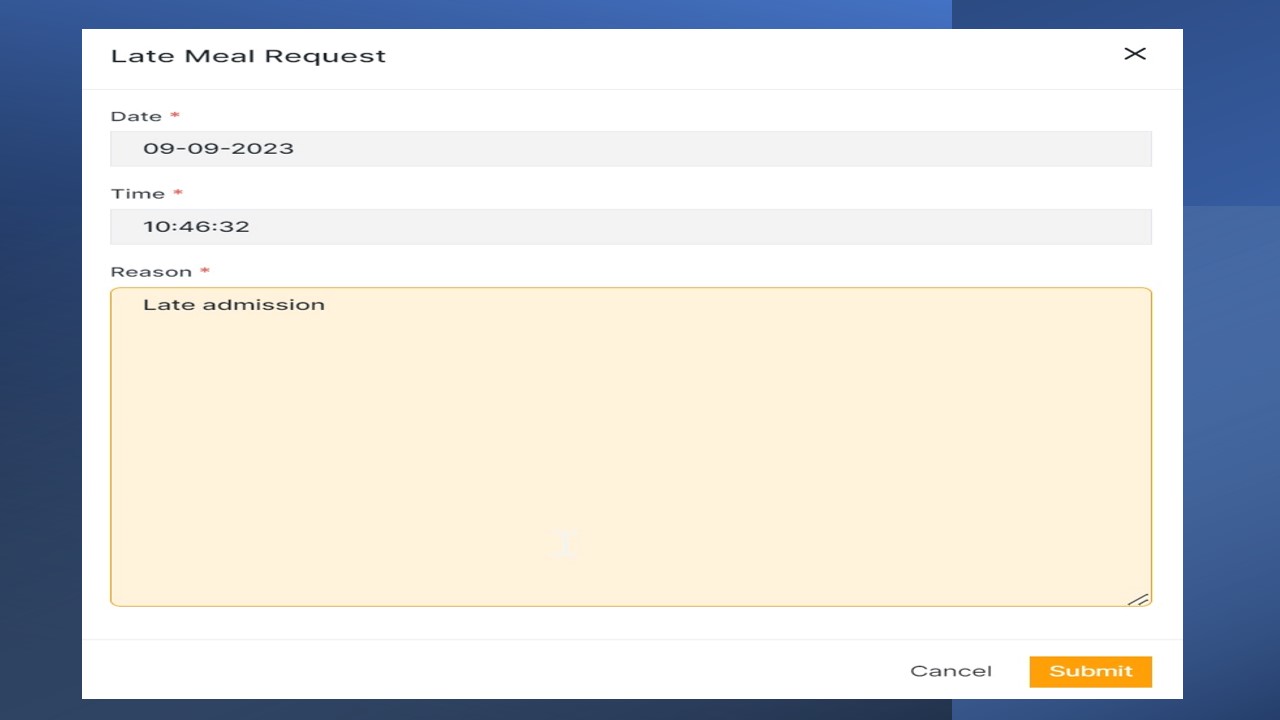
b) Late Meal Request: (Pointer 10)
- Healthcare practitioners can use this function to request late meals for specific patients.
- This ensures that patients receive meals at appropriate times, even if their meal schedules have been delayed.
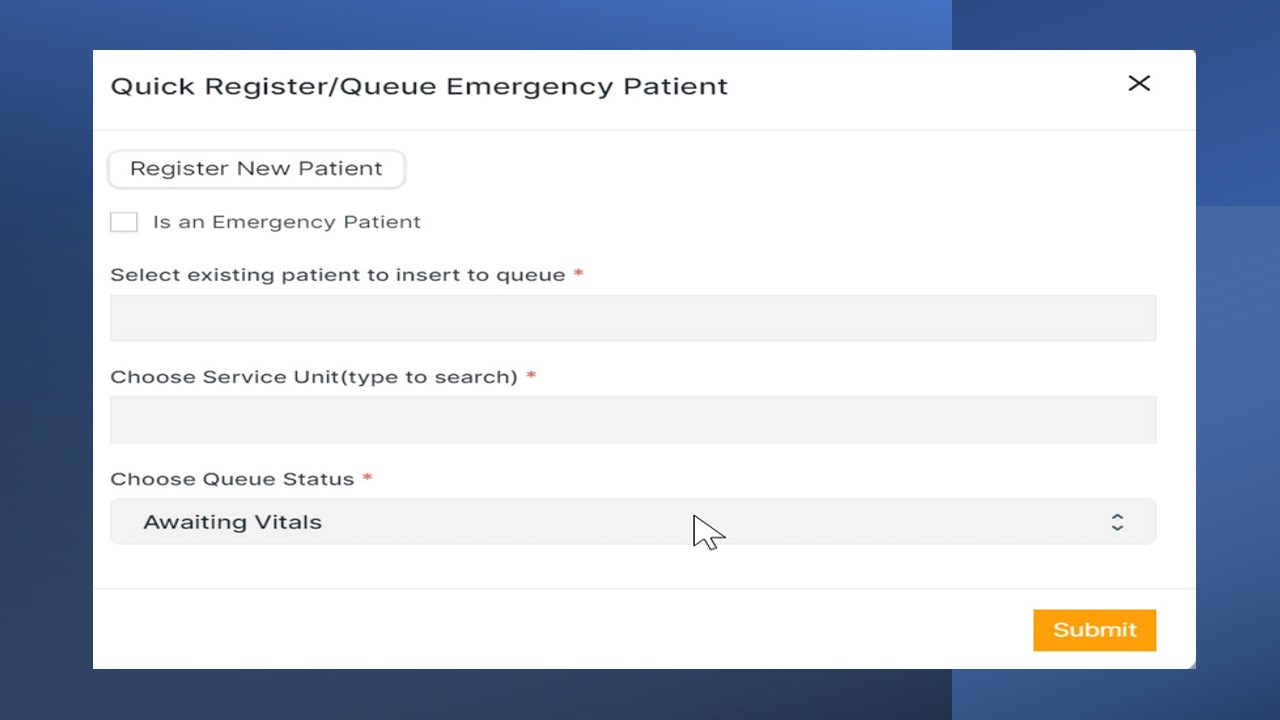
c) Quick Register/Queue Emergency Patient : (Pointer 11)
- This feature enables records personnel to efficiently register new emergency patients and promptly place them in the queue for assessment by the appropriate healthcare practitioner, bypassing the need for the complete registration process.
d) Service Point Manager: (Pointer 12)
- The Service Point Manager allows healthcare practitioners to switch between service points.
- This functionality proves invaluable for managing patient queues effectively.
e) Queue Filters: (Pointer 13)
- Queue Filters enable practitioners to filter and display patients on the patient list based on their queue status.
- Various queue statuses are available, including 'Awaiting Vitals,' 'Awaiting Consultation,' 'Awaiting Investigation,' 'Visit Completed,' 'Awaiting Specialist Review,' and 'Scheduled For Admission.'
- This feature aids in organizing and prioritizing patient care based on their current status and needs.
The top header's design and quick actions ensure that healthcare practitioners can access critical information and perform essential tasks efficiently, enhancing the overall patient care experience within the system.
2. Sidebar Components:
a) Healthcare Service Unit: (Pointer 1)
- This section displays the name of the current healthcare service unit that the logged-in practitioner is currently viewing.
- It provides immediate context, ensuring practitioners are aware of the service unit they are working with, contributing to effective patient care management.
b) Search Bar: (Pointer 2)
- The search bar offers healthcare practitioners a powerful tool to search for patients swiftly.
- Practitioners can search for patients using either the patient's name or their unique patient number, simplifying the process of locating specific patient records.
c) Calendar: (Pointer 3)
- The calendar component allows practitioners to access patient data from the past by selecting a specific date.
- This feature facilitates historical patient queue retrieval, offering insights into a patient's queue history and previous interactions with the healthcare system.
d) Patient List: (Pointer 4)
- In the patient list section, practitioners find a comprehensive list of all patients relevant to the selected healthcare service unit, the currently logged-in practitioner, and the relevant date.
- This patient list provides a quick overview of the patients currently under the practitioner's care.
The organization of these sidebar components ensures that healthcare practitioners have efficient access to essential patient information and tools necessary for providing high-quality care within the healthcare system.
3. Working Area Components:
The working area of the patient chart interface is divided into two primary sections: Patient Information and Tabs Section, each serving distinct purposes.
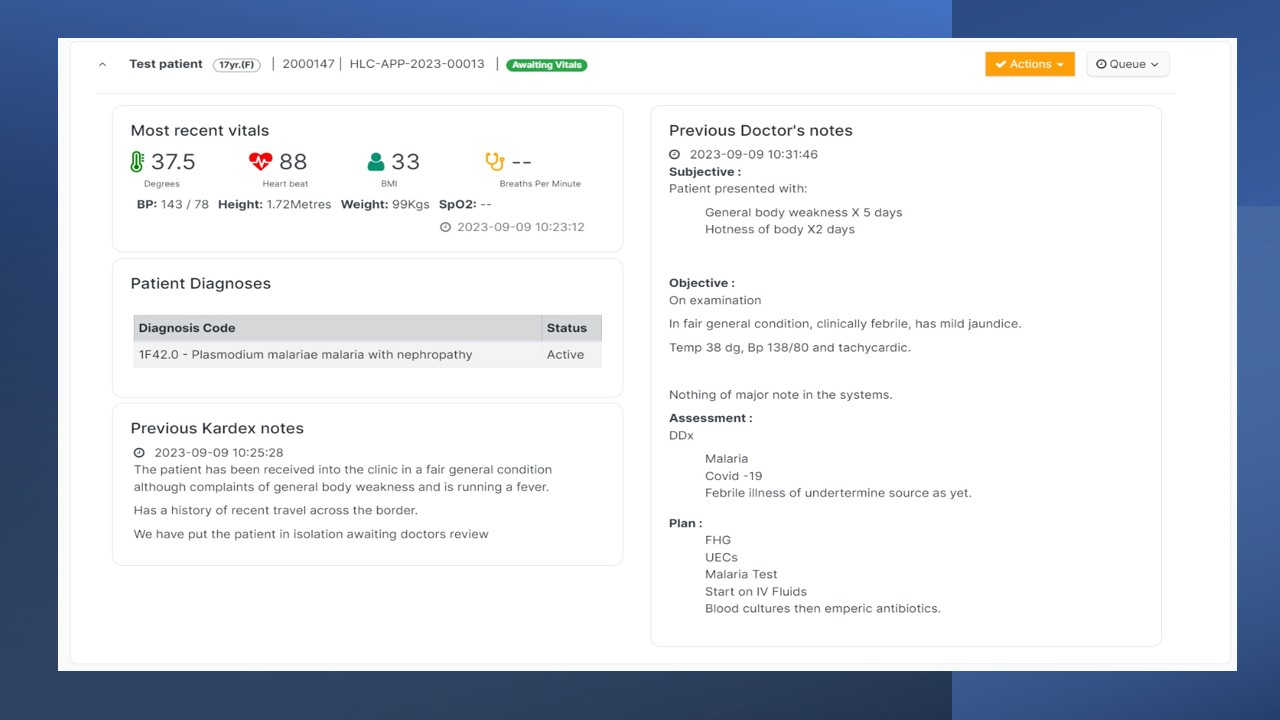
a) Patient Information: (Pointer 5)
- The Patient Information section is dedicated to presenting essential patient details and contextual information, including patient biographical data, appointment information, and admission status.
- Additionally, this section provides contextual actions for healthcare practitioners: (Pointer 6)
i) Sign Off:
- The Sign Off action is performed by healthcare practitioners to conclude a patient encounter.
- It typically includes activities such as signing off doctor's notes, kardex notes, and orders like drug prescriptions and clinical procedures.
- The practitioner inputs their PR (practitioner) number and submits to complete the sign-off process.
ii) Request Patient Transfer:
- This feature applies primarily to inpatients and facilitates the transfer of a patient from one medical ward to another.
- Practitioners must specify the target medical department, the target Healthcare Service Unit, and the target bed.
iii) Accept/Reject Transfer:
- This functionality is used to respond to transfer requests made by other healthcare practitioners.
- Practitioners can either accept and assign a bed for admission or reject the transfer request entirely.
iv) Schedule Admission:
- Healthcare practitioners utilize this feature to schedule patient admissions.
- The admission is scheduled to a specific medical department or ward, and practitioners provide admission instructions needed.
Queue Actions for Outpatients: (Pointer 7)
- For outpatient management, there are specific Queue Actions available:
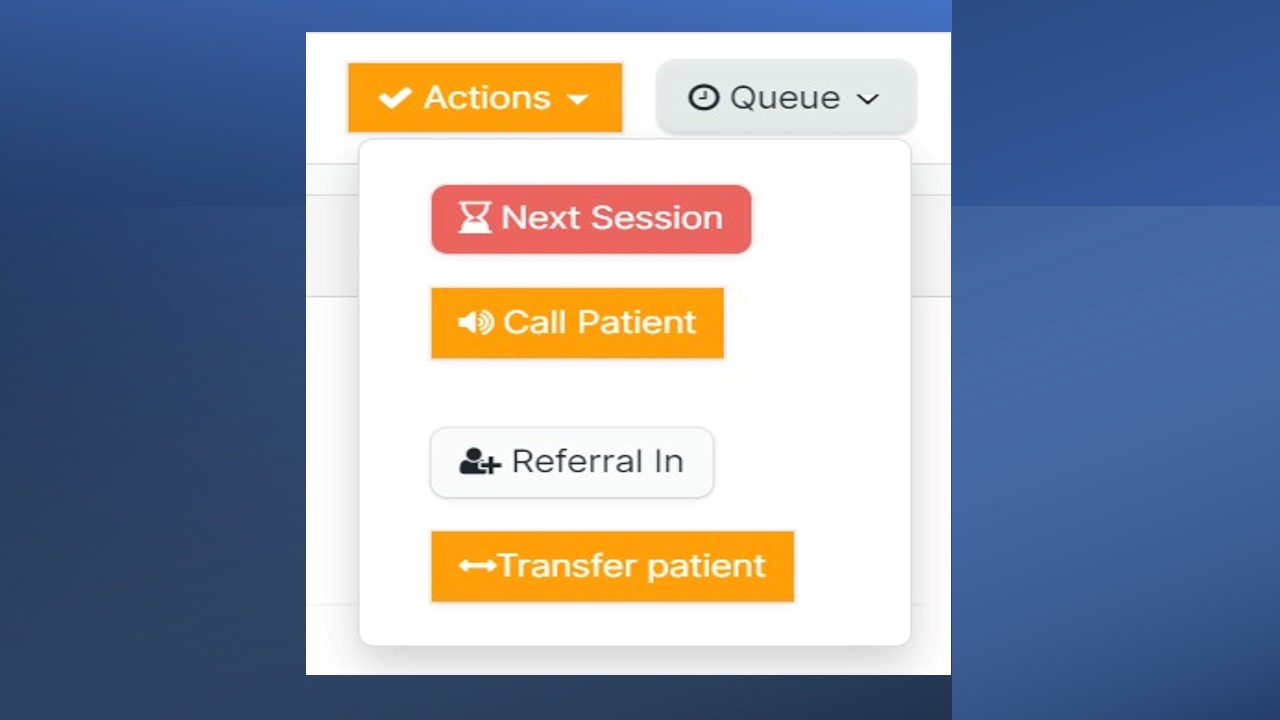
i) Next Session:
- This action allows practitioners to transfer patients from one queue status to another.
- For instance, patients can be moved from 'Awaiting Vitals' to 'Awaiting Consultation.'
- Practitioners can also book follow-up appointments during this process.
ii) Call Patient:
- Integrated with the queue system, this function is used to initiate the call for the next patient in the queue, streamlining the patient flow.
iii) Referral In:
- Practitioners can mark a patient as a referral in, indicating that the patient has been referred from another healthcare provider or department.
iv) Transfer Patient:
- This feature applies to outpatients and facilitates the transfer of patients from one service unit to another, ensuring efficient care coordination.
When the patient information section is clicked, it will be expanded, and important information such as the most recent vital signs, kardex notes, patient diagnoses and doctor's notes can be viewed.
These components within the working area empower healthcare practitioners with the tools and actions necessary to manage patient encounters, transfers, and queue activities effectively, ultimately enhancing the quality of patient care within the system.
b) Tabs Section: (Pointer 8)
The Tabs Section in the patient chart interface contains a variety of relevant tabs, each serving specific purposes to facilitate comprehensive patient care management:
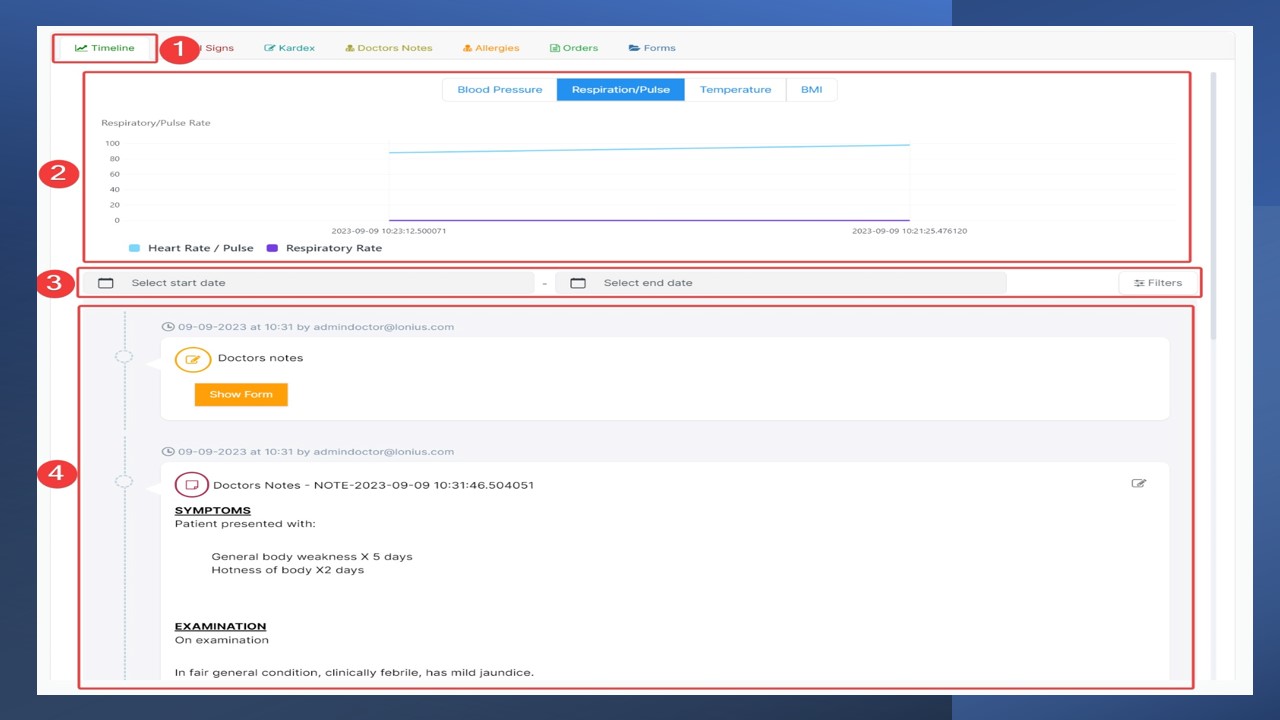
i) Timeline:
- The Timeline tab serves as an electronic patient file, encompassing all pertinent patient information and past activities.
- It archives scanned files, vital signs, clinical procedures, patient appointments, encounters, drug prescriptions, lab tests, and more.
- Appropriate filters are available to refine the displayed information, allowing healthcare practitioners to access only the data they require.
The image below divides the timeline into three distinct sections
- The vital signs graphical depiction, designed for healthcare practitioners' analysis. (Pointer 2)
- Filters, encompassing date ranges and content filters to control the displayed information in the section. (Pointer 3)
- The information section, serving as an interface to view all patient-related data, filtered based on the criteria provided. (Pointer 4)
ii) Drug Administration:
- Designed for inpatient drug administration, this tab enables practitioners to administer medications at the prescribed times.
- It helps ensure accurate medication management for hospitalized patients.
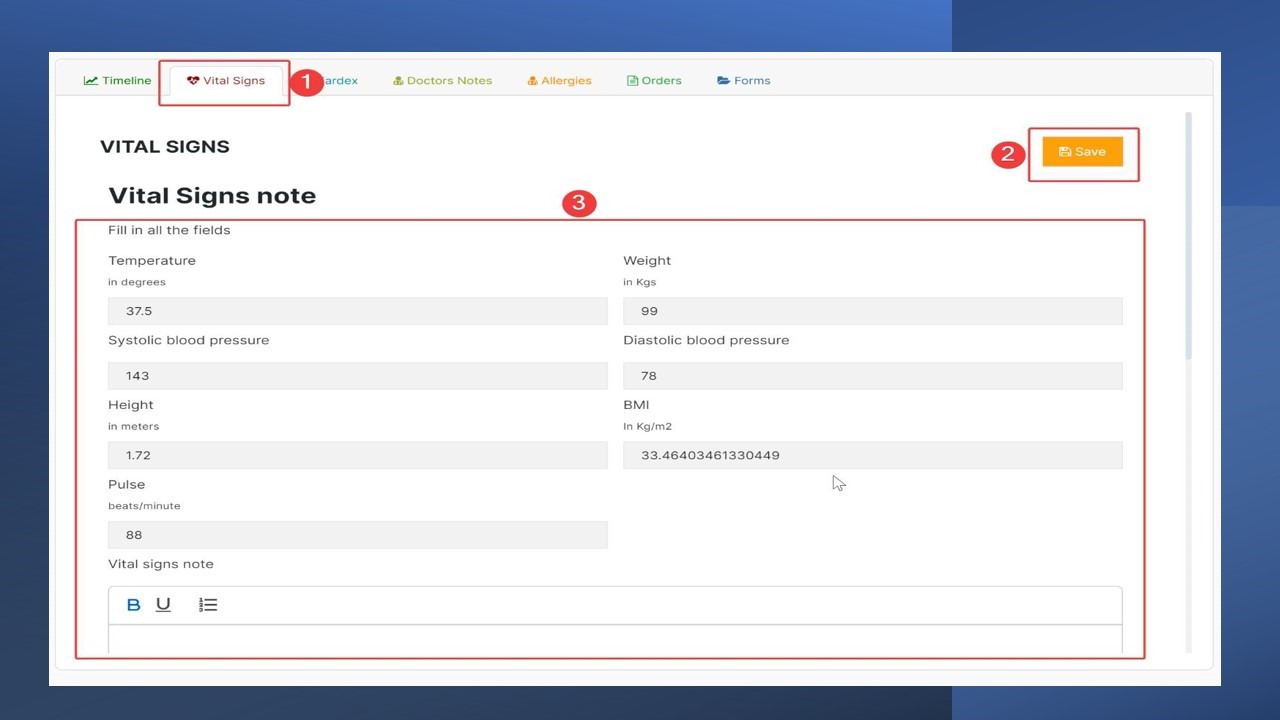
iii) Vital Signs:
- In this tab, practitioners can record and input a patient's vital signs data.
- By clicking "click to start" and filling in the required fields and then clicking "Save" (Step 2), vital signs data can be entered and saved for comprehensive patient monitoring.
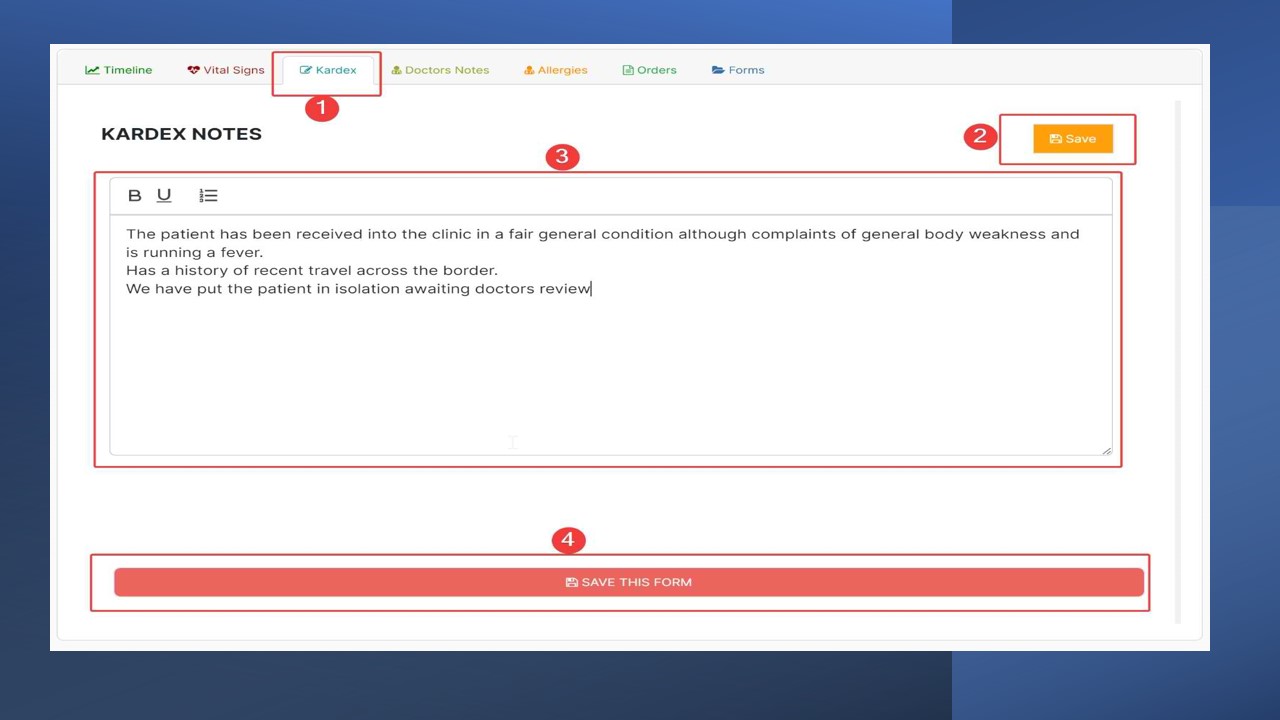
iv) Kardex:
- The Kardex tab is used for recording kardex notes, which provide essential patient care information.(Step 3)
- Practitioners can initiate notes by clicking "click to start," filling in the necessary details, and saving the information. (Steps 2 & 4)
Sometimes the save button at the top has been used interchangeably with "start" button
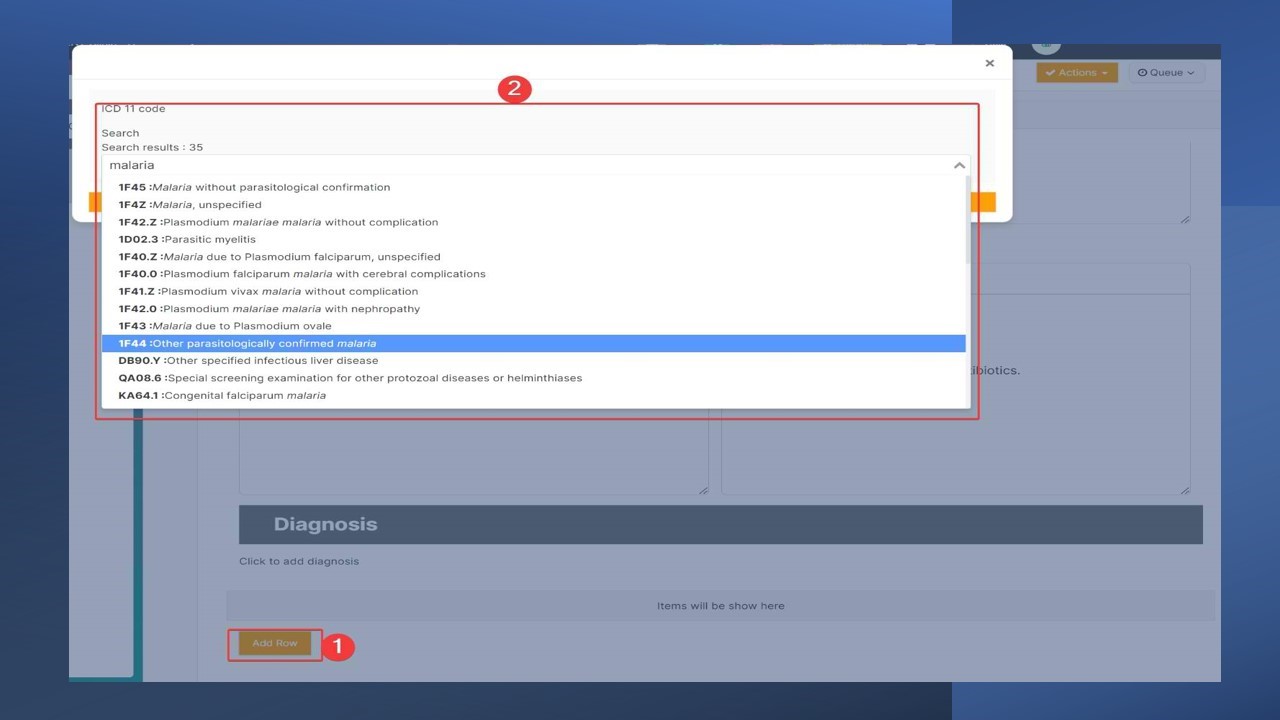
v) Doctors Notes:
- This tab allows healthcare practitioners to input doctor's notes and select the appropriate ICD-11 diagnosis.
- By clicking "click to start" and completing the required fields, practitioners can record detailed clinical notes and diagnoses. (Steps 2 & 3)

To input a diagnosis, follow these steps:
- Click on "Add Row." (Step 1)
- Search for and select the relevant ICD-11 code. (Step 2)
vi) Allergies:
- In this section, practitioners can create and add known allergies for the patient.
- The process involves clicking "Create," then "Add," and saving the allergy information.
vii) Orders:
- The Orders tab offers multiple order types:
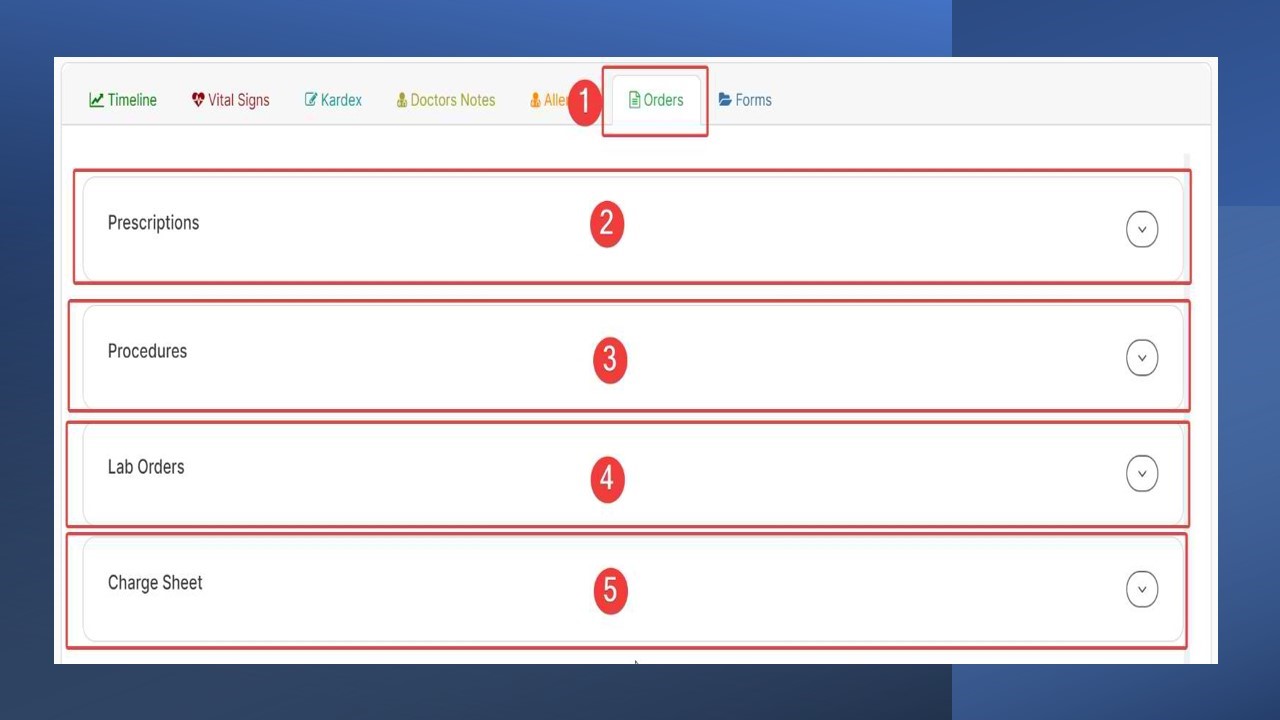
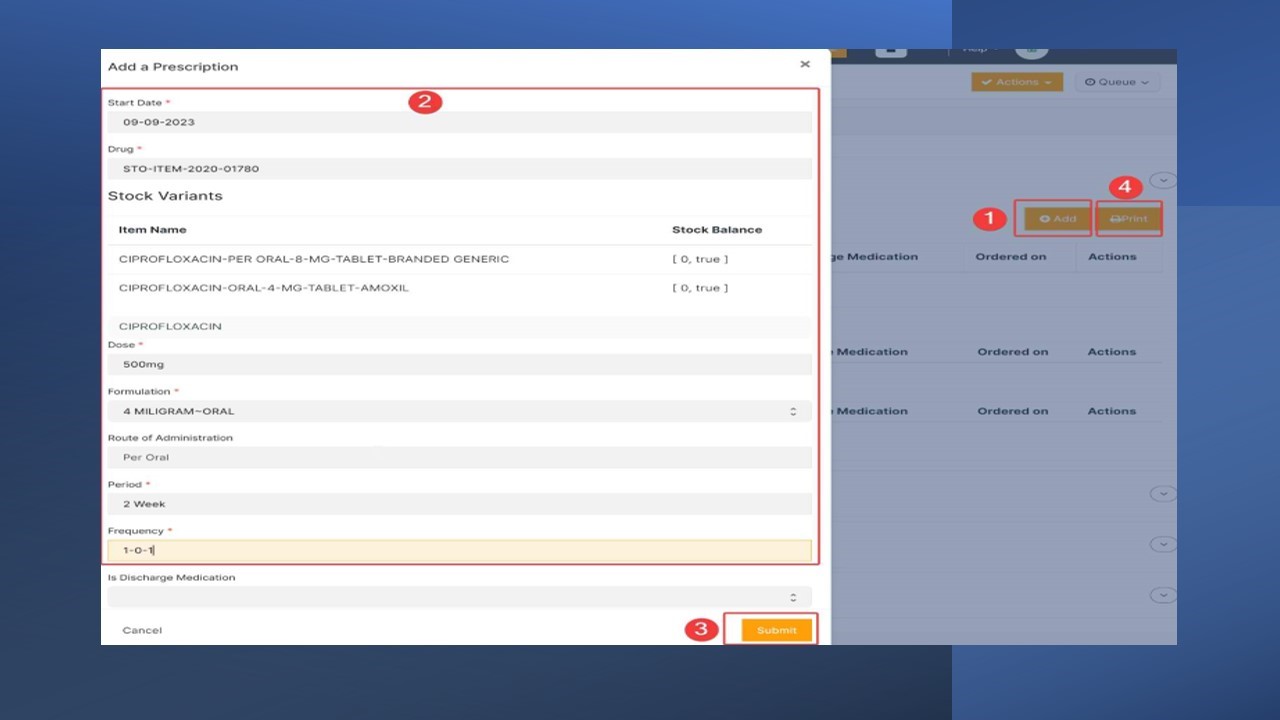
Prescriptions: (Pointer 2)
This function enables practitioners to create drug prescriptions for patients, which are then handled by the pharmacy.
- By clicking "Add," practitioners can enter essential prescription details, including drug name, dose, route of administration, duration, frequency, and any relevant instructions. (Steps 1 & 2)
- Once submitted, this prescription order will then be managed by the pharmacy. (Step 3)
- Prescriptions can be canceled after creation, and a print option is available for hard copies. (Step 4)
- Previous prescriptions are archived, and practitioners can stop prescriptions at any time.
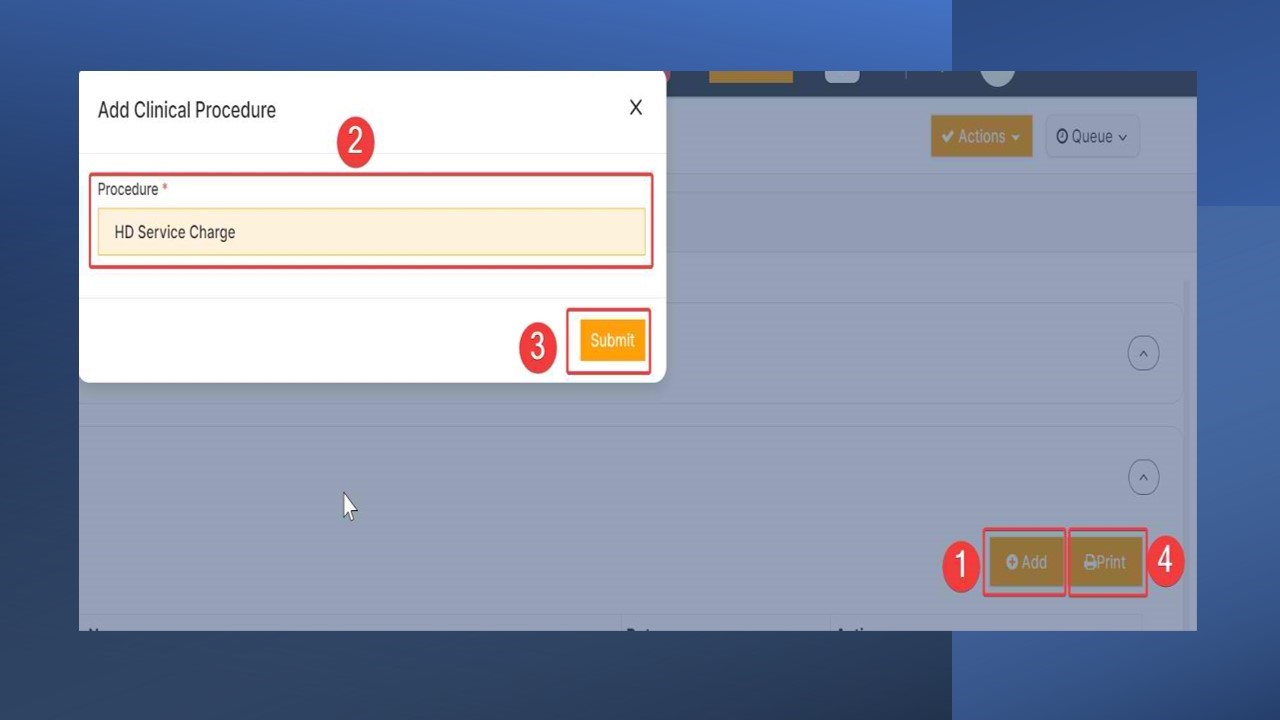
Procedures: (Pointer 3)
This option is used for ordering clinical procedures, both major and minor.
- By clicking "Add," practitioners can select the desired clinical procedure, add relevant comments, and submit the order. (Steps 2 & 3)
- A print option is available for procedure documentation (Step 4), and previous procedures can be canceled or have deposit requirements waived.
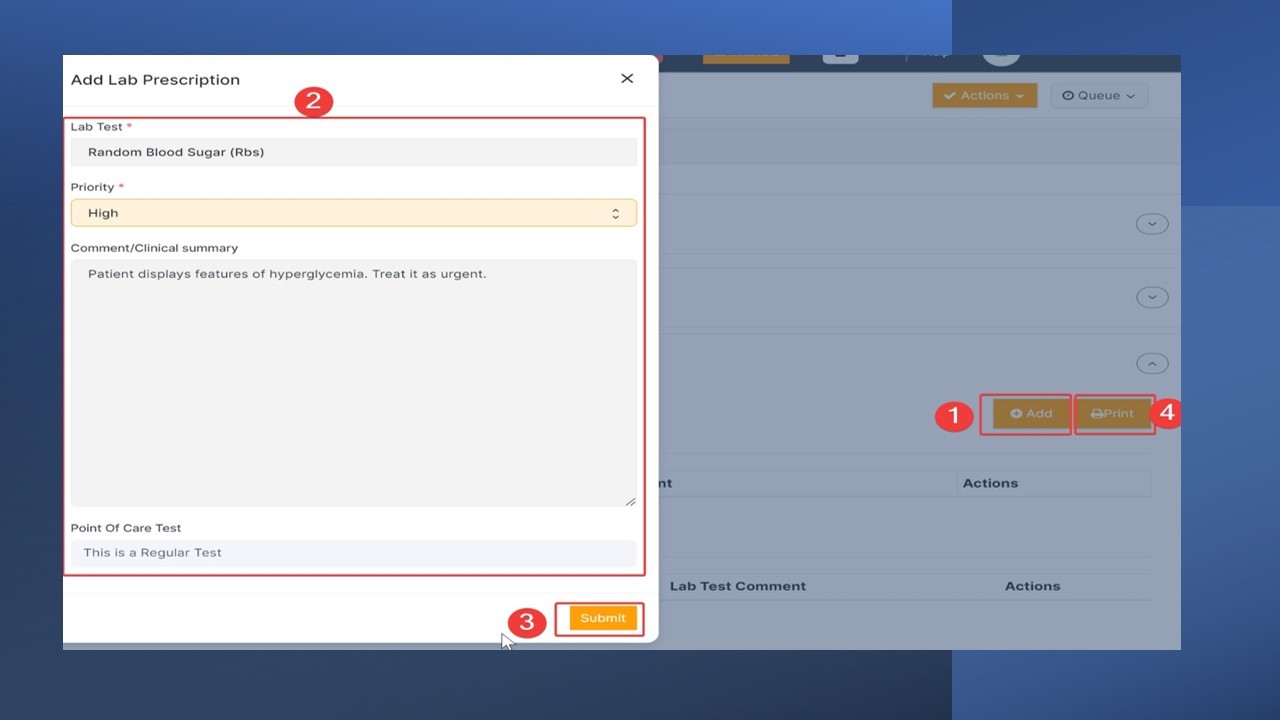
-Lab Orders (Pointer 4): Practitioners can use this feature to order lab tests.
- By clicking "Add," they can select the lab test, specify priority (normal or high), and provide comments or clinical summaries before submission. (Steps 1,2&3)
- Lab orders can be removed if necessary, and a print option is available. (Step 4)
- Previous lab test orders are archived, allowing for cancellations.
- Charge Sheet (Pointer 5): This tab replicates the charge sheet from the accounts page, enabling practitioners to bill patients for consumables or services. More information can be found in accounts/billing documentation.
viii) Forms:
- The Forms section contains flexible built-in forms that streamline data entry and documentation. Detailed instructions can be found in the forms documentation.
ix) Discharge:
- The Discharge tab serves the purpose of scheduling patient discharges and storing recent patient clinical activities.
- It includes discharge notes, inpatient medications, clinical procedures, and lab tests.
- A print option is available for this information.
- To schedule discharge, practitioners select the discharge status, book follow-up appointments if necessary, provide discharge notes, and submit the details.
These tabs collectively provide a comprehensive and structured approach to patient care management, covering various aspects of patient information, medication, documentation, and order management within the healthcare system.
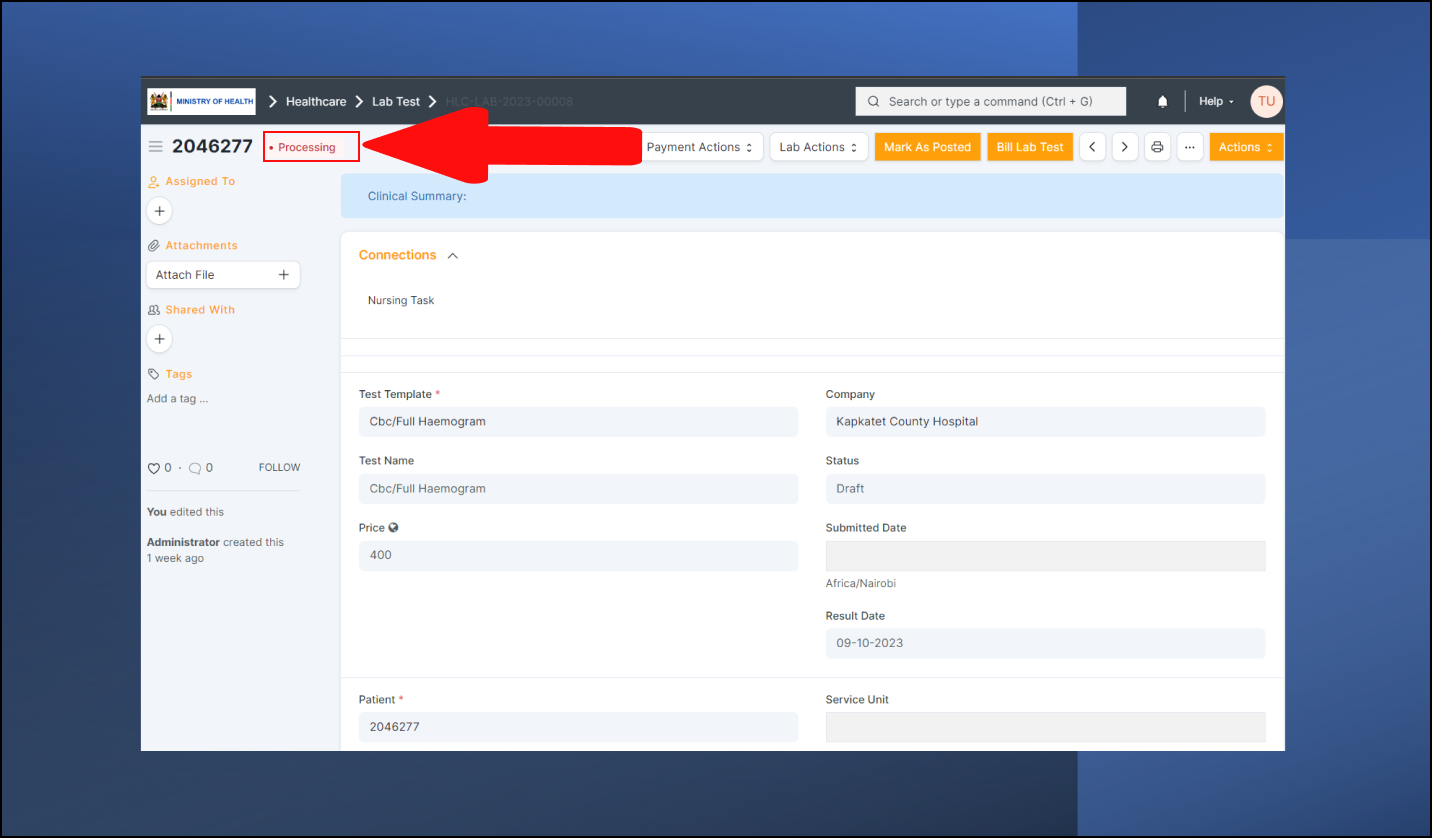
The Laboratory Workflow
This laboratory module contains a step by step guide on how to carry out the laboratory work flow. Lab should be accessed by the lab technician user role, or anyone else assigned that user role.
In the system, a patient is forwarded to the lab after a clinical encounter. The doctor/nurse makes the lab orders, sends the patient to billing for order payments and once the payment is done, the patient is sent to the labs queue.
To access Lab, log in to the system using your user credentials.
- On the left side menu, click on the Lab icon.
- A new page will open with the following links.
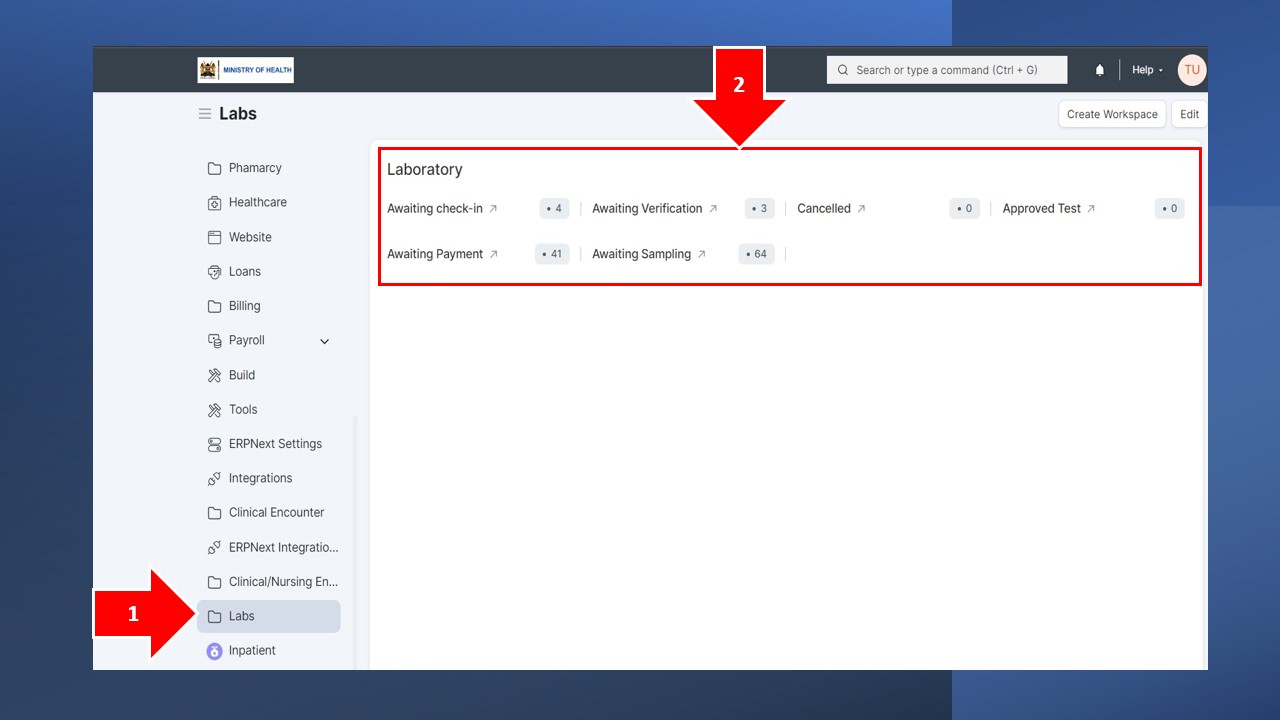
The links and their description below gives detailed statuses of a patient's lab journey, from the moment the doctor makes a lab order to the point he gets back the result
i. Awaiting Check-in
Description: In the context of a lab test, this stage indicates that the test request has been received but has not yet been officially checked into the laboratory's system. The test has not started processing.
Action: Lab administrative staff or receptionists may perform the check-in process, which involves recording the test request, assigning a unique identifier, and preparing it for laboratory processing.
ii. Awaiting Payment
Description: This stage signifies that there are outstanding fees or payment obligations associated with the lab test. The payment must be settled before the test can proceed.
Action: Billing or finance teams handle the verification of payment. Once the payment is confirmed, the lab test can advance.
The above two steps are sometimes not applicable to some facilities.
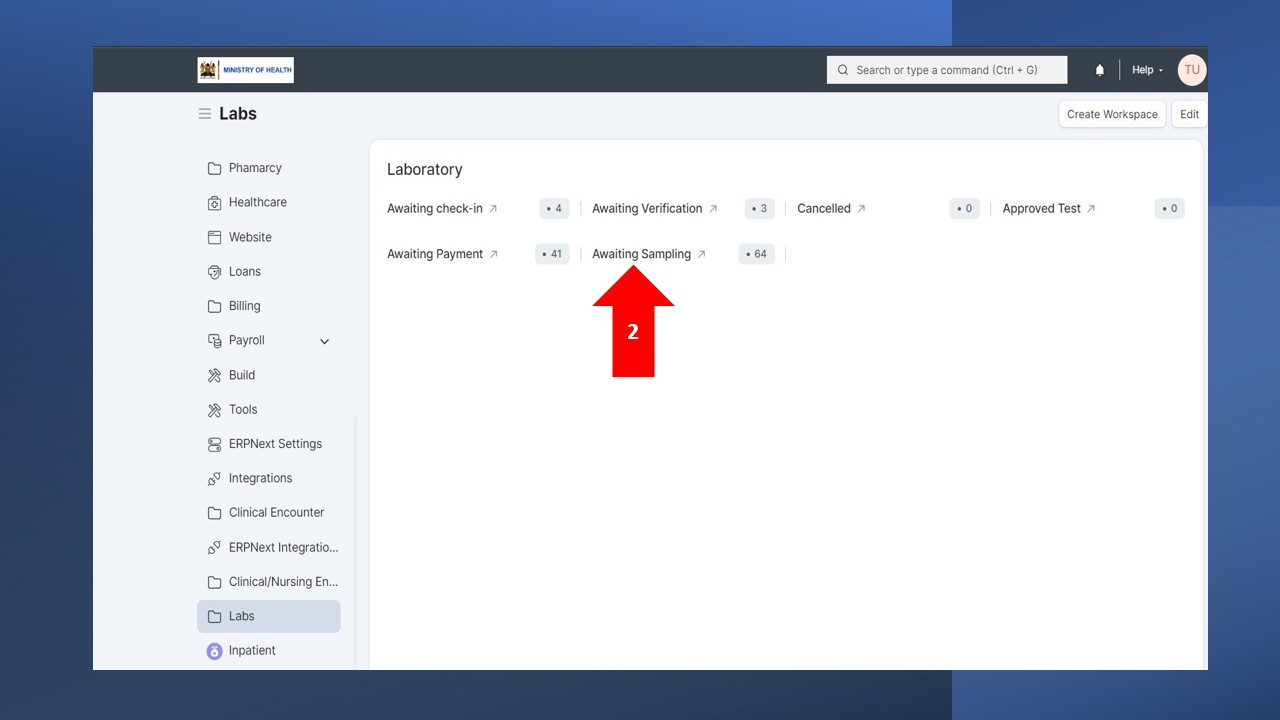
Patients are automatically queued in the "Awaiting Sampling" queue after paying for the lab orders at Billing.
To perform lab procedures, click on the "Awaiting Sampling" link as shown below.
iii. Awaiting Sampling:
Description: In a lab test workflow, this phase indicates that the sample collection process has not yet occurred. The test cannot proceed until the required sample is obtained.
Action: Lab technicians, nurses, or phlebotomists typically perform the sampling, collecting the necessary specimens (e.g., blood, urine, tissue) for analysis.
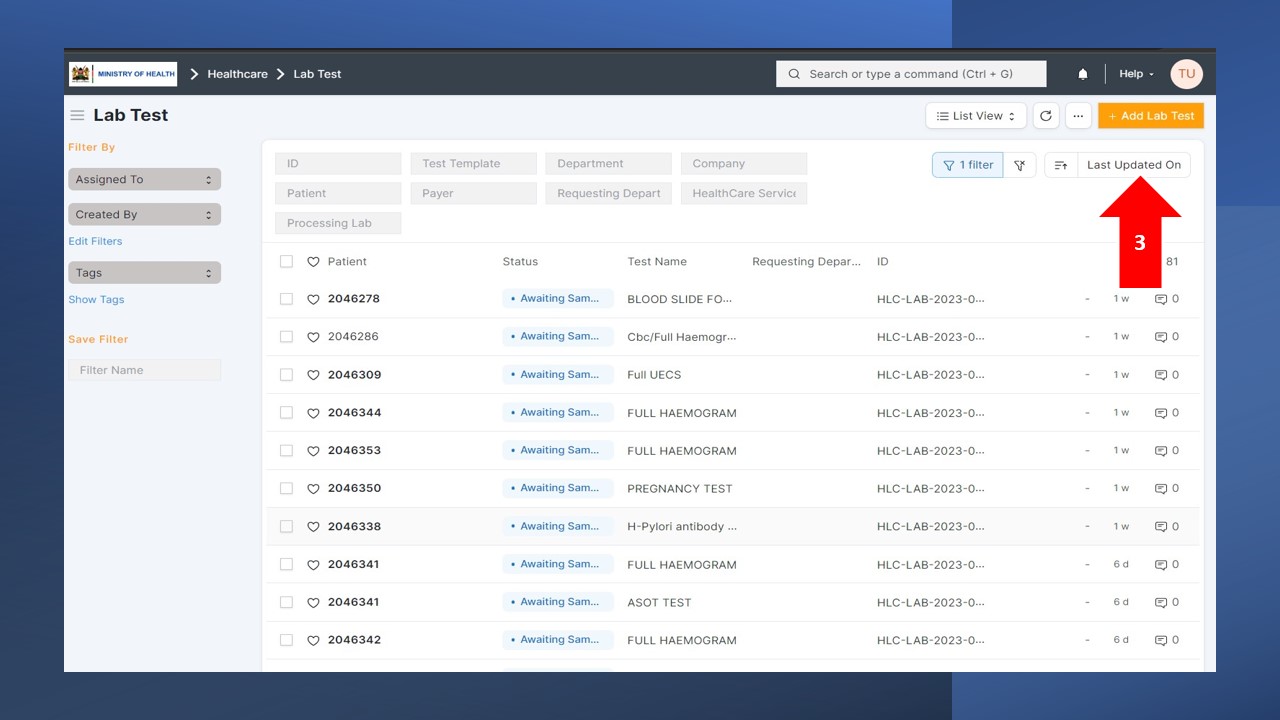
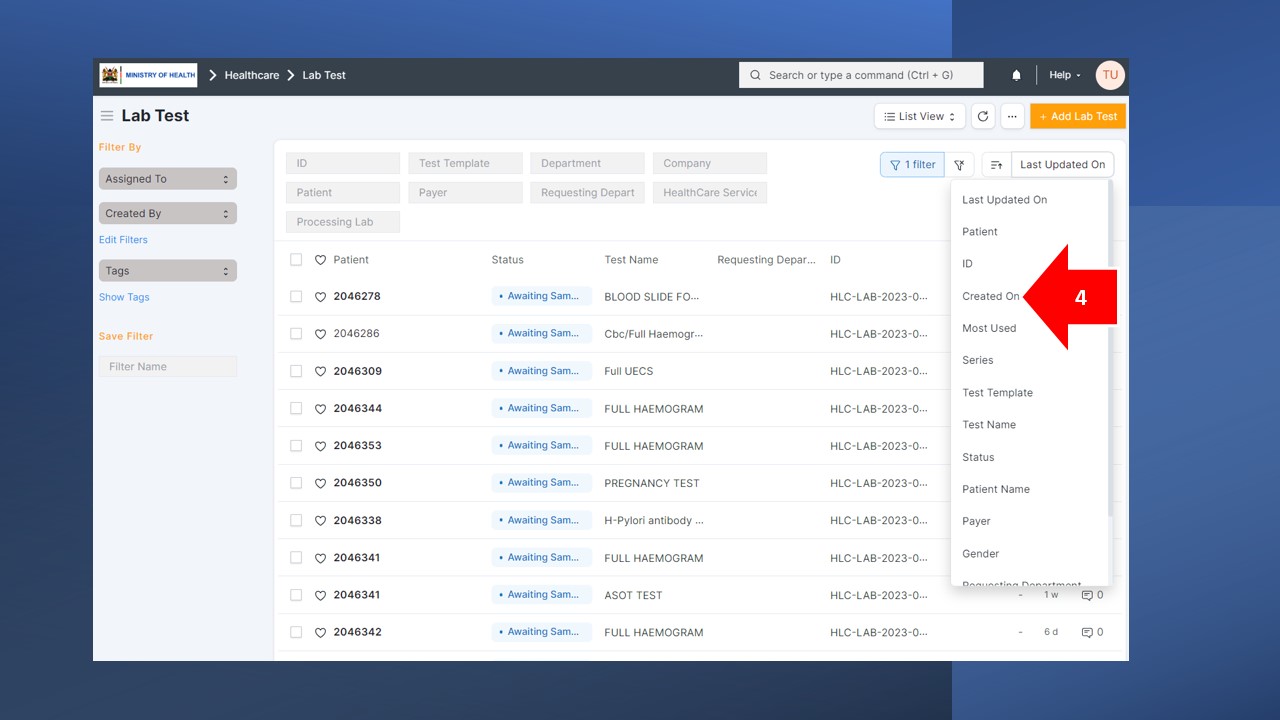
A window will open showing the list of patients awaiting sampling as shown below. Click on the "Last Updated On" button and select "Created On" from the dropdown list to change the order of patients' list to the earliest/first.
Patients' name Column has been deliberately hidden
Searching for a patient is done using Filters. To search using the patient name, follow the steps below.
- Click on "Filter" Icon.
- Click on the Field shown in step 2 and type "Patient Name" filter to change the type of filter you want to apply.
- Select "Patient Name" once it appears in the dropdown list.
- Click on the Field shown in step 4 and type the patient name you are searching for. Select once it appears in the dropdown list
- Click "Apply Filters" to apply.
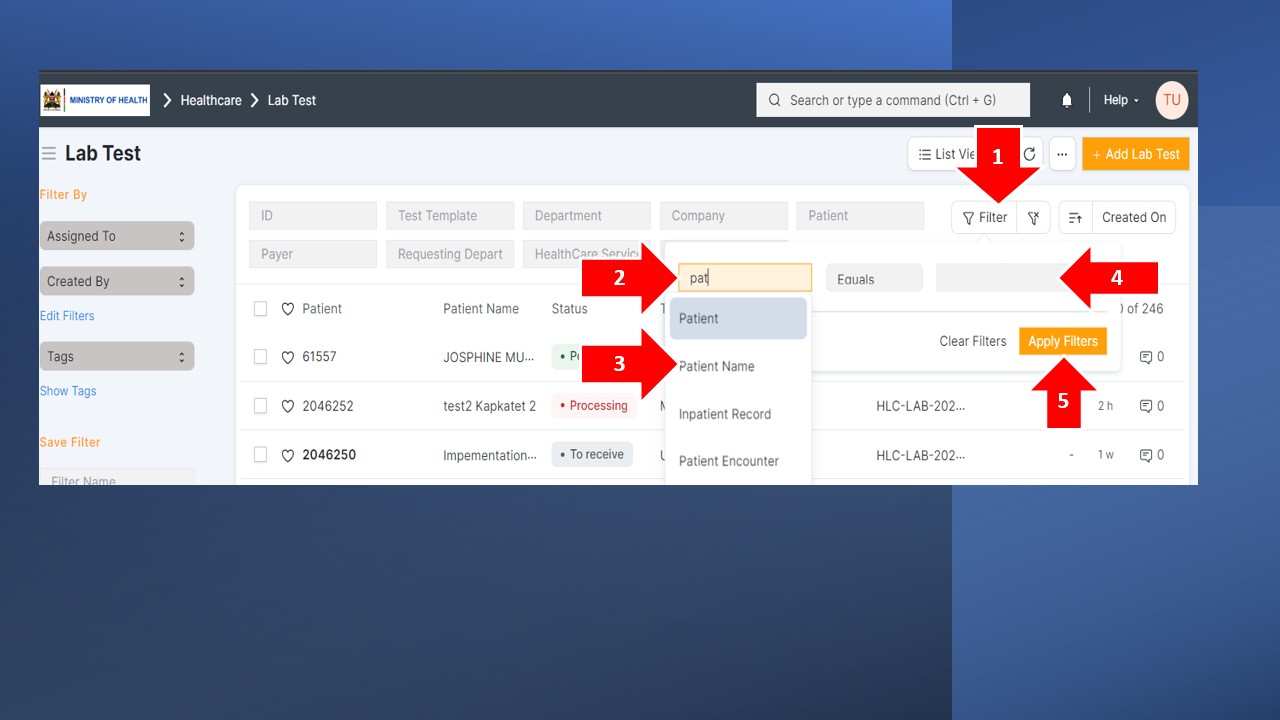
Follow the steps above to change the type of filter you want to apply. e. g ID, test name, etc.
Once the patient you are searching for has been listed, click on the Patient ID to open the lab form.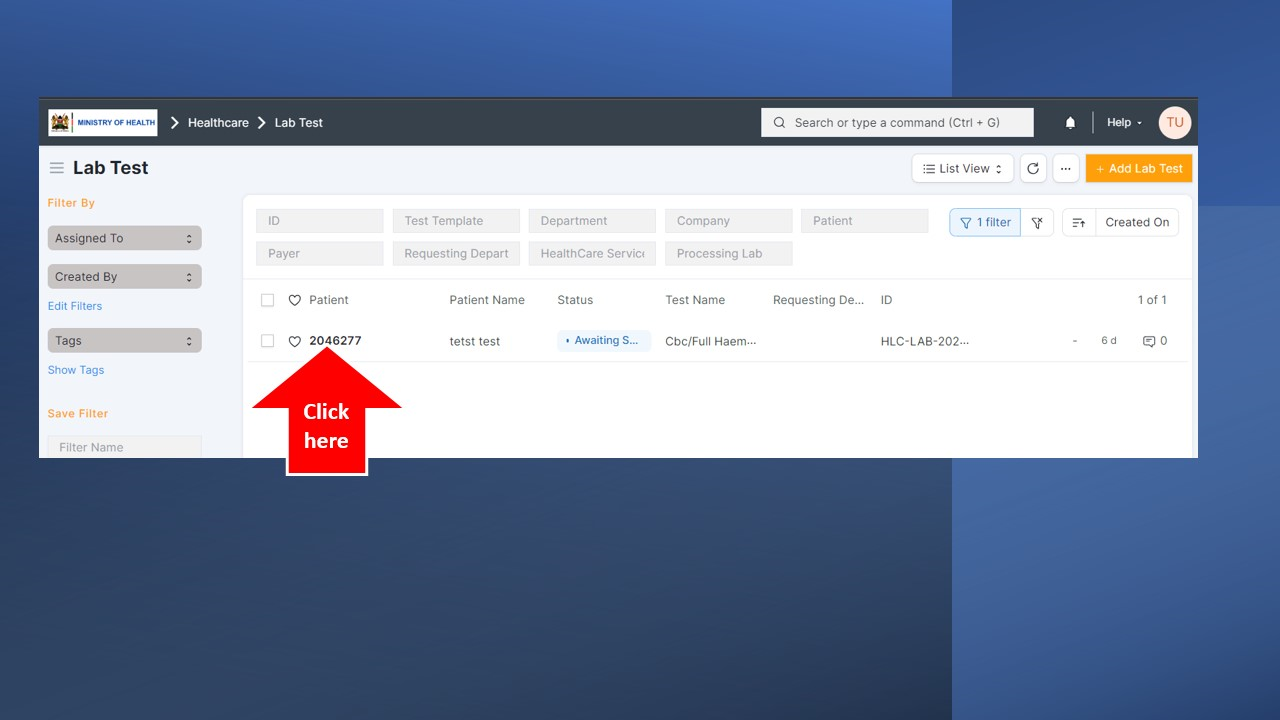
Carefully check the lab tested that has been ordered and collect samples from the patient.
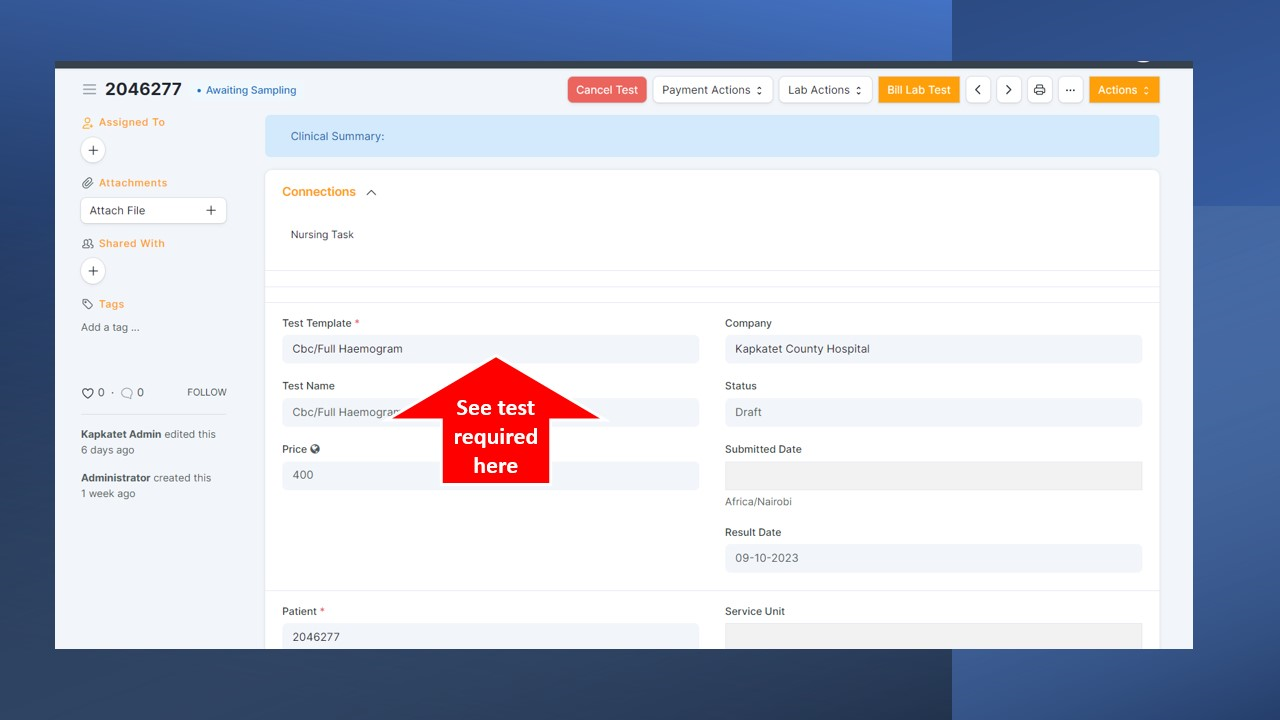
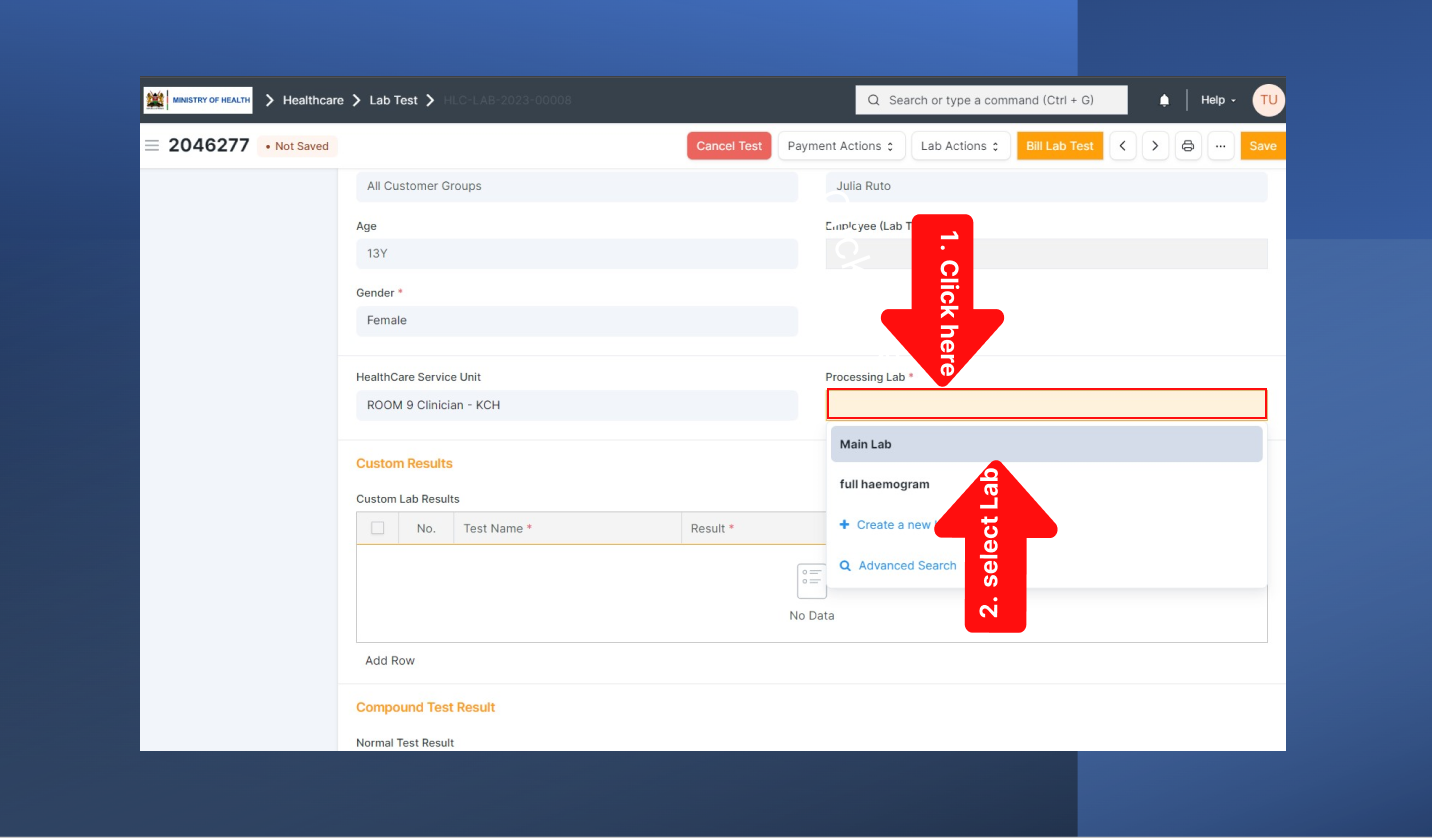
Scroll down the form and fill the processing lab by selecting from the dropdown list as shown below.
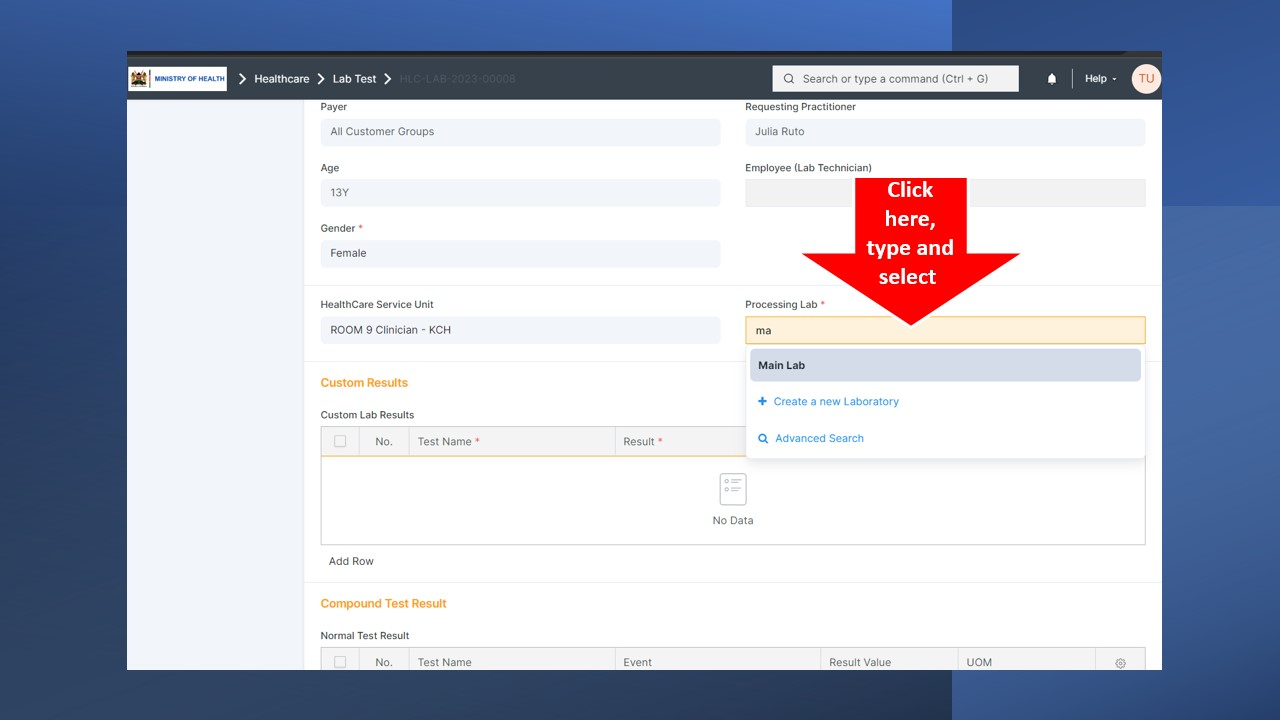
Once you have collected samples from the patient, click and select the processing lab from the dropdown list as shown below and click "Save" when prompted.
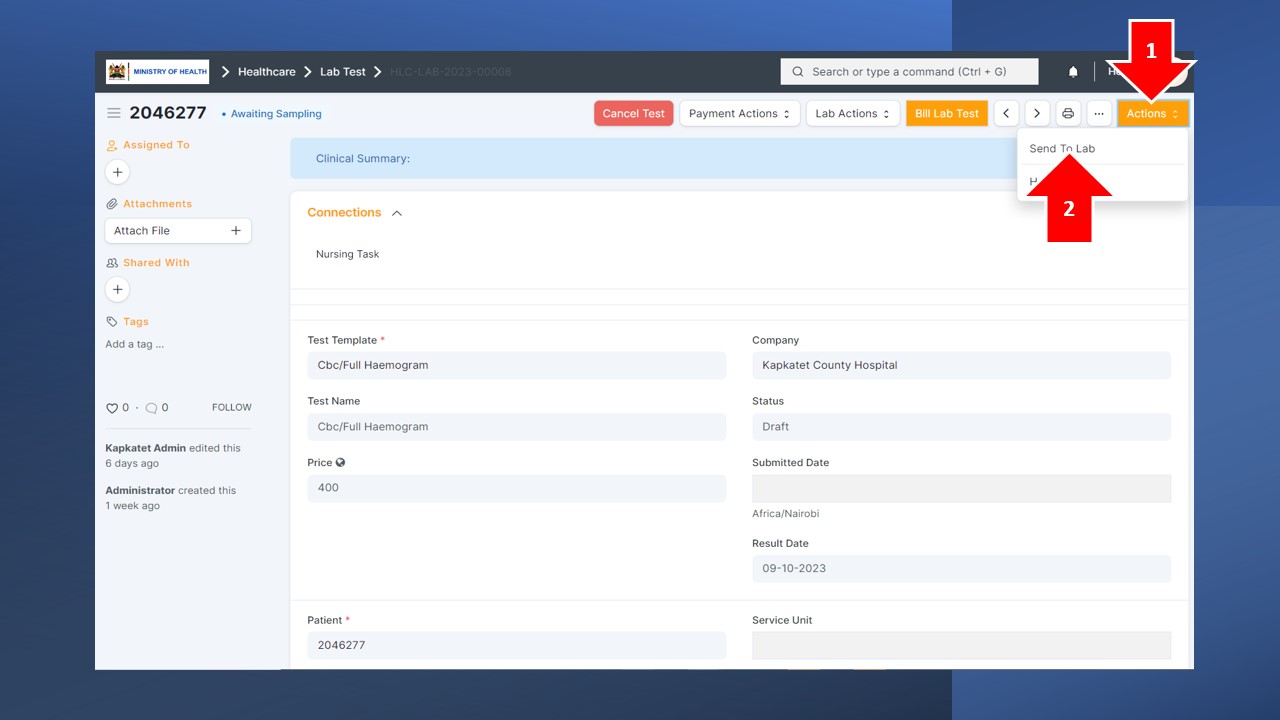
Next, click on "Actions" button at the right top corner and select " Send to Lab". This action will automatically queue the sample(s) for testing by the lab tech.
iv. To Receive
Description: At this stage, the collected sample is in transit or scheduled to be delivered to the laboratory for testing.
Action: Logistics or delivery personnel are responsible for ensuring that the sample is received securely and in a timely manner.
At this point, the lab technician confirms receipt of samples as requested/required. They may also request for retaking of samples from the patient. If satisfied with the samples and the form, click on "Receive Lab Test" button to start processing samples.

v. Processing:
Description: Once the lab receives the sample, it enters the processing phase. This is where the actual analysis and testing of the sample take place.
Action: Lab technologists or scientists conduct the tests, record results, and perform any necessary data analysis or interpretation.
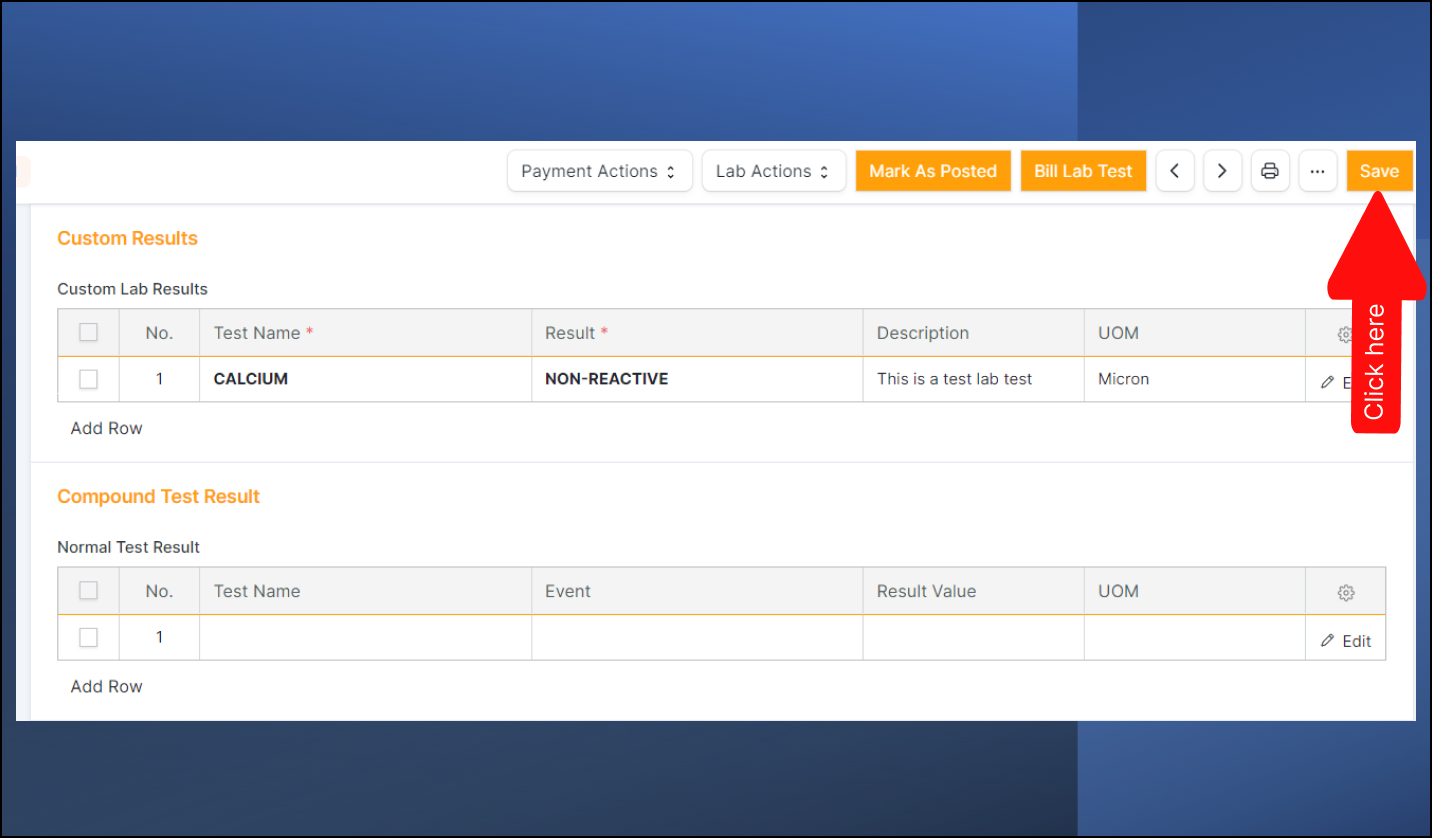
At this point, the lab technician processes the samples and records the results, as shown below. Notice how the status has changed from Receiving to processing
Fill in the results as shown below:
Click on "Add Row" then "Edit" Buttons.
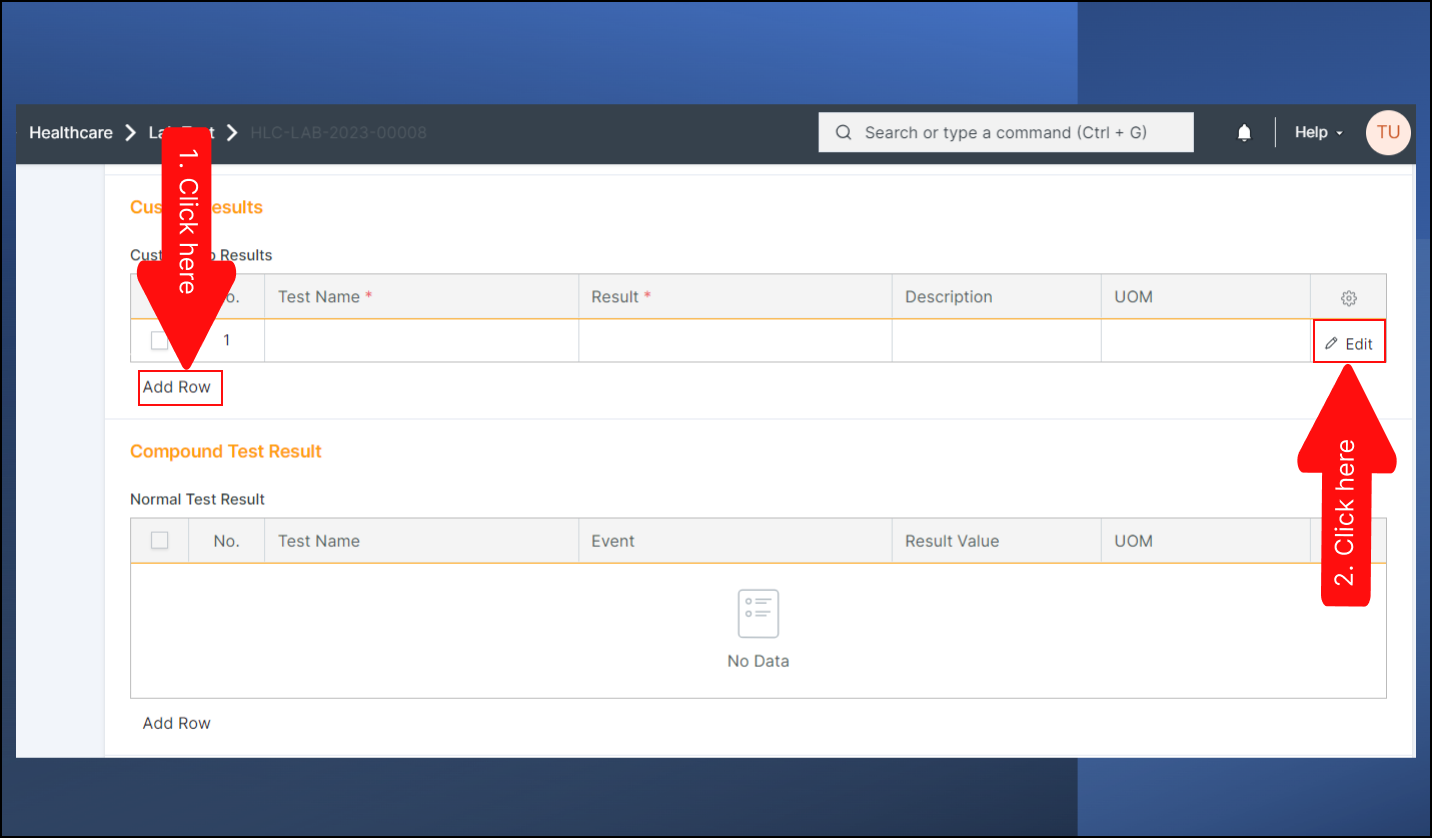
This action will open a new form. Fill the fields accordingly by selecting from the dropdown list or inputting values. Do the same if you have more than one test as well as Compound Test Results. Lastly, input Descriptive Result, Descriptive Test Result, Sensitivity Test Result, Comments, Medical Coding and a comment if any.
After filling contents of each form , click outside the form to automatically save the row.Click on the "Save" button to save.
Next, click "Actions" then " Forward for Verification" to send the test results for verification by a different personnel as shown. The status will change to "Awaiting verification"
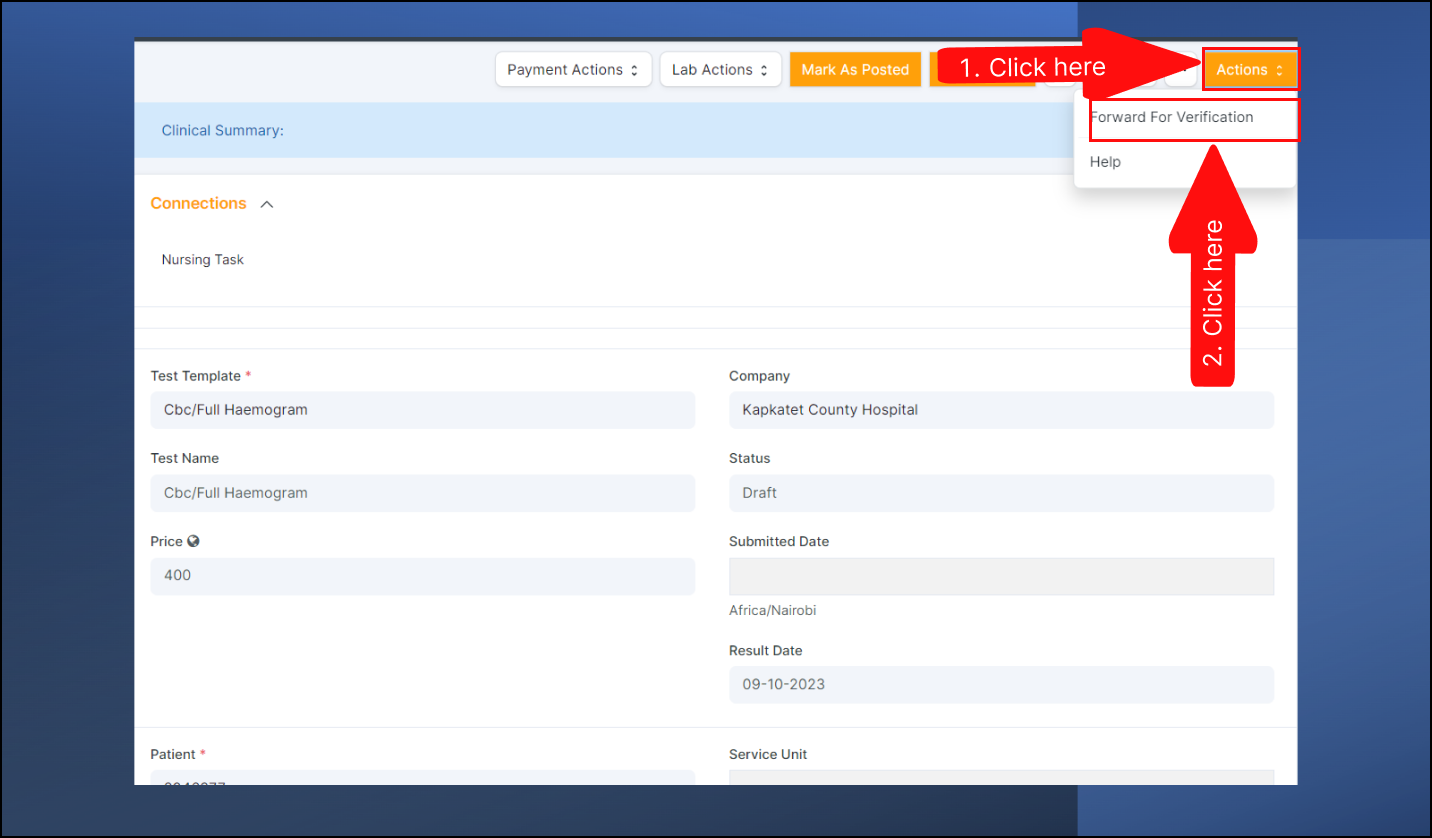
vi. Awaiting Verification:
Description: After the initial processing, the test results may need to be verified for accuracy and quality control purposes. This step ensures that the results are reliable.
Action: Quality control personnel or senior lab staff review the test results and confirm their accuracy. Any discrepancies are addressed before proceeding.
Once you are satisfied with the test results, click "Actions" then "Post Lab Results" as shown below.
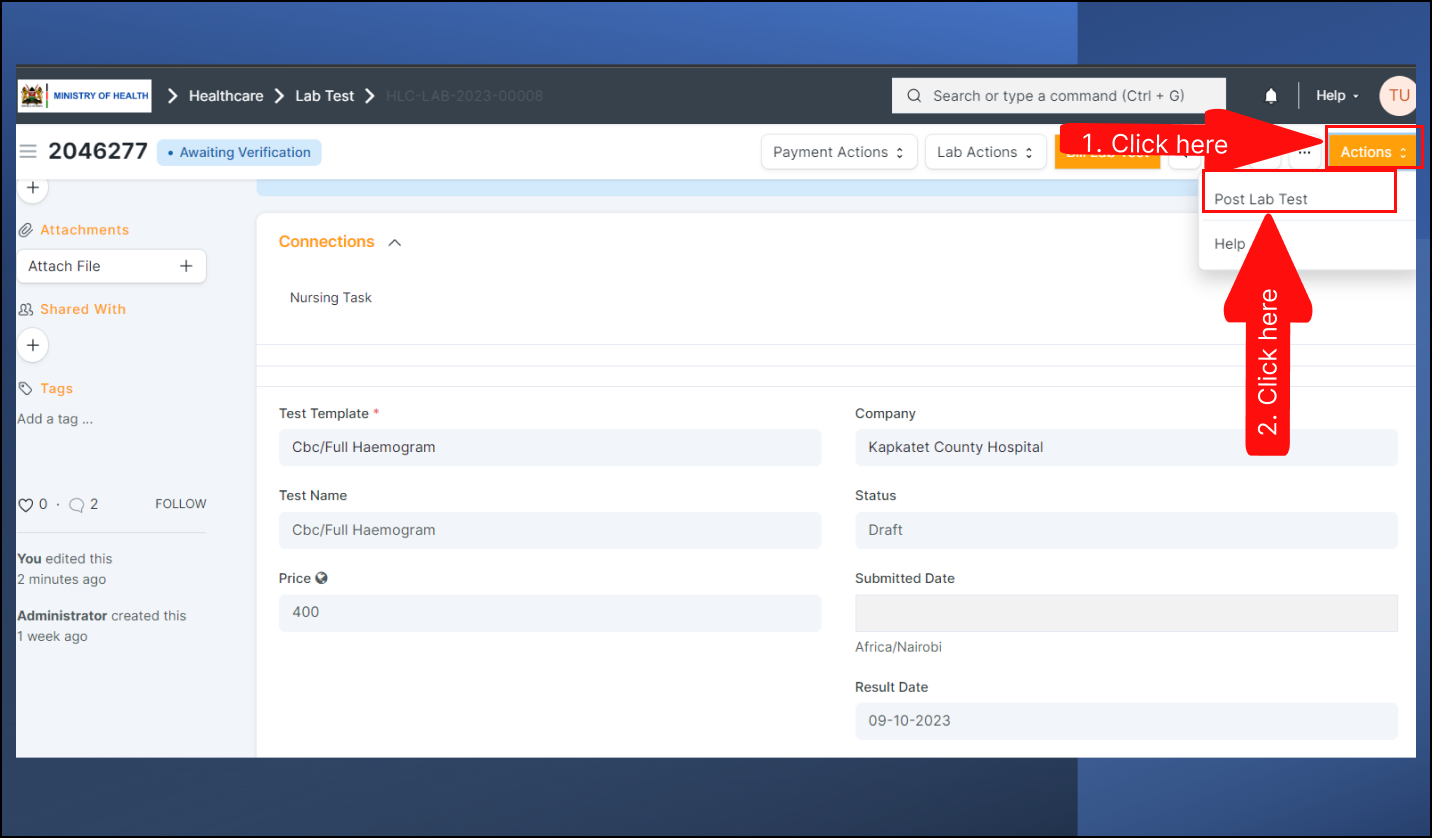
This action sends the lab results to the doctor or clinician who had ordered them.
To amend the results, click on " Amend Results" button, accept to proceed when prompted and amend the results accordingly. This action will return the results to "Awaiting Verification" stage.
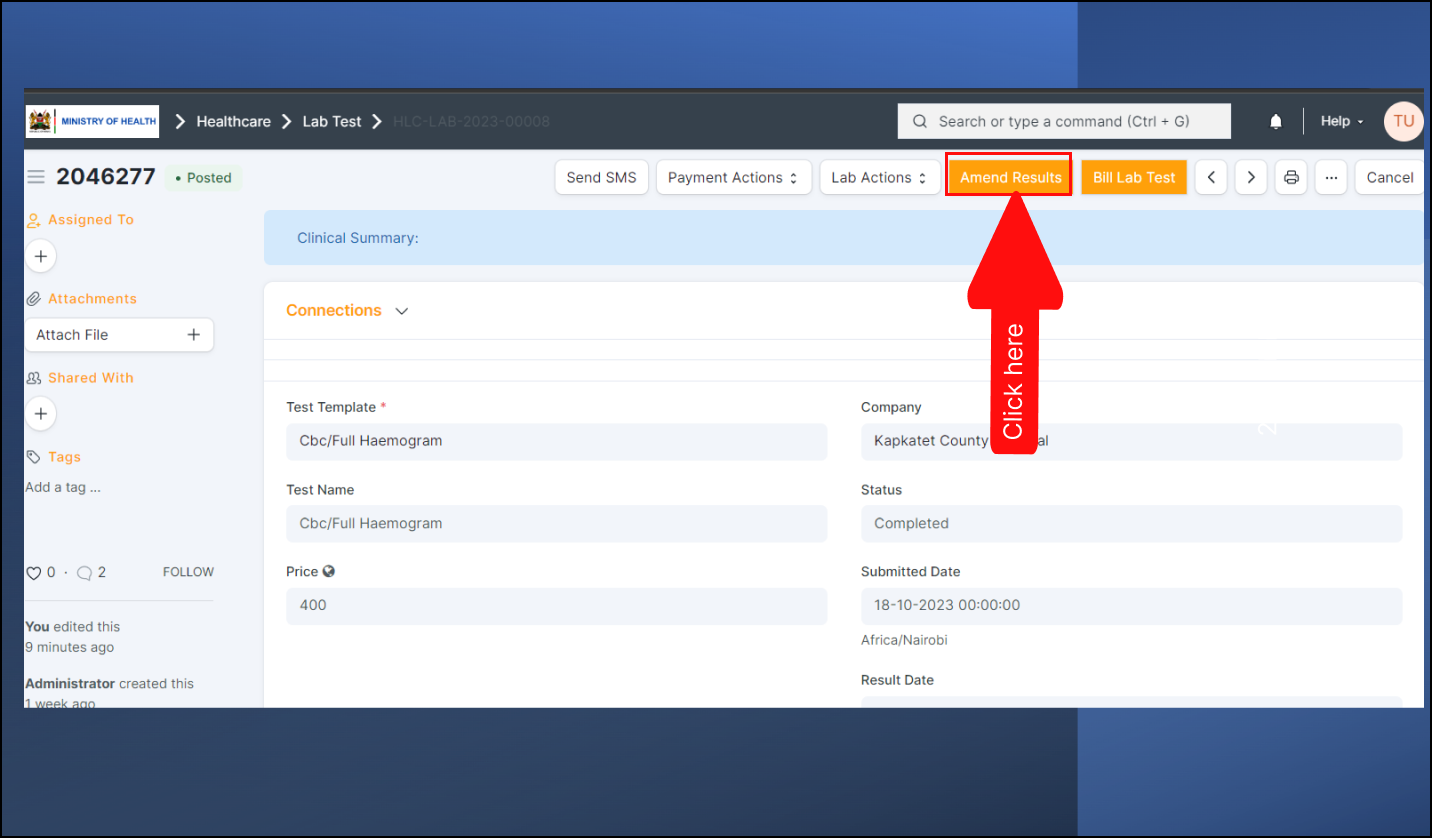
vii. Posted:
Description: In the context of a lab test workflow, "Posted" signifies that the test results have been finalized, validated, and are ready for distribution to the requesting healthcare provider or patient.
Action: The lab reports are typically released to the healthcare provider electronically or through secure channels for review and further medical decision-making.
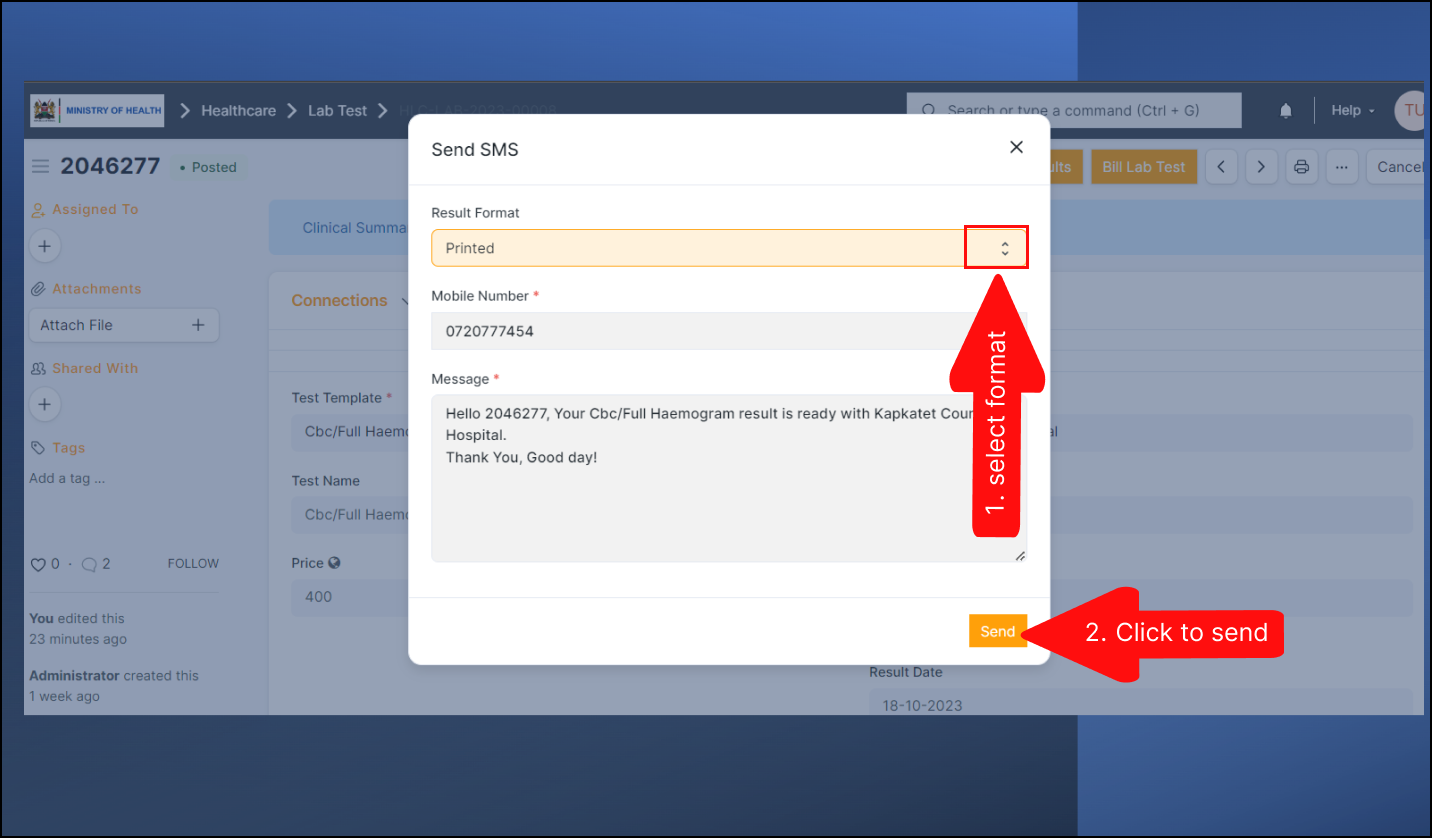
Click "Send SMS" to notify the patient that the results are out as shown below.

The message will be in the format below. Click the arrows shown to select results format(either email or printed" then click "Send" to notify the patient.
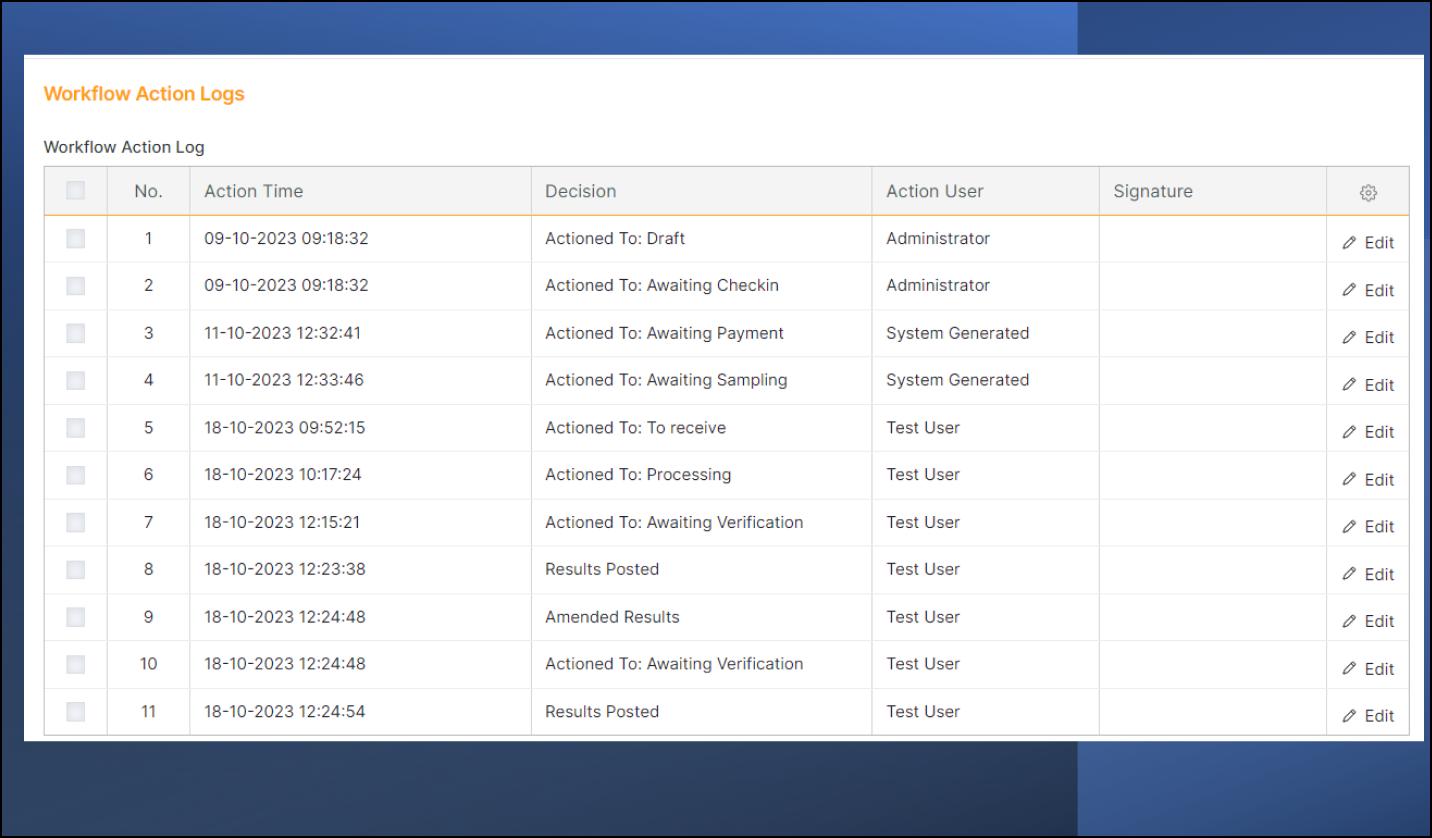
WorkFlow Logs
These logs show every action that was performed on the lab samples of the patient.
Pharmacy / Drug management / Inventory
Forms - Design & Implementation
REQUIREMENTS
- To create forms the following are first required
- Dictionary Concepts which are the building blocks of the form.
- Form formulae: for forms with calculated values from different input fields in the form
How to create a Dictionary Concept
How to create a form
How to update a form
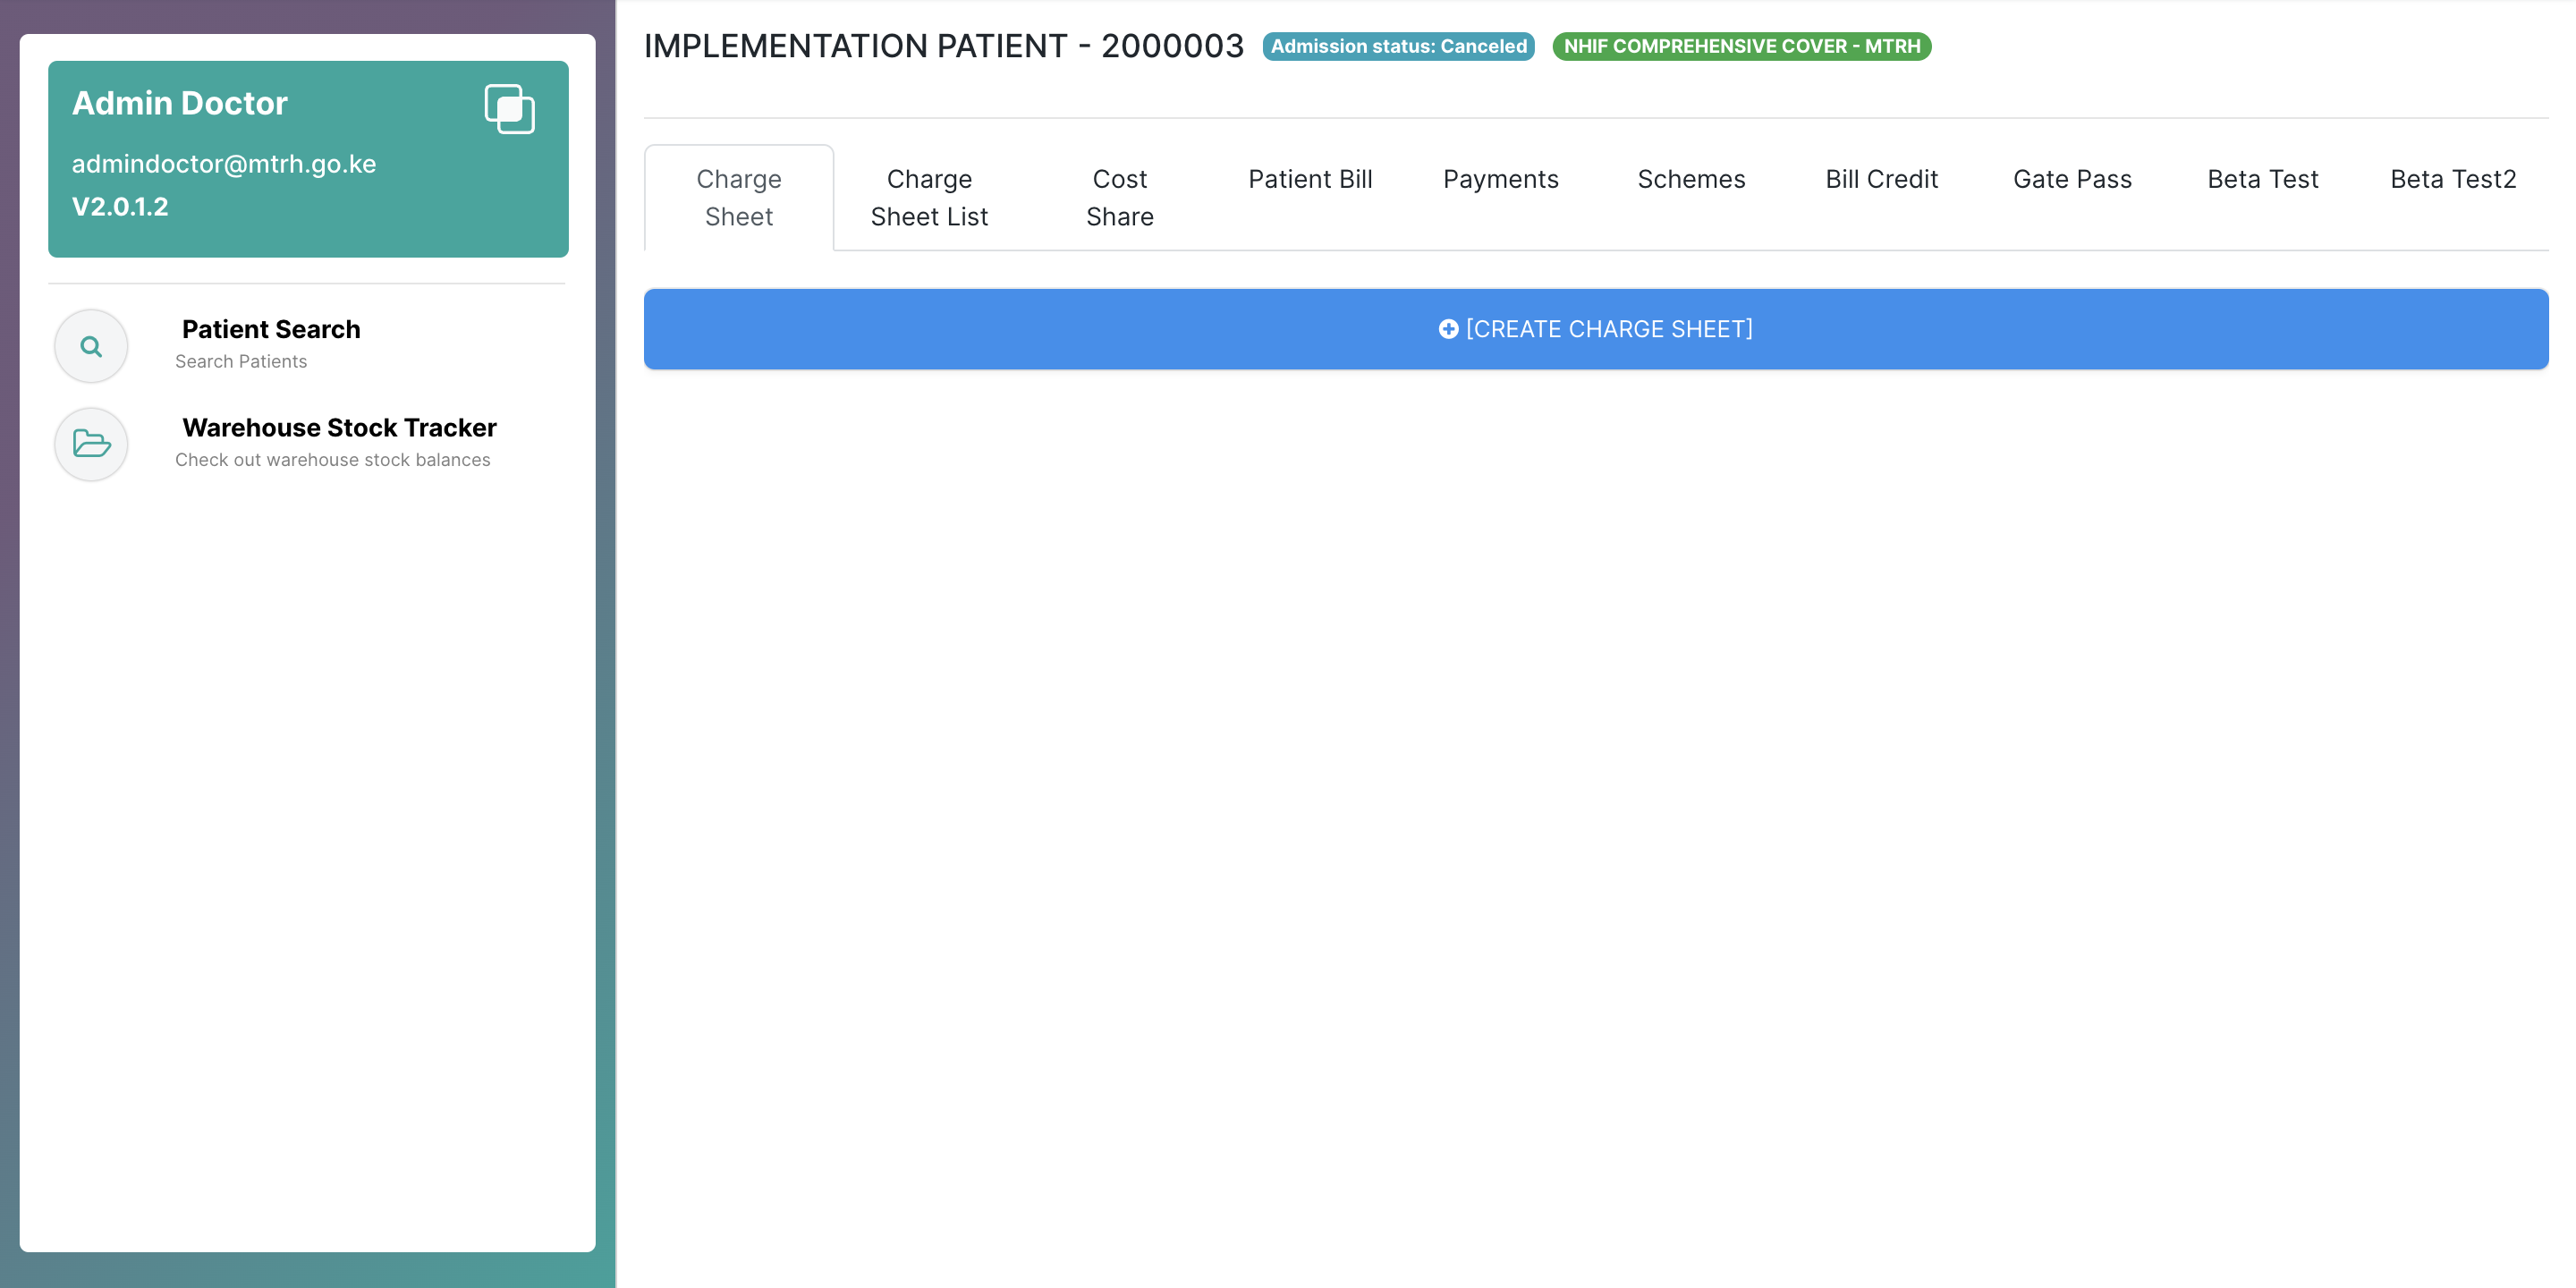
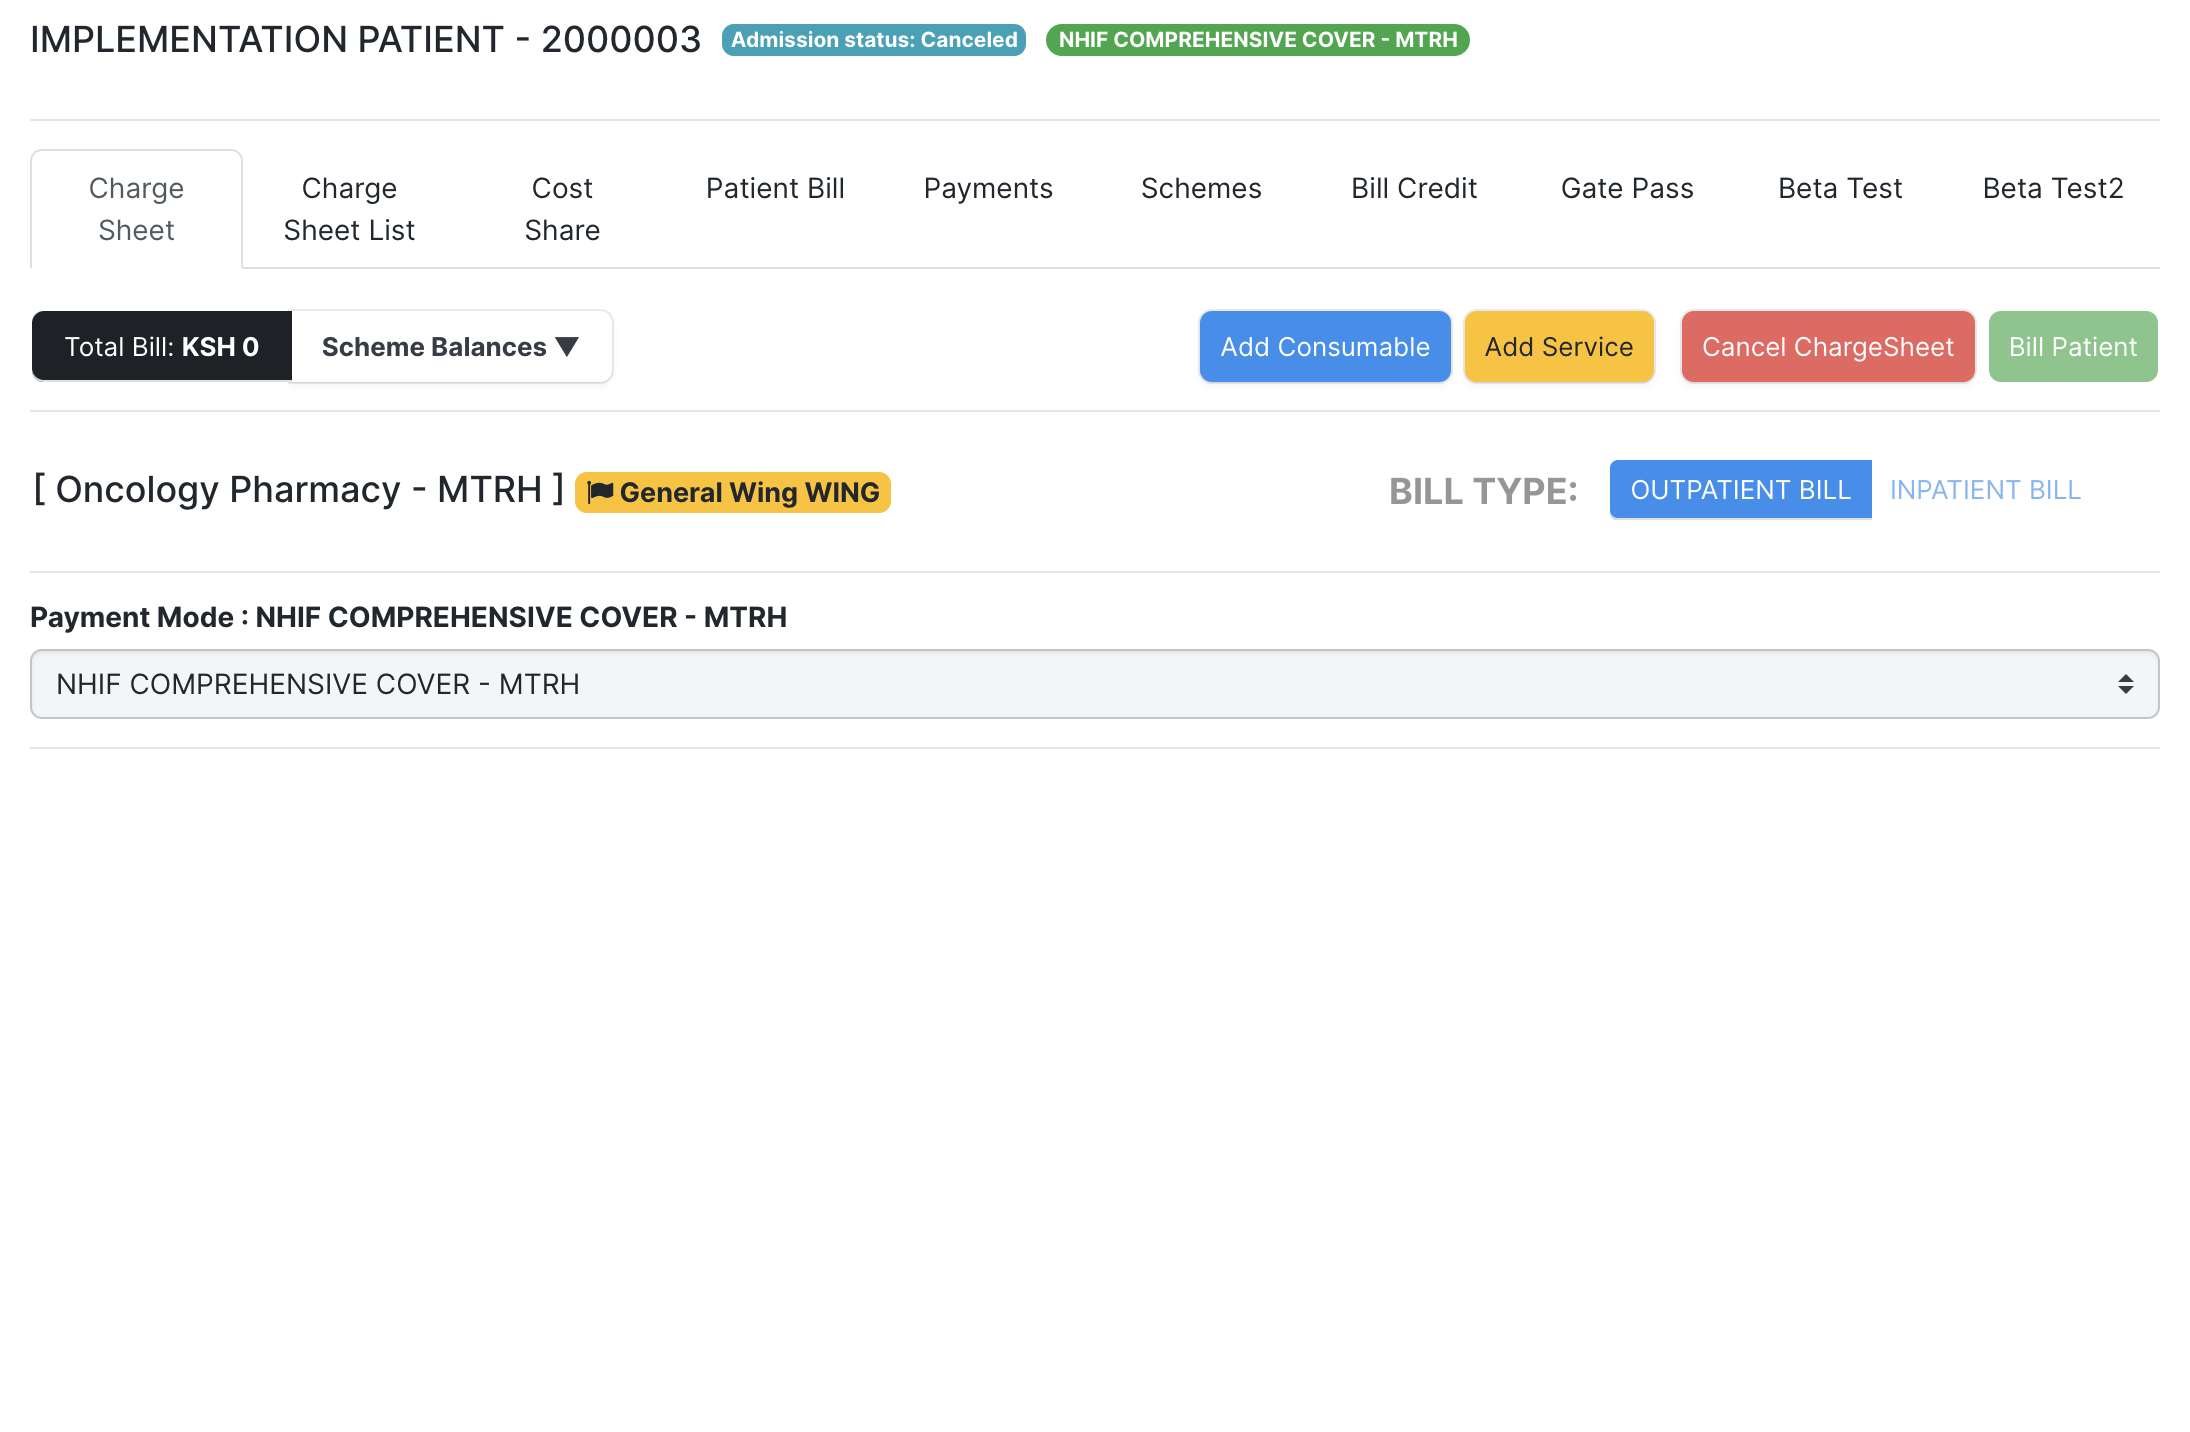
Billing, Charge Sheets & Consumables Management
Billing
Charge Sheets
1.Charge Sheet Creation
A charge sheet is a document used in billing of patients.During creation one would search for the patient's hospital number then click on the create charge sheet button as shown below.
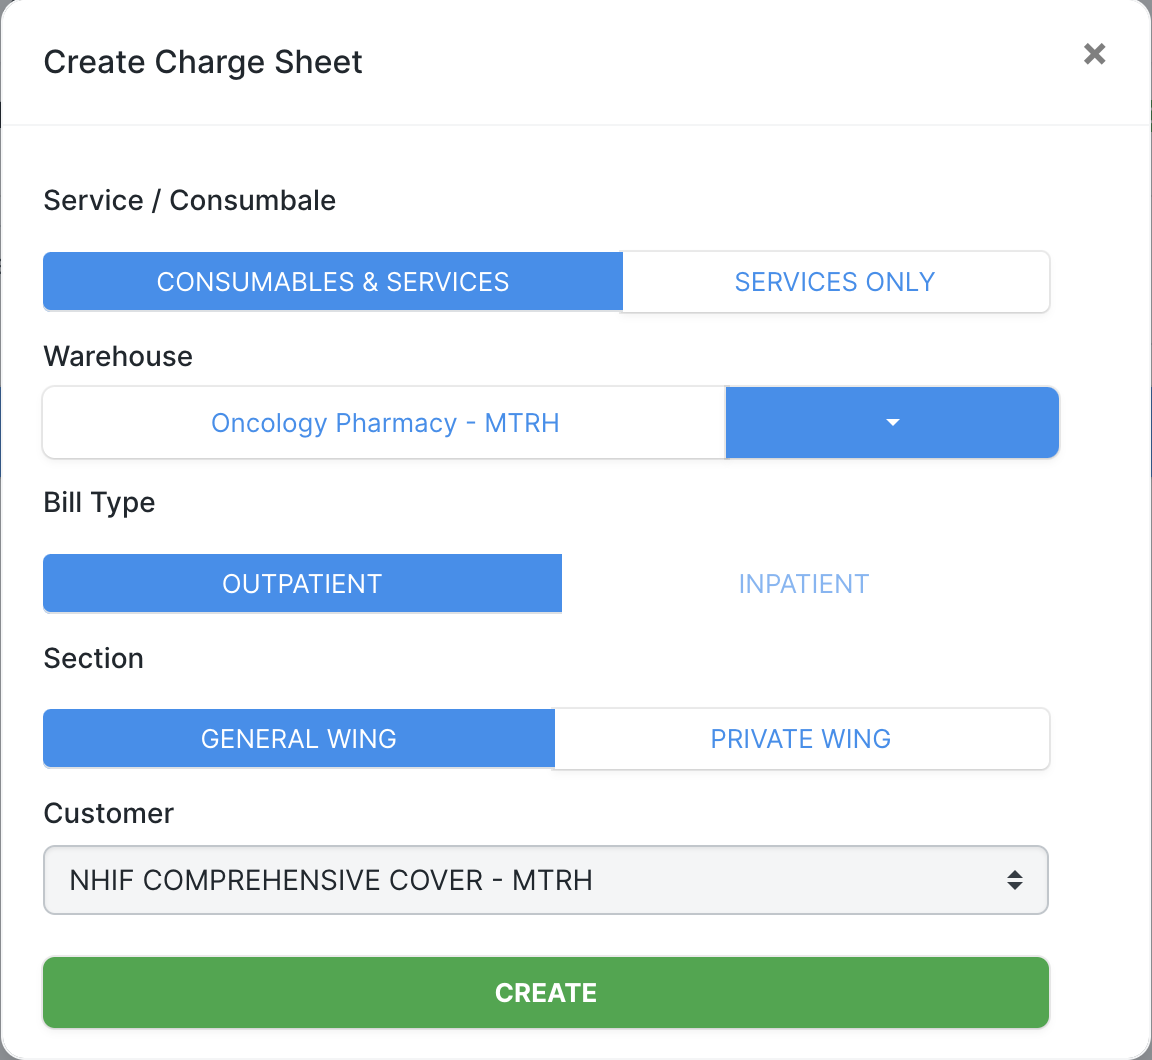
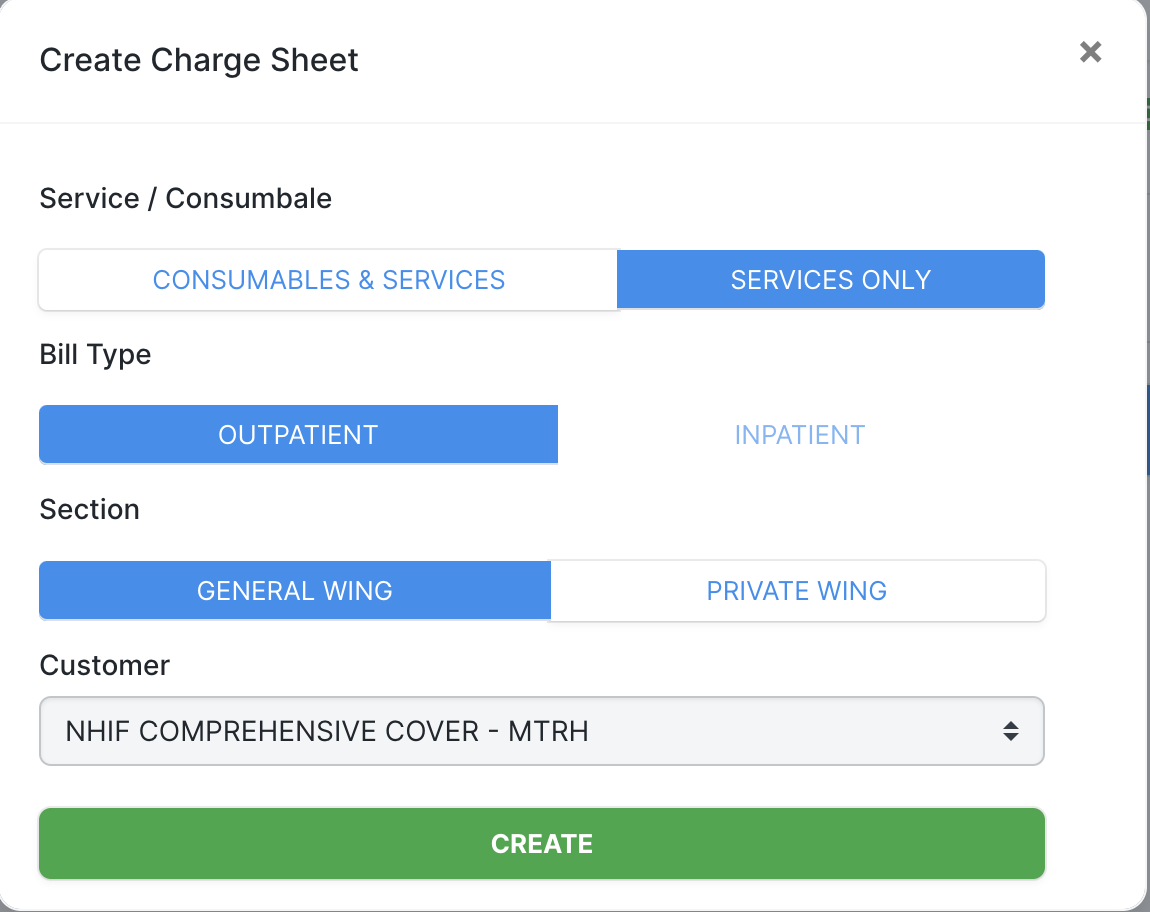
The dialog to create the charge sheet as shown would appear with the options as defined:
service/Consumable : The service option would create a charge sheet for services only whilst the services and consumables would have options for both services rendered by the institution and consumables with stocks.
Warehouse : Warehouse is the service point where the consumables are being dispensed from.
Bill Type: This would specify wether patient is inpatient or outpatient .
Section: This would specifyt wether private wing or general institution wing.
Customer : This would specify wether the payment is through self/cash or a scheme plan.
The outlines below illustrate this:
The interface below is the charge sheet page with options as defined:
Add Consumable: This option is active when billing a consumable&services charge sheet and would allow for billing of stockable items when clicked.
Add service: Used to add a service bill.
Cancel Charge Sheet: used to remove a draft and empty charge sheet not yet billed.
Bill Patient: Used to bill the items in the Charge Sheet.
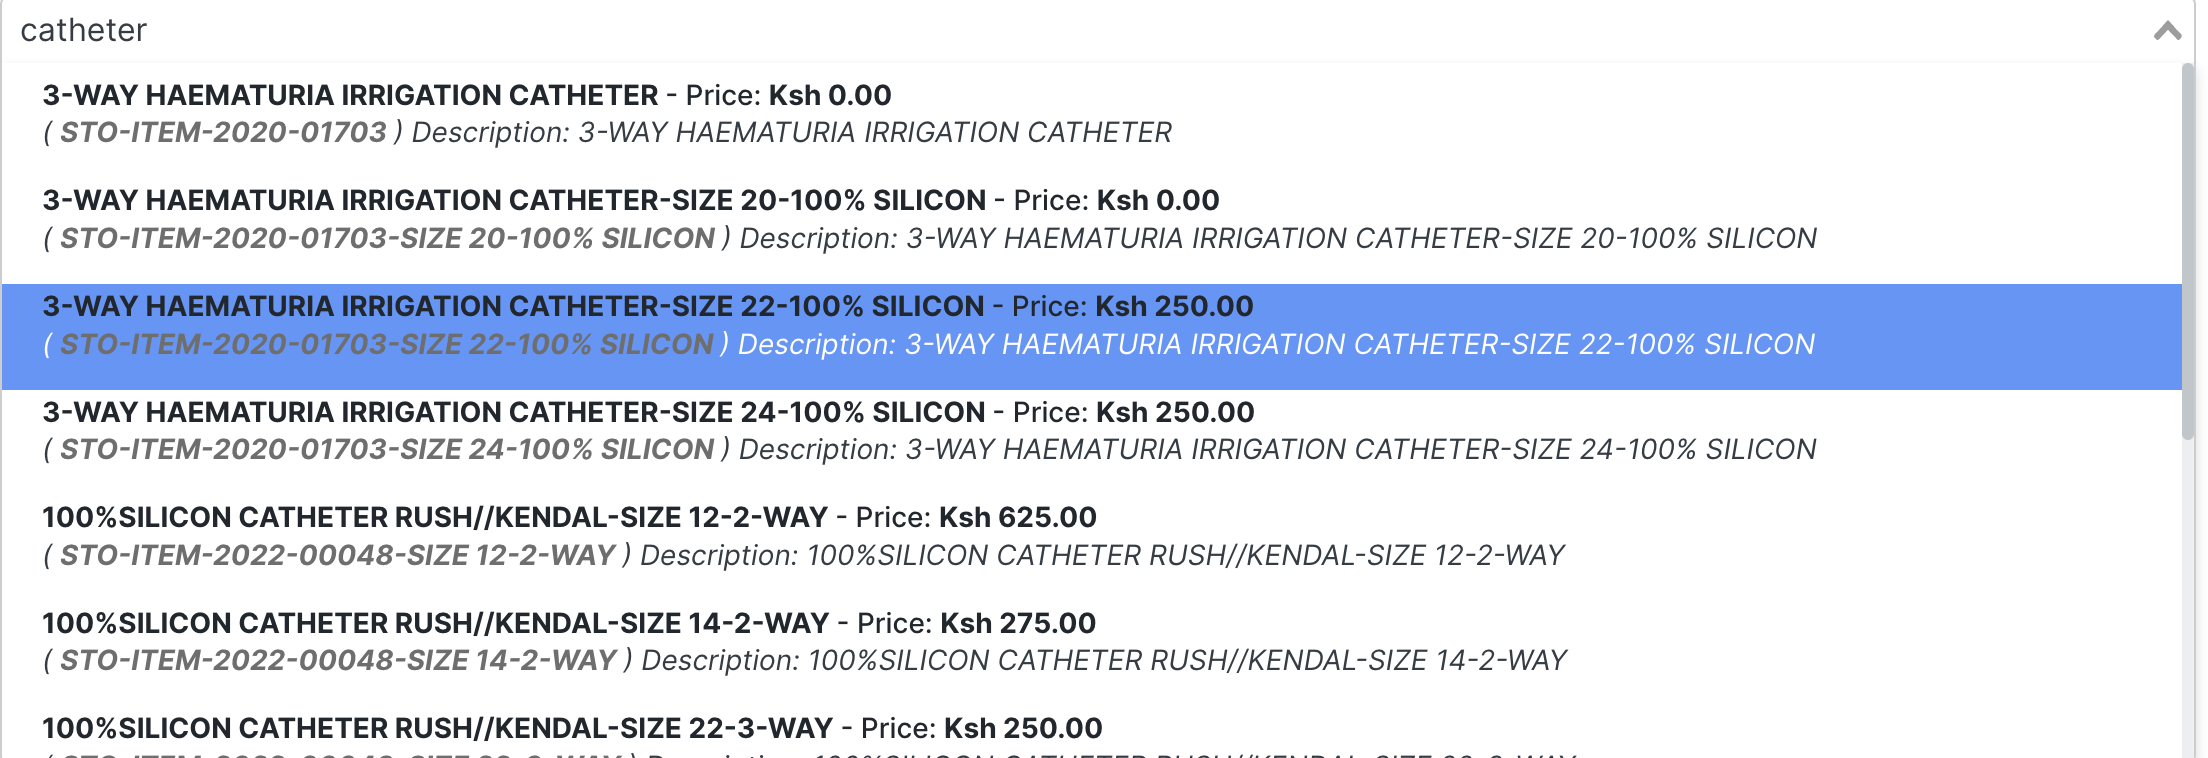
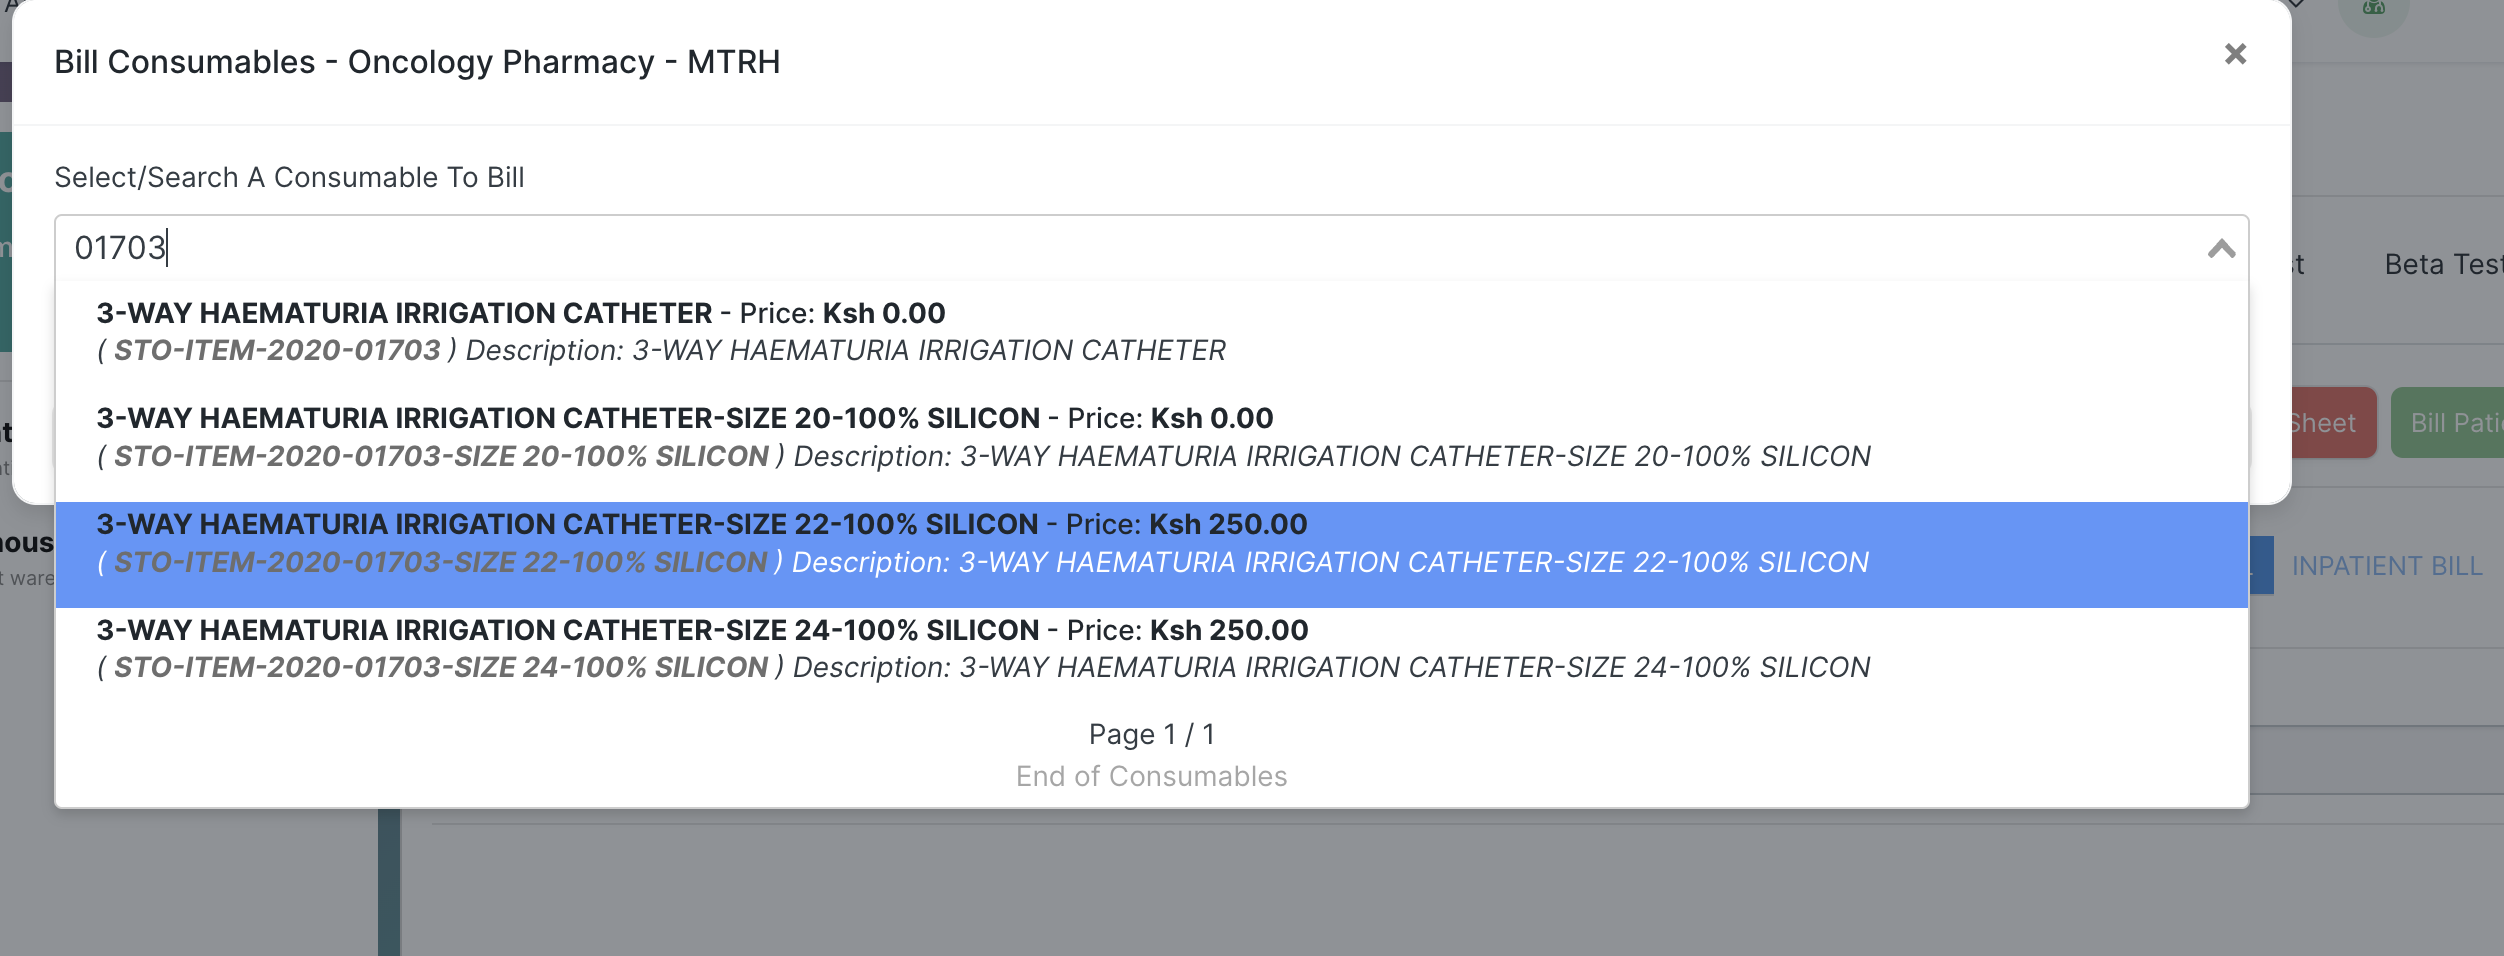
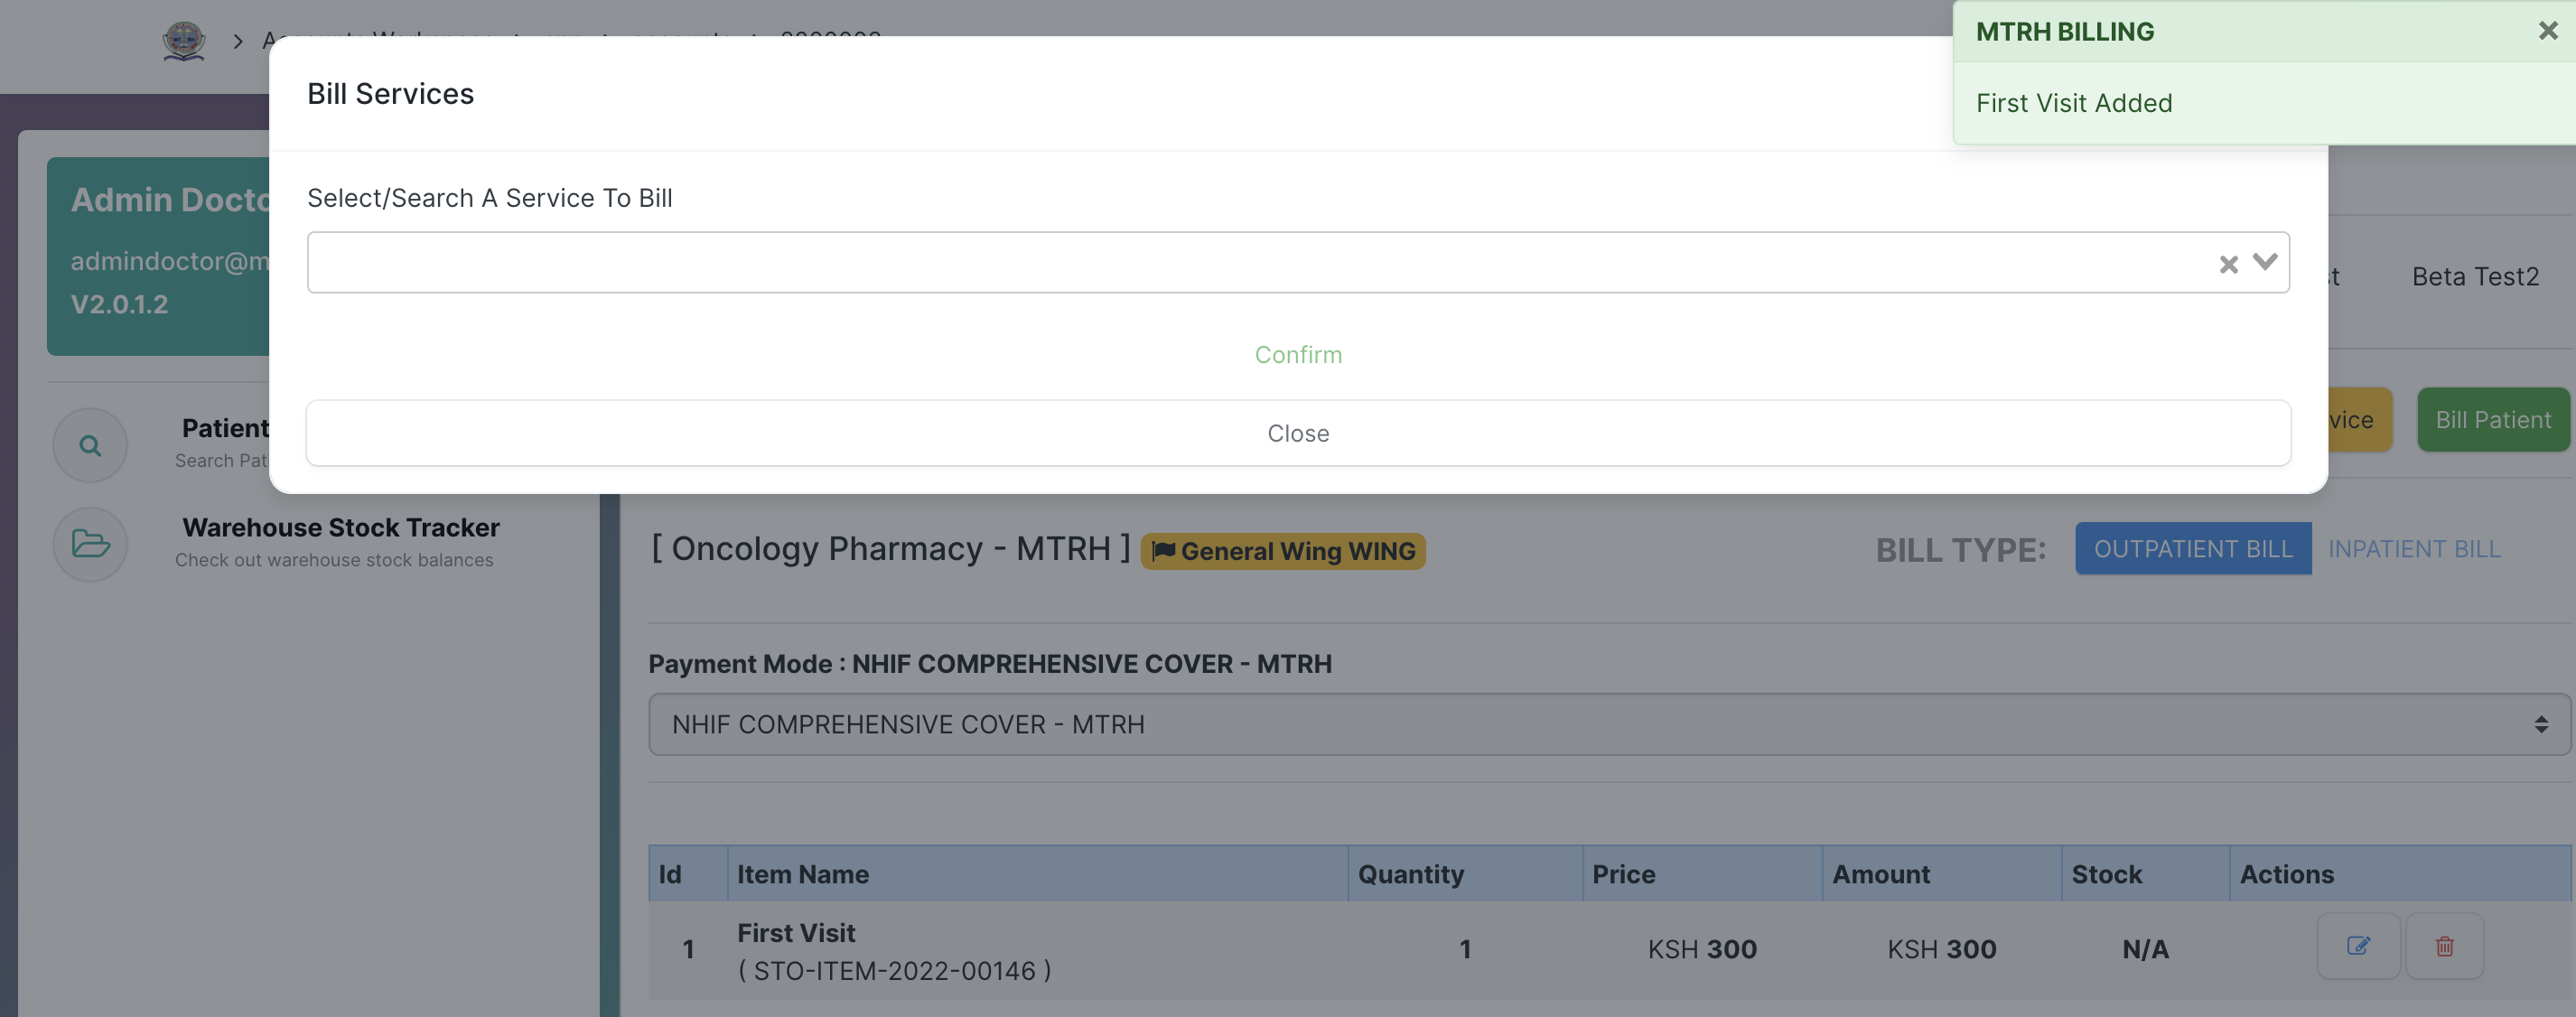
On clicking The add cosumable or service the dialog appears to select the desired item.
Items can be searched using name criteria or a unique item code.
Upon searching a stock tracker sub section for stockable items is shown as belo used to detect a specific ware house stock levels for the item.
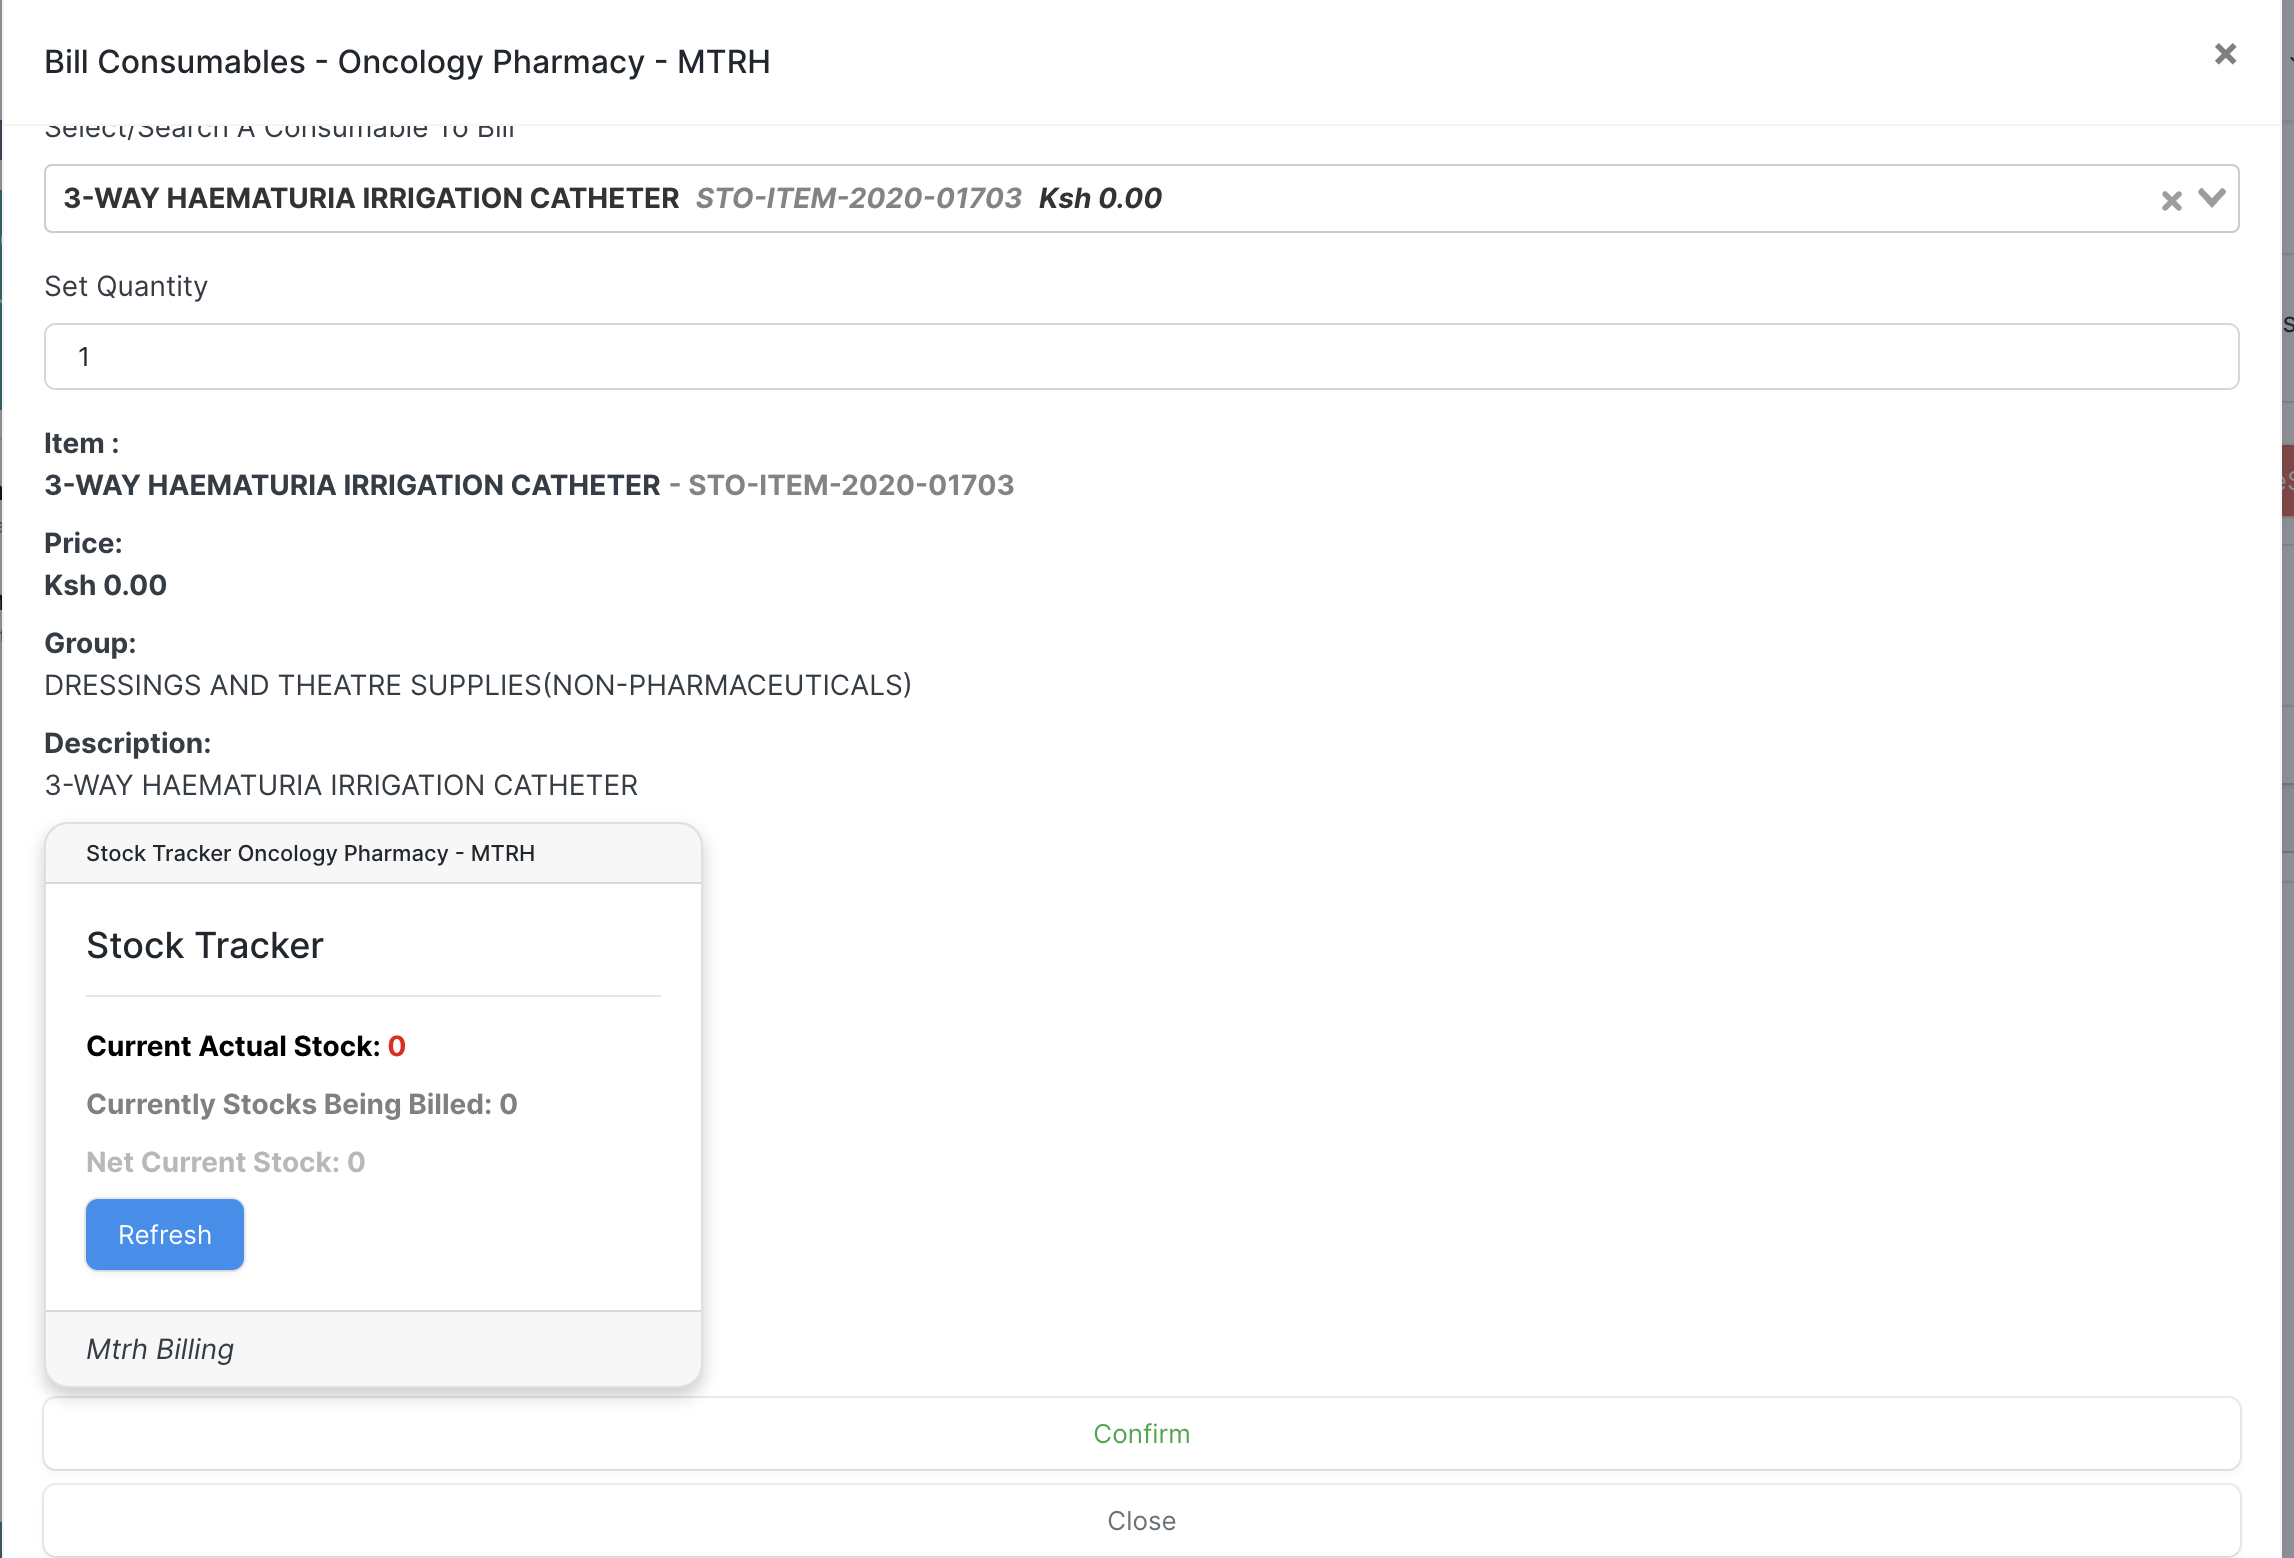
Upon adding ad item a message would appear and the item is added as below
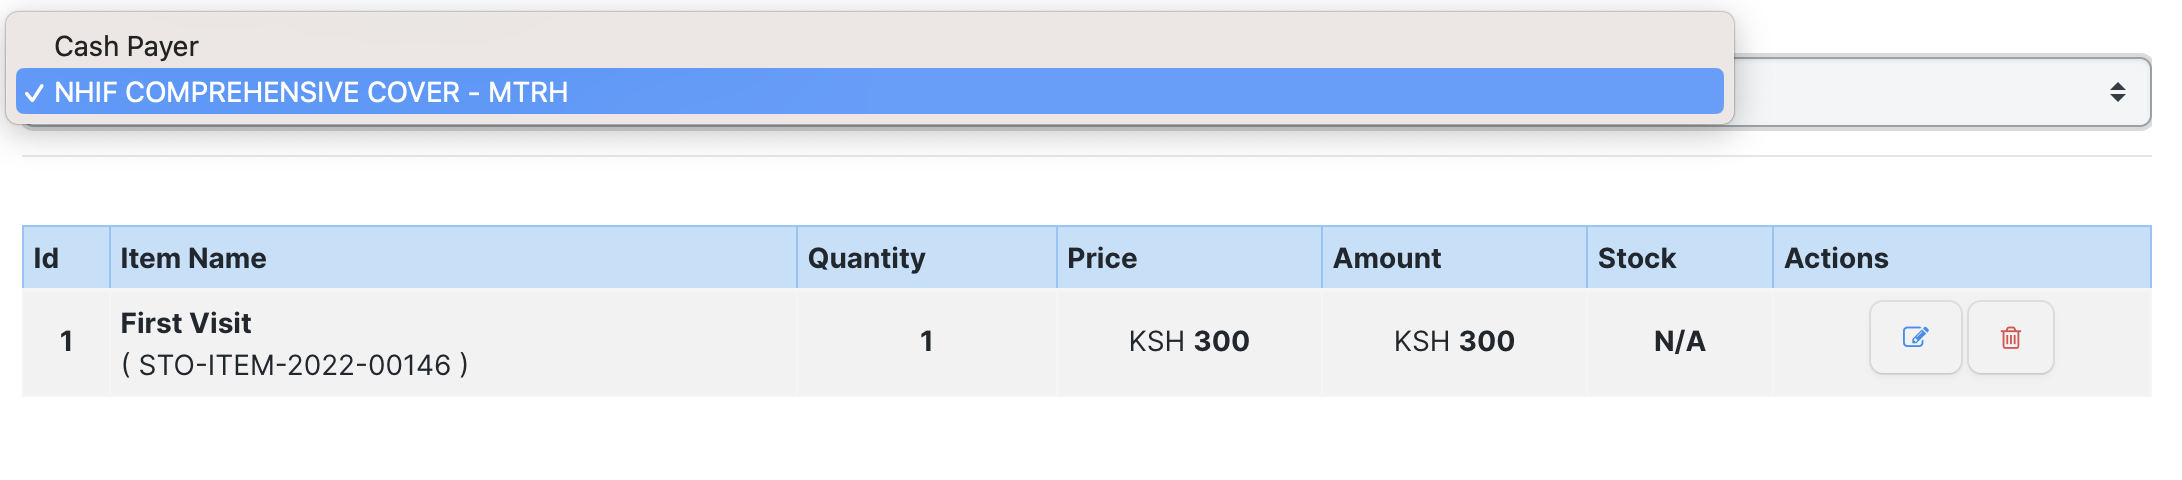
The payment method can be changed here as below.
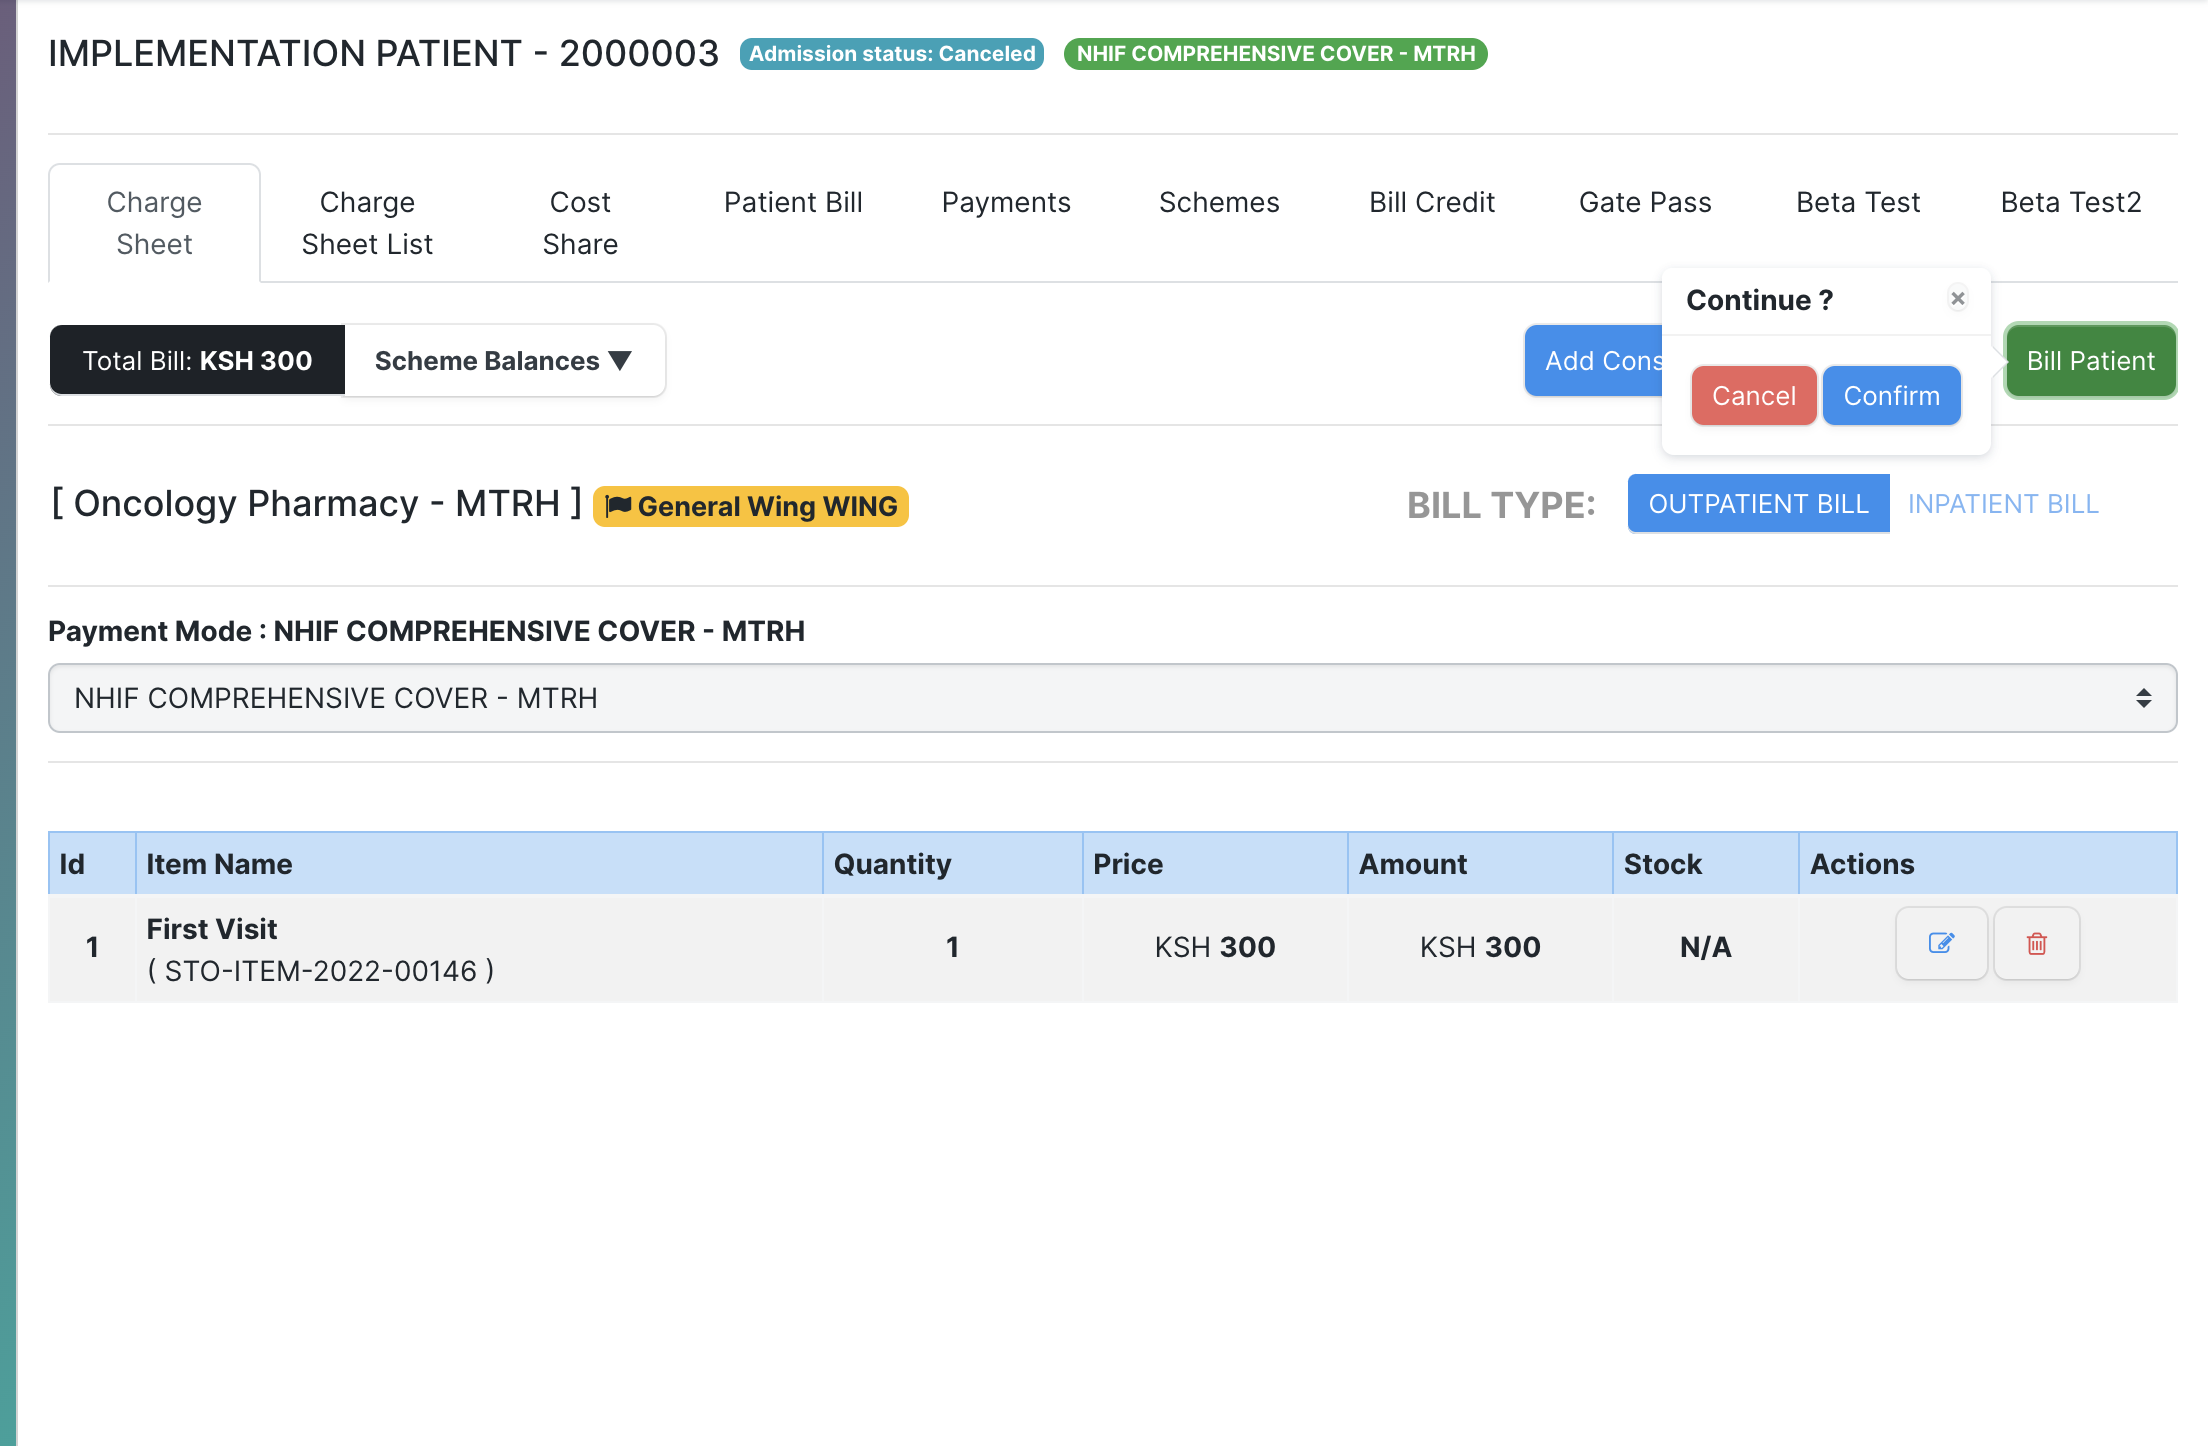
The Charge sheet can be billed as shown below upon confirming to continue it will be billed successfully.
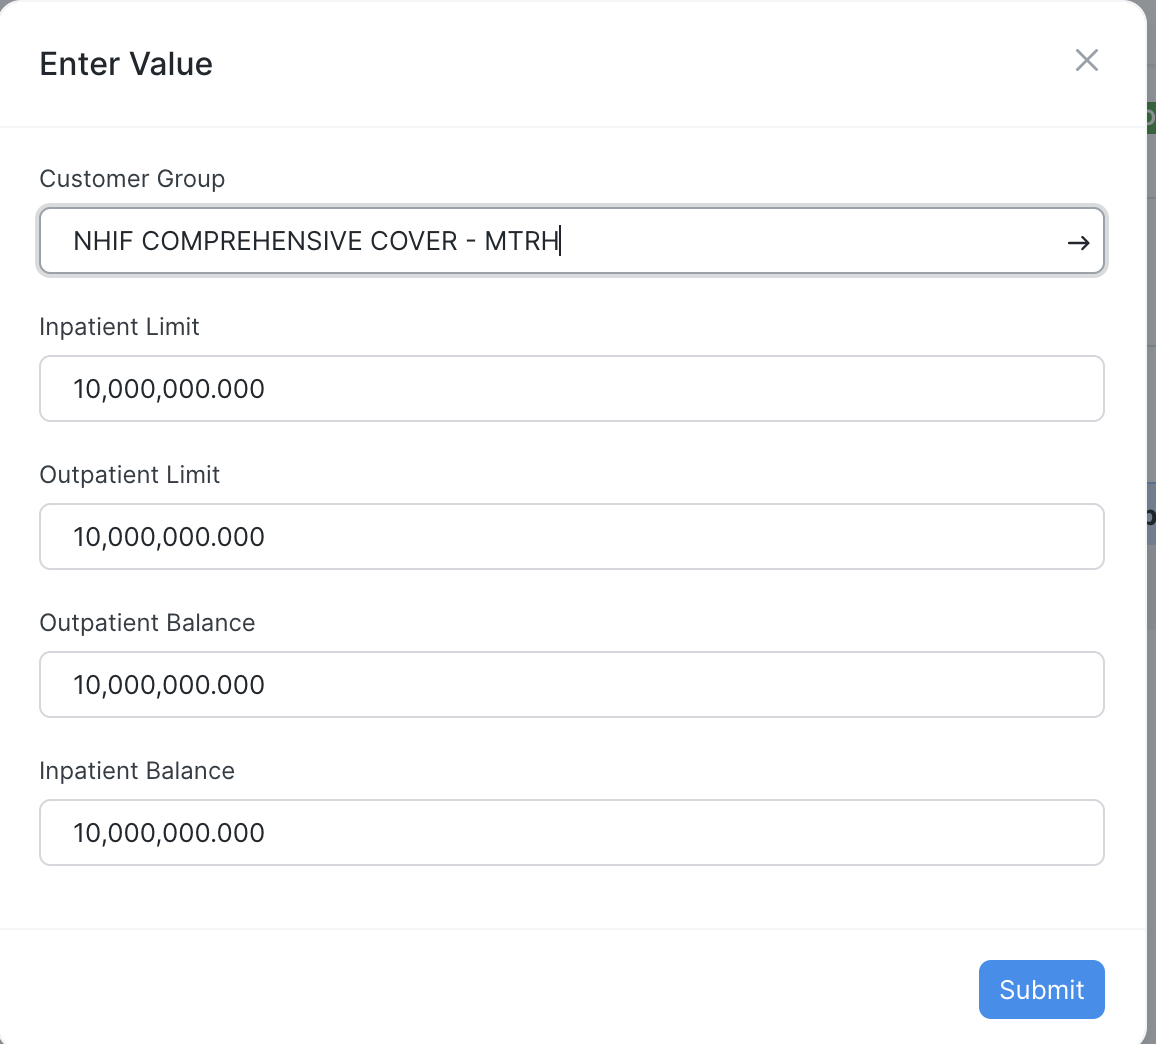
Schemes plans limits and balances can be set based on the patient's plan from the tab schemes illustrated below.
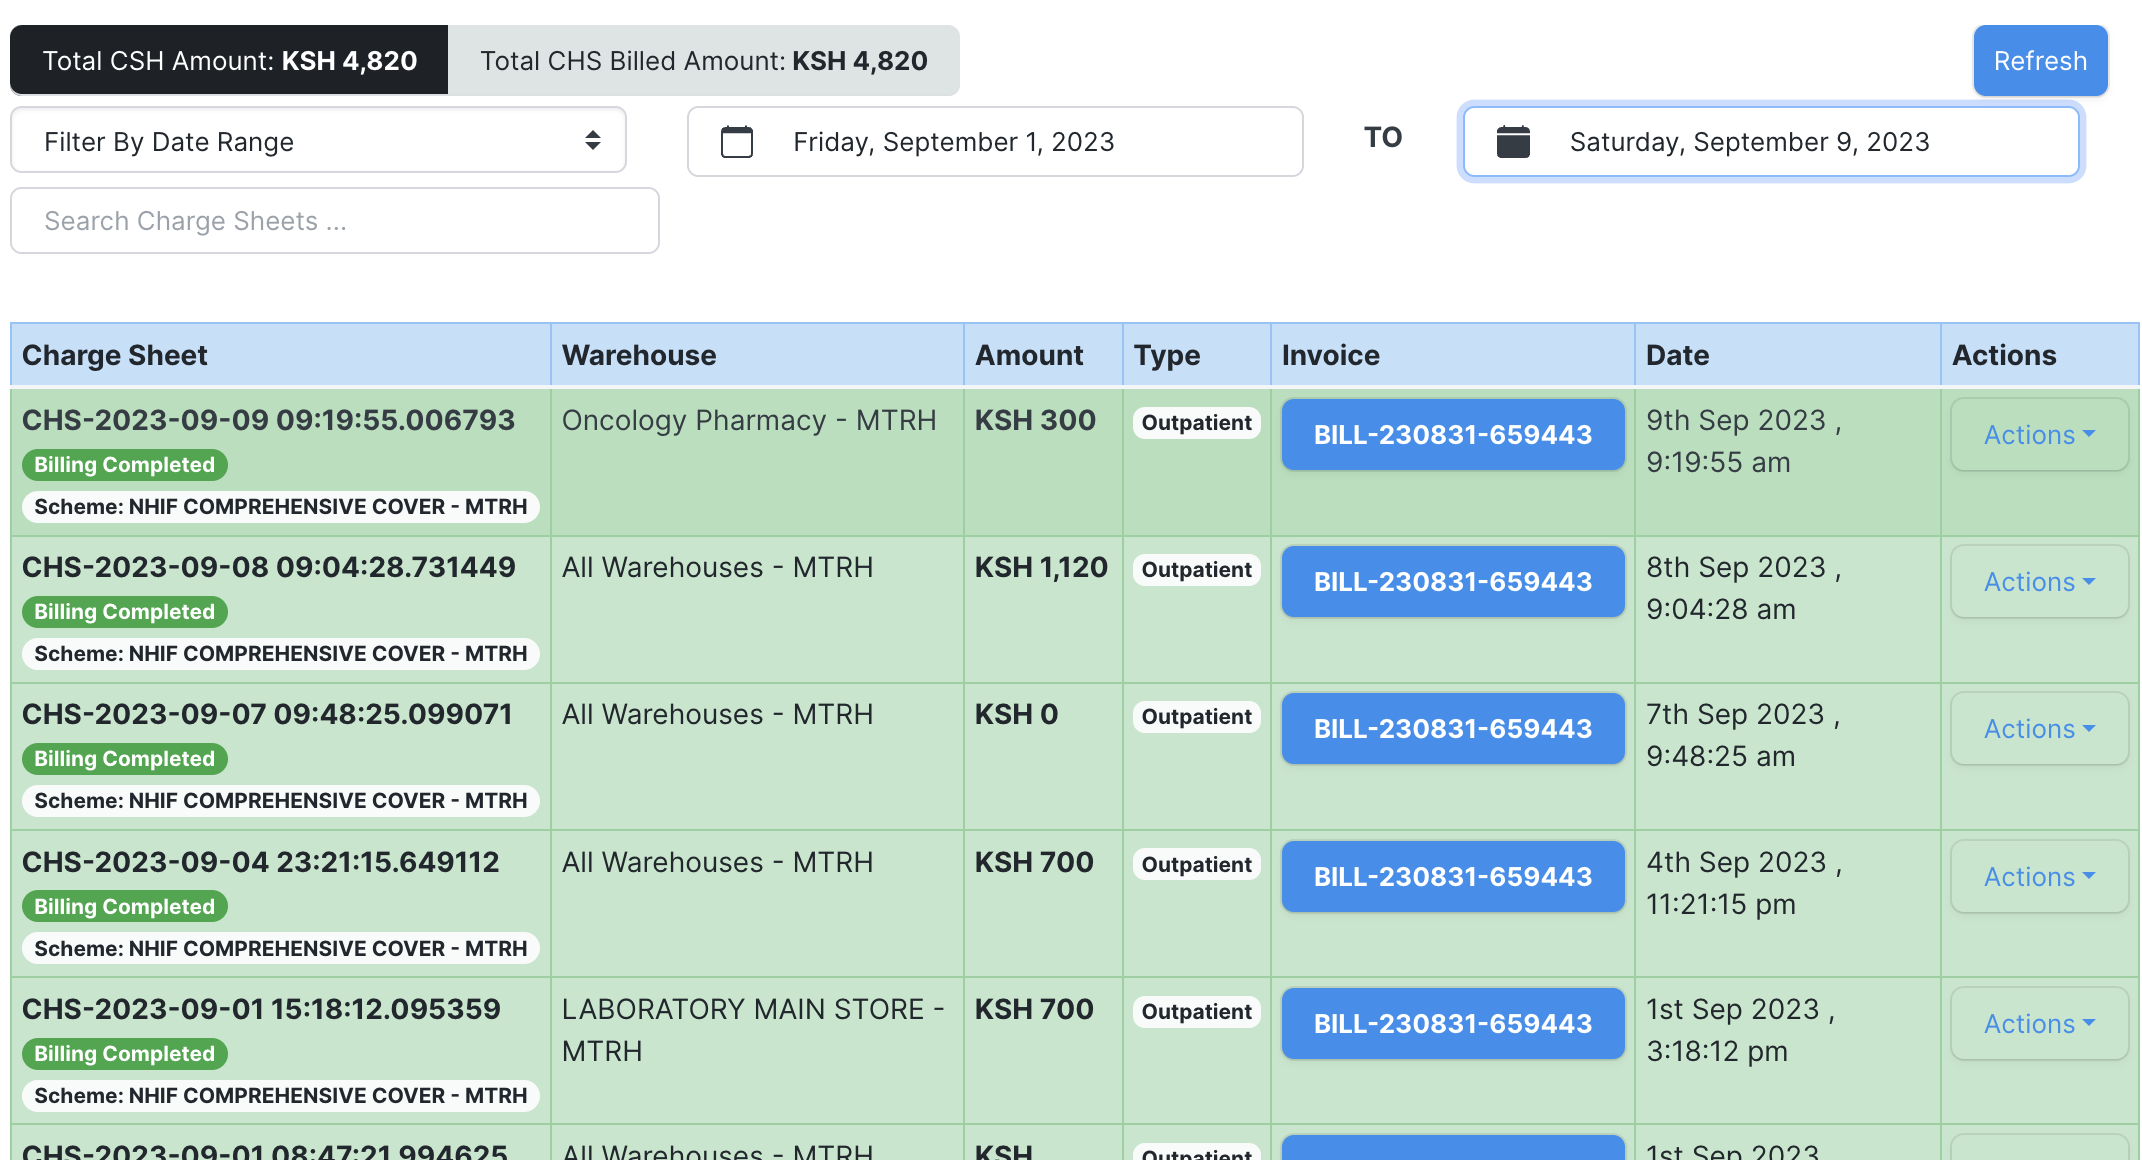
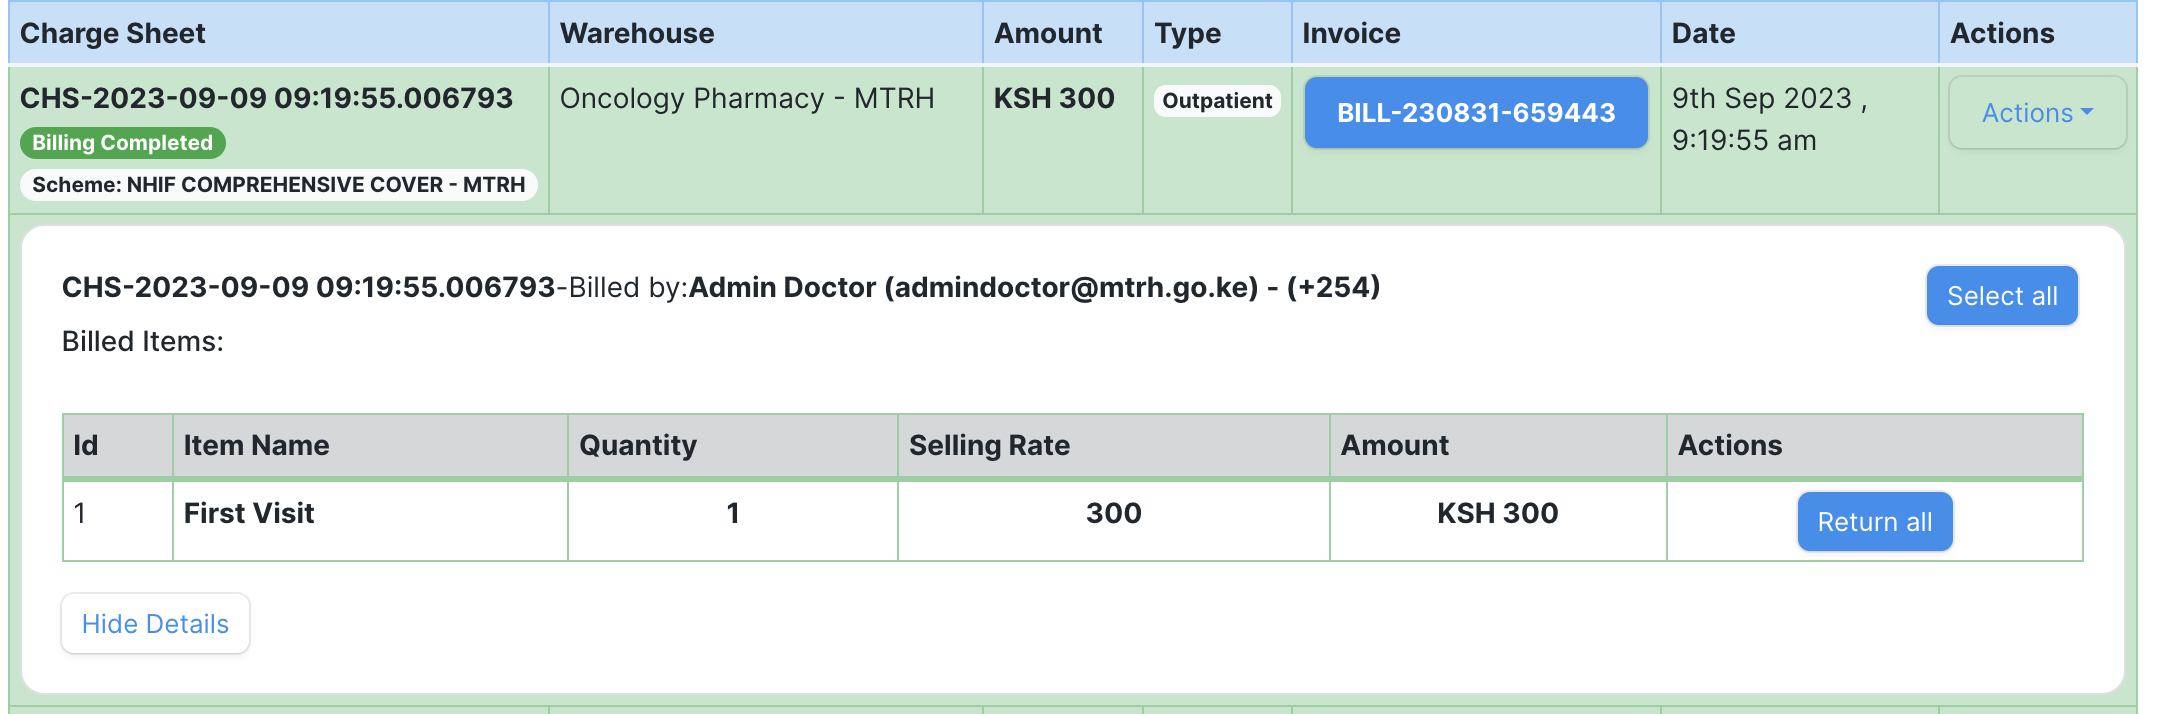
To see charge sheets there is a section of charge sheet list whith alll billed charge sheet for the contextual patient.
it has details containing:
Charge sheet Name: This is the unique charge sheet code in timestamp format at the end.
Warehouse:This is the service point it was created from.
Amount:Total charge sheet amount for all items in it.
Type:Either outpatient or Inpatient .
Invoice: The Invoice the charge sheet is in.
Dare:Time created.
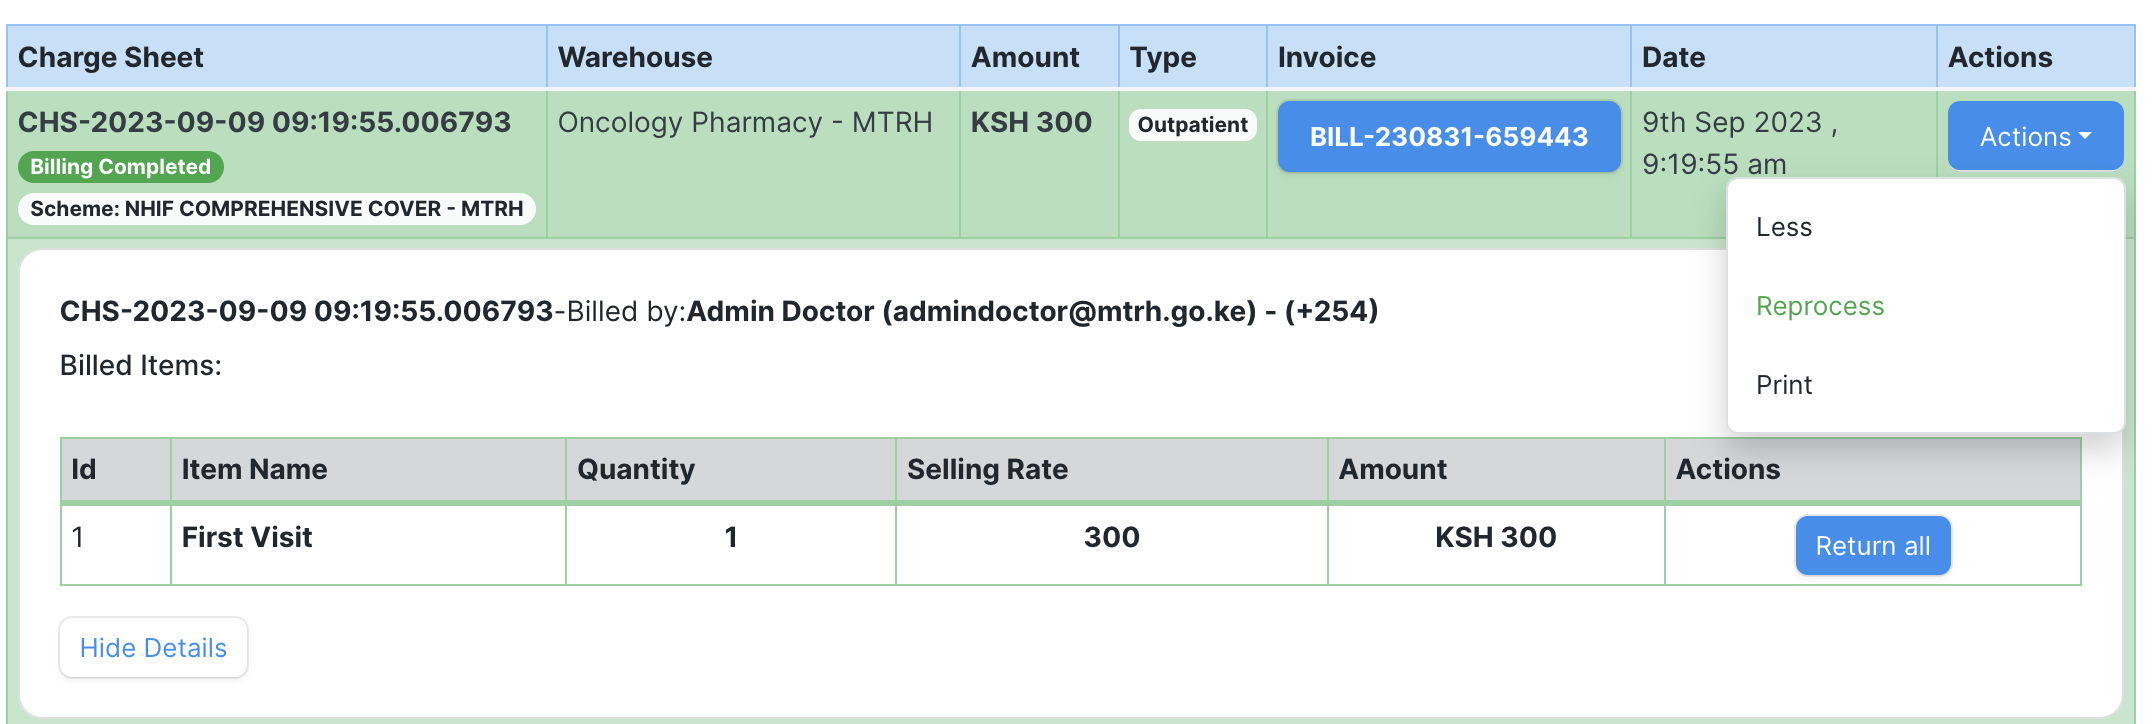
Actions :To view more details or print the charge sheet
On clicking more, more details are shown as below .It shows the items contained in the charge sheet and the user who billed the items.There is also functionality to return items which only the biller can undertake.The return all would return all items after a prompt confirmation .
The total CHS amount below shows the total charge sheets both billed and draft.
The total CHS billed amount shows total amount of all billed charge sheets.
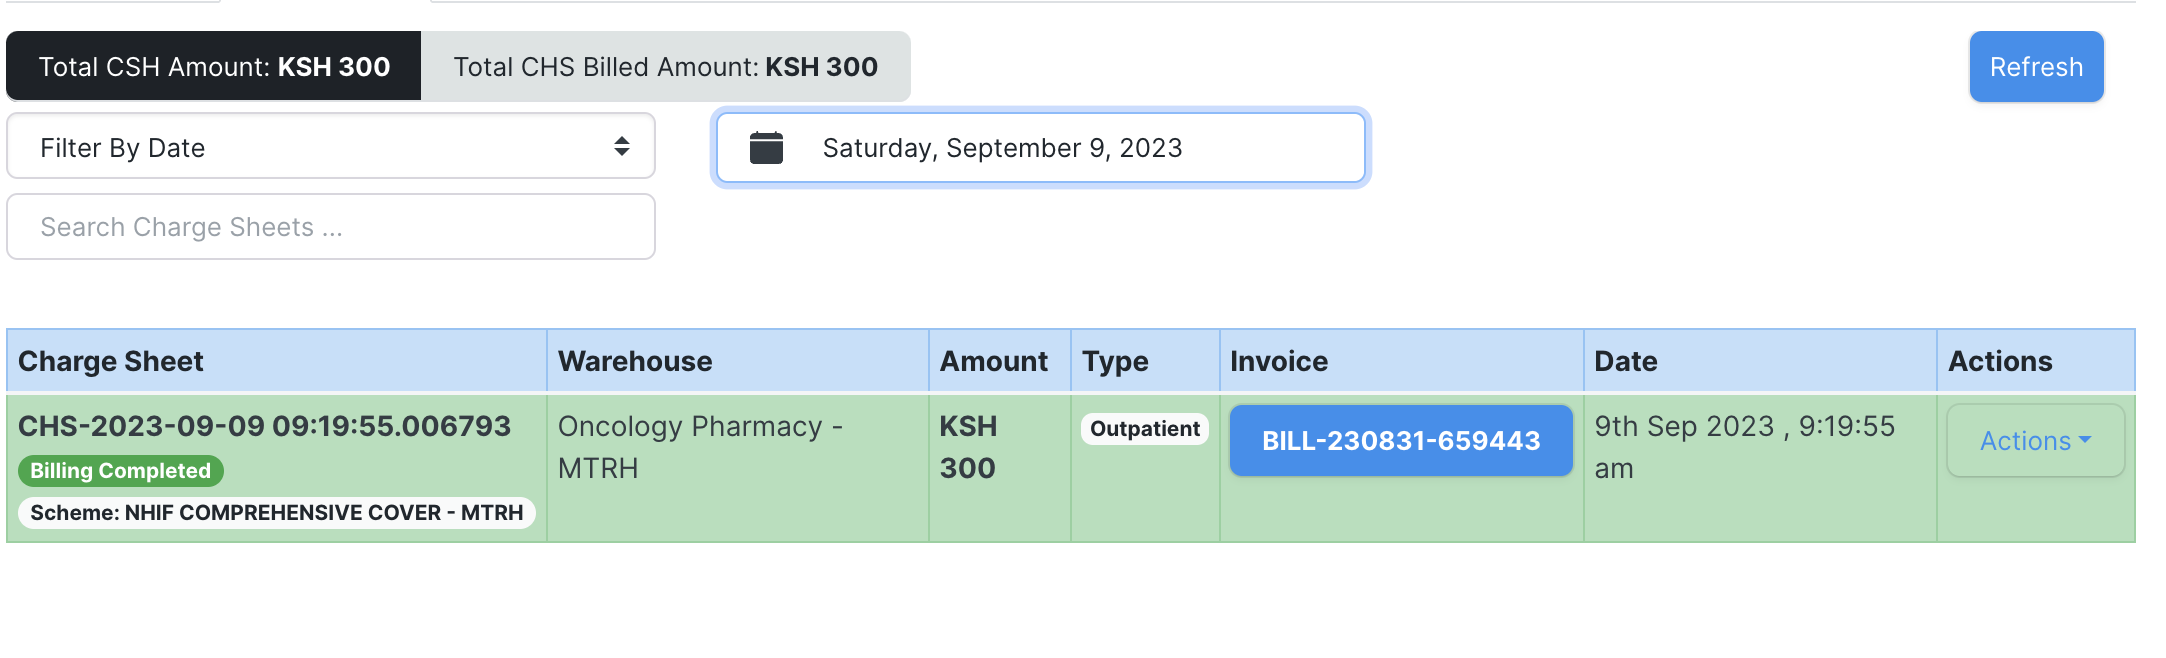
The filters has options to filter by critearia shown below:

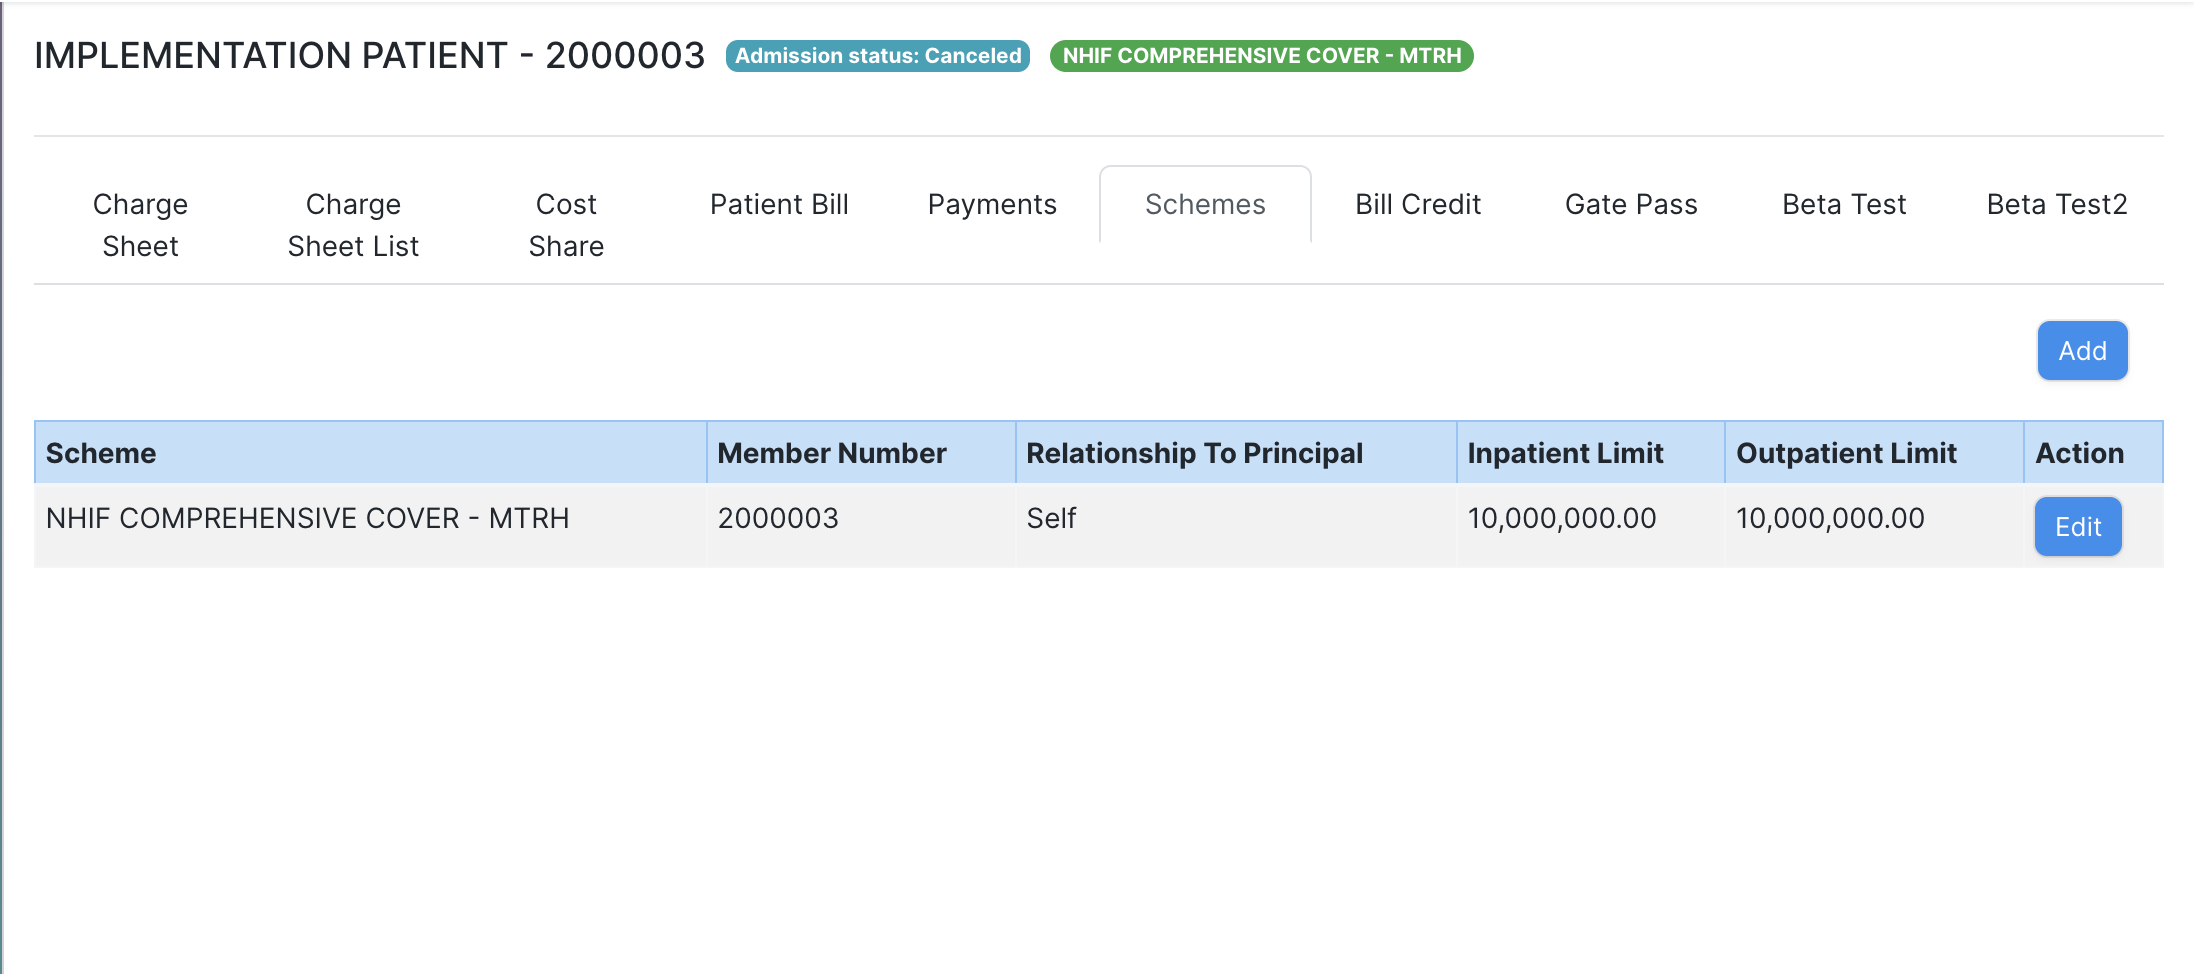
The fields set in the scheme are as follows:
customer Group: This is the scheme plan set.
Inpatient Limit: This is the maximum Upper limit set on inpatient scheme plan.
Outpatient Limit: This is the maximum Upper limit set on outpatient scheme plan.
Outpatient Balance: This is the current available outpatient balance in the scheme used for dispensing.
Inpatient Balance: This is the current available inpatient balance in the scheme used for dispensing.
The payments tab with payments receipts would be as below.
For each service/consumables charge sheet would get equal payment amount allocated as below in the payments breakdown.
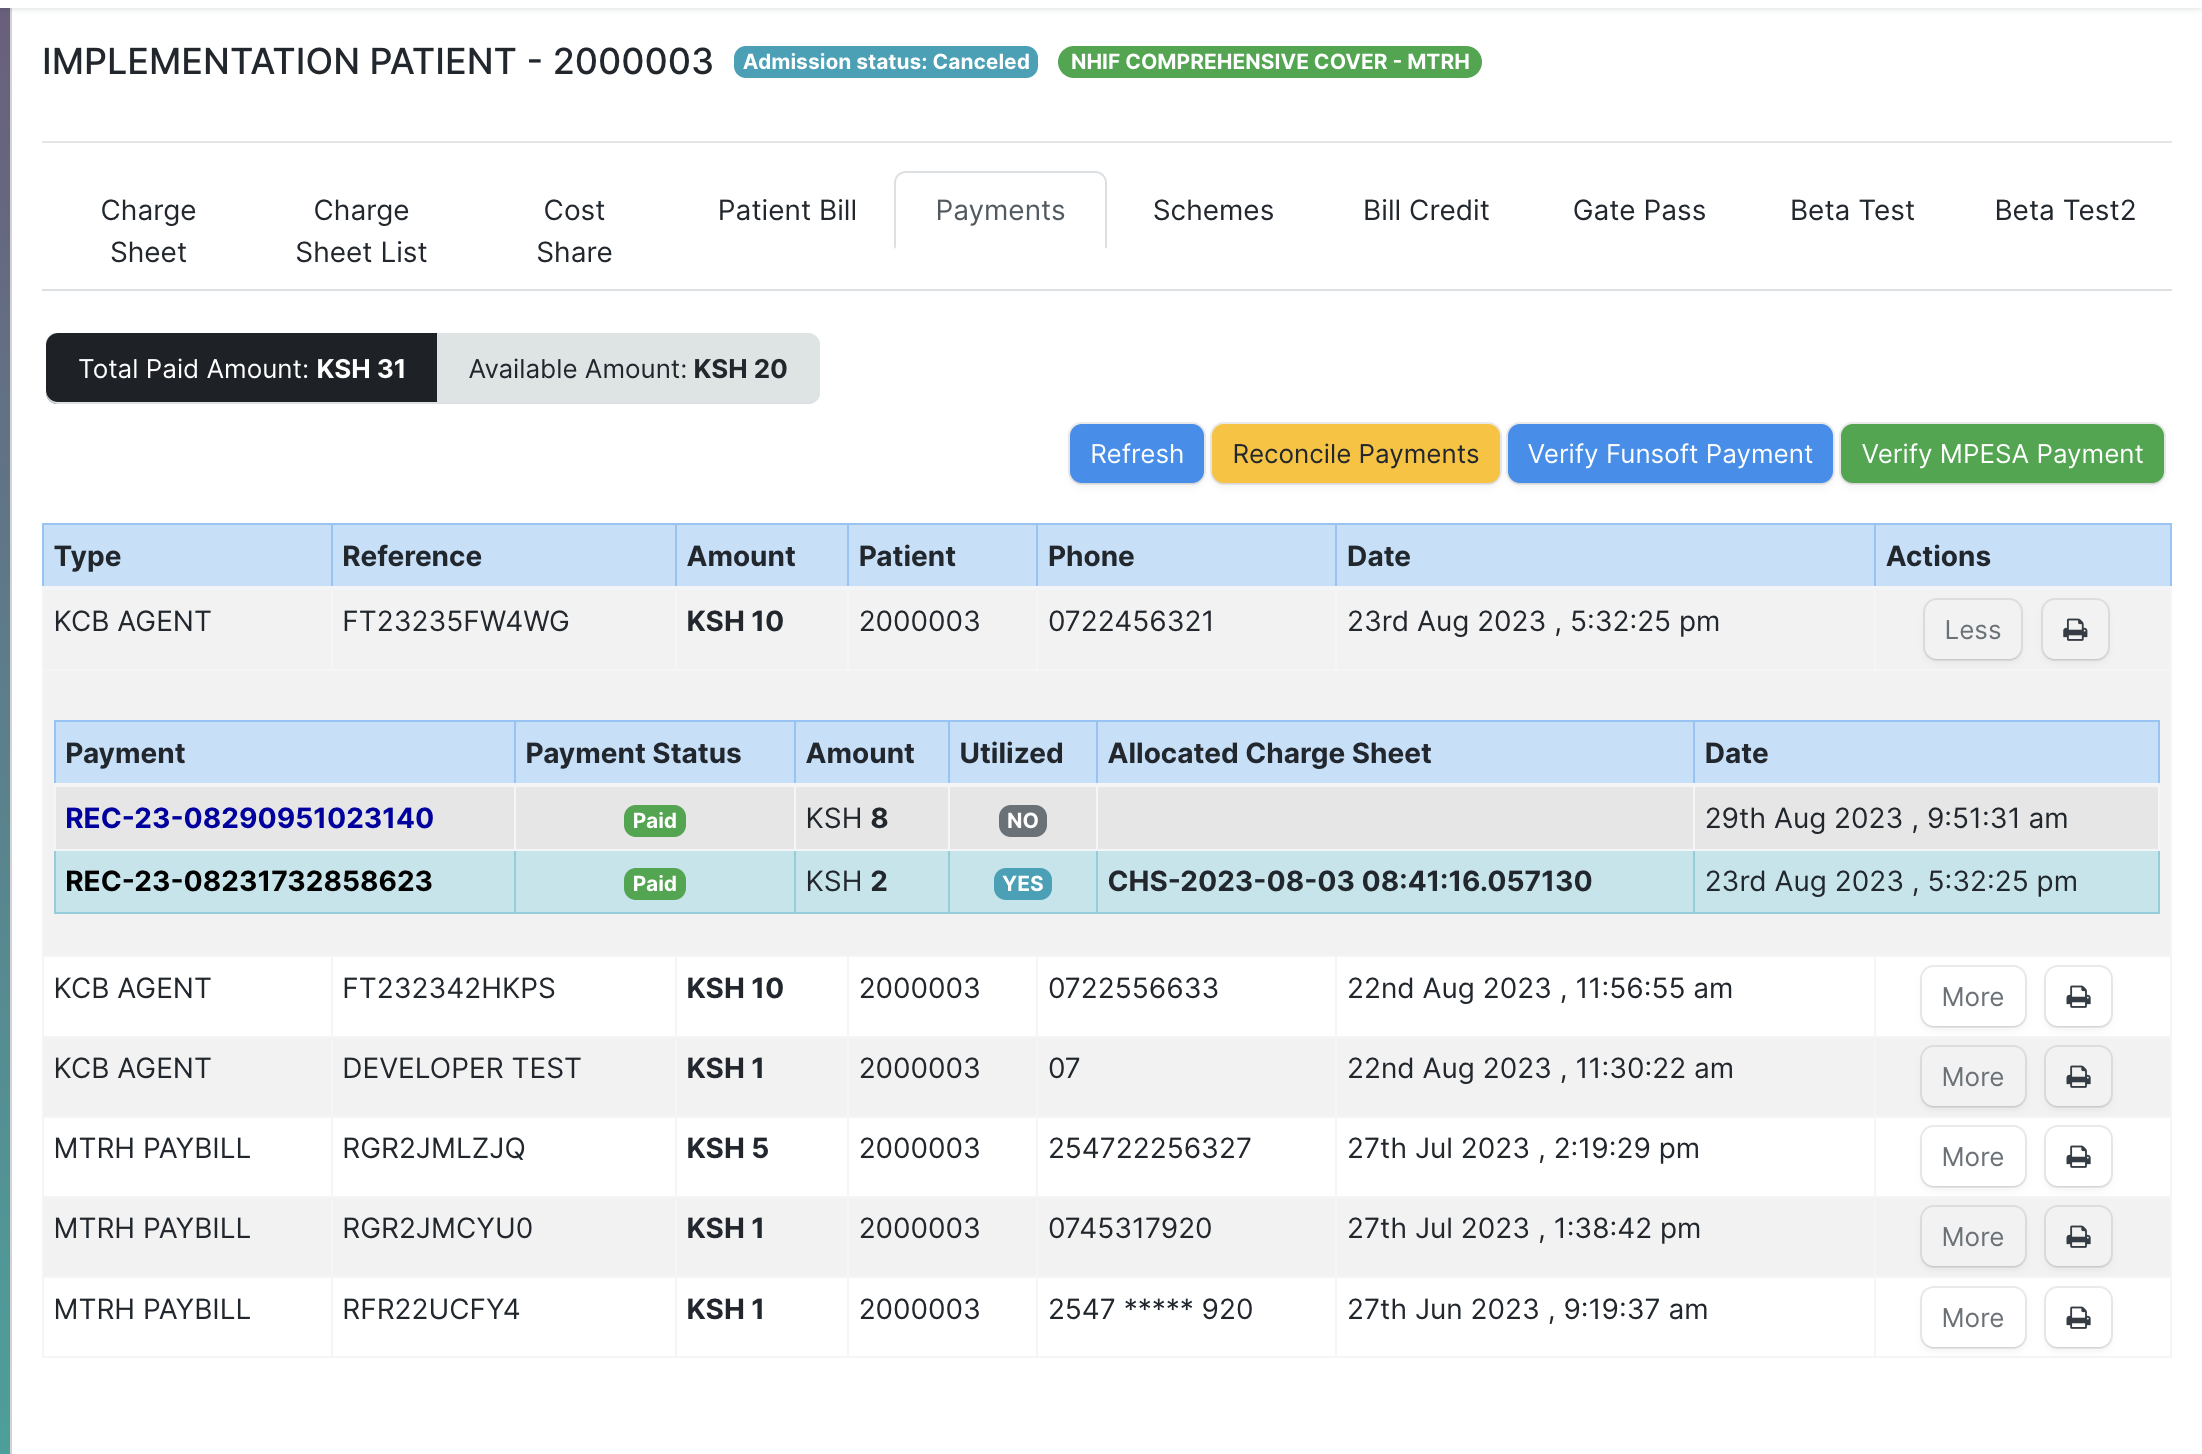
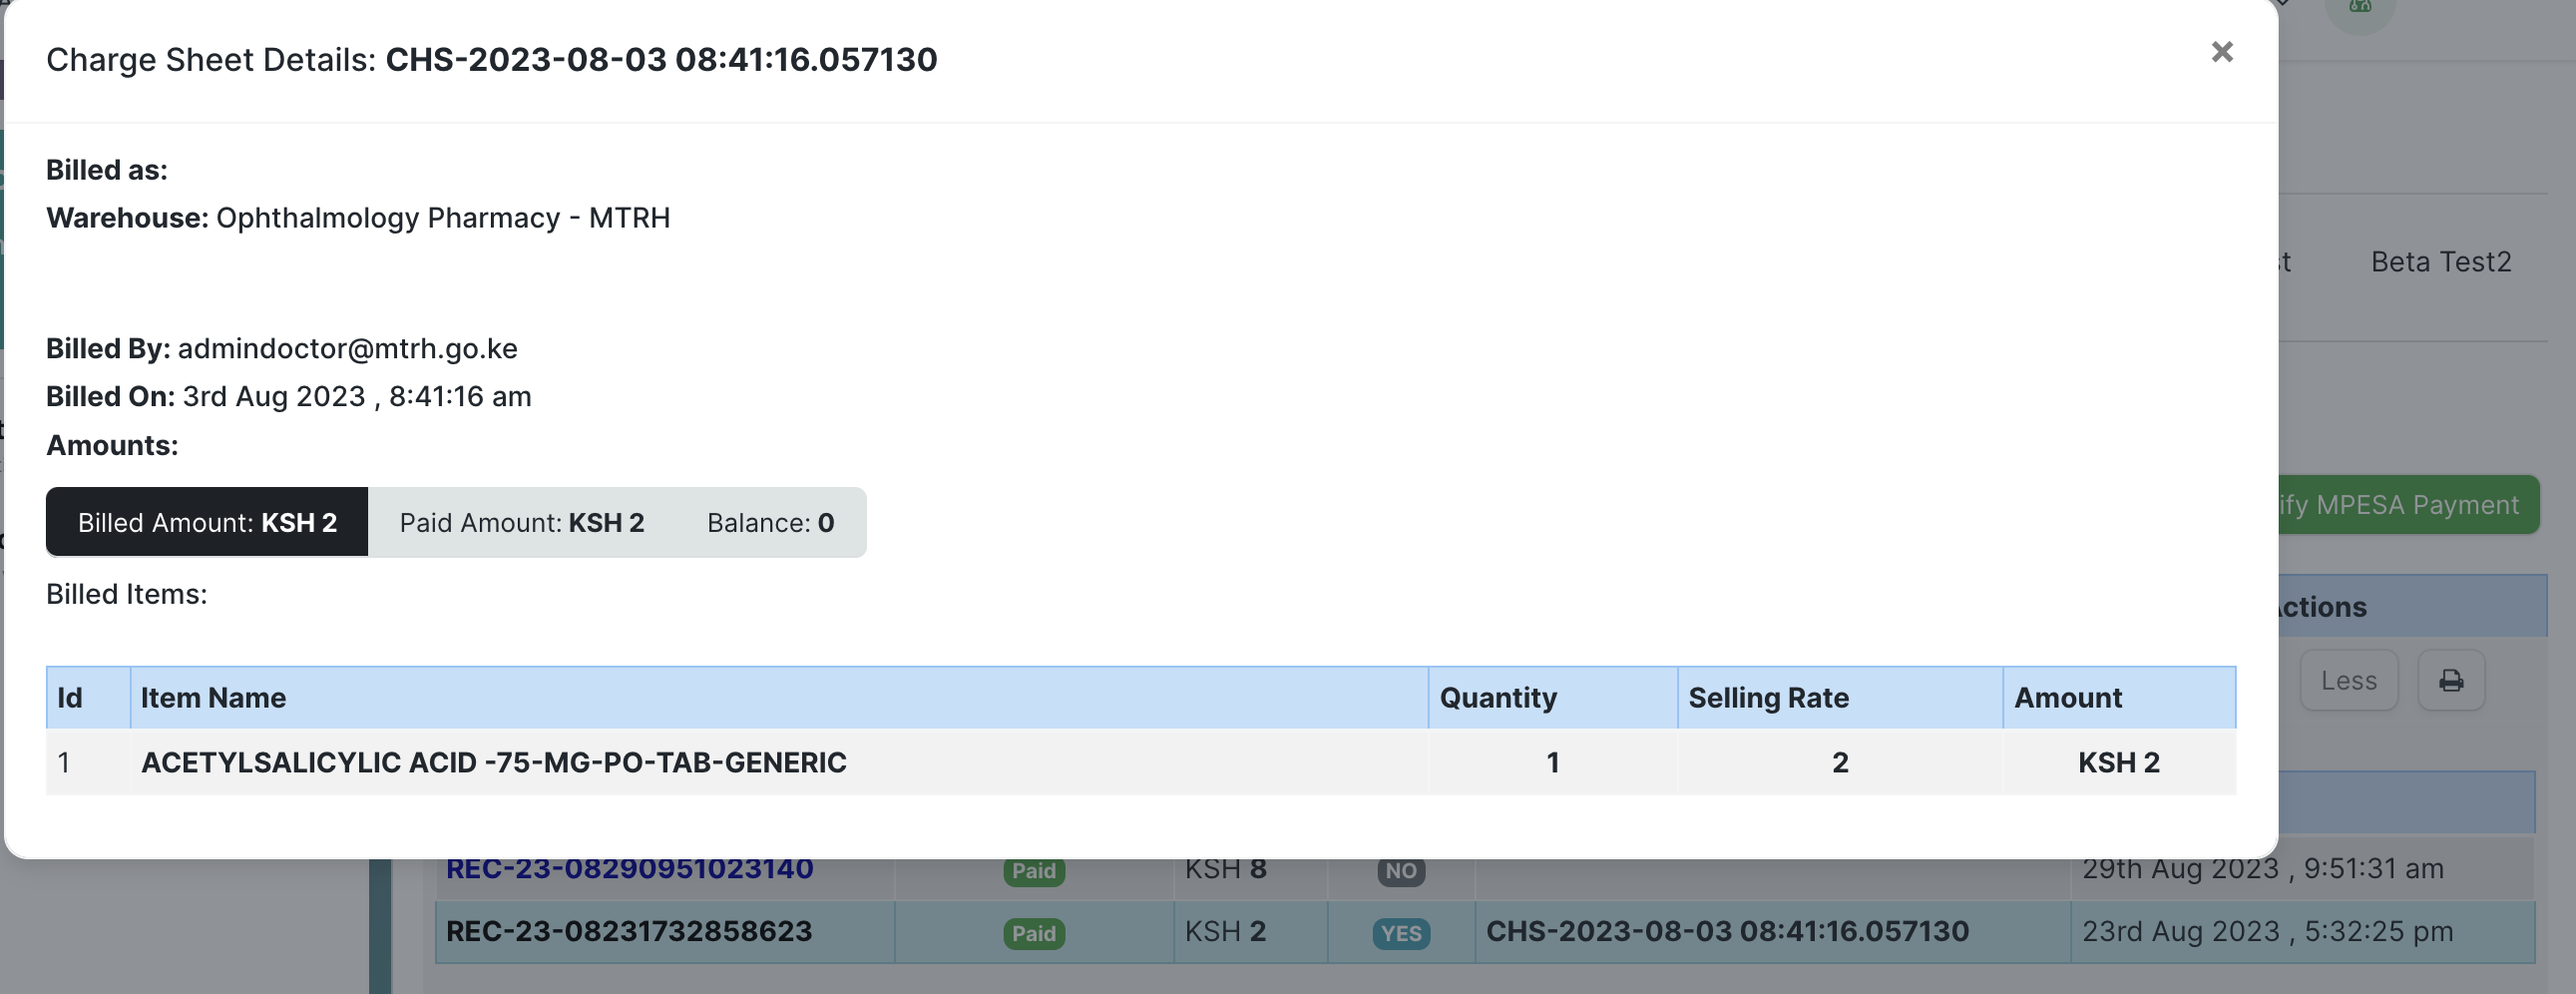
On clicking the allocated cfharge sheet one would see the items billed in the charge sheets as below.

The verify mpesa option is to reconclie missing payments from the system .This queries Safaricom api in case of a valid transaction it is updated in the system.

Inventory / Warehousing (Stock Ledger, Stock Movement, Stock Reconciliations)
Introduction
Tiberbu HealthNet is a fully fledged Enterprise Resource Planning system. What this means is that everytime there is a transaction involving an item that is stockable, that transaction is tracked in detail. In the context of a Hospital setting, you should be able to answer any of the questions below from the system at a click of a button:
- Which user in which department requested for the procurement of this drug that is about to be administered?
- Which vendor supplied this item?
- What batch did this drug come from?
- Are we almost at reorder level for ceftriaxone in this pharmacy?
- Which drugs are at short expiry notice across the Hospital?
- Which items does the system recommend we do an order today?
- Show me a list and quantities of all drugs transferred from Main Pharmacy to this Pharmacy over the last one week
- How has the consumption of Morphine syrup been today?
- Have these medications been paid for by the Hospital?
- And much much more....
Proper management of the Item Master determines the extend at which the above questions can be answered with definite accuracy. Guard the quality of items entered into the system like you life depends on it!
Item Management
An item encompasses stocks e.g. drugs and consumables, services e.g. dialysis as well as assets. Tiberbu provides a way for you to manage all these under the Item Master.
Before creating and using an Item, it is advised that you create the following first:
- Item Groups
- Warehouse
- Unit of Measure
Follow these steps to create an item:
- Go to the Item list, click on new.
- Enter an Item Code, the name will be auto-filled the same as Item Code on clicking inside the Item Name field.
- Select an Item Group.
- Enter the opening stock units and standard selling rate.
- Save.
Item Properties
- Item Name: Item name is the actual name of your product or service.
- Item Code: Item Code is a short-form to denote your Item. If you have very few Items, it is advisable to keep the Item Name and the Item Code same. This helps new users to recognize and update Item details in all transactions. In case you have a lot of Items with long names and the list runs in hundreds, it is advisable to code. To understand naming Item codes see Item Codification. You can also generate Item Code based on a Naming Series by enabling this feature in Stock Settings.
- Item Group: Item Group is used to categorize an Item under various criteria like products, raw materials, services, sub-assemblies, consumables or all Item groups. Create your default Item Group list under Setup > Item Group and pre-select the option while filling your New Item details under Item Group. Item groups can be sub-assemblies, raw materials, etc, or based on your business use case.
- Default Unit of Measure: This is the default measuring unit that you will use for your product. It could be Nos, Kgs, Meters, etc. You can store all the UOMs that your product will require under Set Up> Master Data > UOM. These can be preselected while filling New Item by using % sign to get a pop up of the UOM list. Visit the UoM page for more details
Options when creating an item
- Disabled: If you disable an Item, it cannot be selected in any transaction.
- Allow Alternative Item: Sometimes when manufacturing a finished good, specific material may not be available. If you tick this, you can create and select an alternative item from the Item Alternative list. To know more, visit the Item Alternative page.
- Maintain Stock: If you are maintaining stock of this Item in your Inventory, ERPNext will make a stock ledger entry for each transaction of this item. Ensure to keep this option unchecked when creating a non-stock Item (make to order/engineer) or a service.
- Valuation Rate: There are two options to maintain valuation of stock. FIFO (first in - first out) and Moving Average. To understand this topic in detail please visit Item Valuation, FIFO and Moving Average.
- Standard Selling Rate: When creating an Item, entering a value for this field will automatically create an Item Price at the backend. Entering a value after the Item has been saved will not work. In this case, the Item Price is created from any transactions with the Item. The rate at which you'll sell the item. This will be fetched in Sales Orders and Sales Invoices.
- Is Fixed Asset: Tick this checkbox if this item is a company Asset. Check out the Asset Module to know more.
- Auto Create Assets on Purchase: If Item is a Company Asset, tick this checkbox if you want to auto create assets while purchasing this item through Purchase Cycle. Check out the Asset Page to know more.
- Uploading an Image: To upload an image for your icon that will appear in all transactions, save the partially filled form. Only after your file is saved the 'Change' button will appear on the Image icon. Click on Change, then click on Upload, and upload the image
Barcodes
Barcodes can be recorded in Items to quickly scan and add them in transactions. In the Barcodes table you can add an Item's barcode for scanning. There are two types of barcodes in ERPNext:
- EAN: The European Article Number is a 13 digit number. EAN is used internationally and recognized by more POS systems.
- UPC: The Universal Product Code is a 12 digit number. UPC is generally used only in USA and Canada.
Inventory
- Shelf Life In Days: This is for a product Batch. The number of days after which product batch will be unusable. For example, medicines.
- End of Life: For a single item/product, the date after which it'll be completely unusable. That is, the item will be unusable in transactions and manufacturing. For example, you're using plastic crystals for manufacturing Items for the next 5 years after which you want to use plastic beads.
-
Warranty: To track a warranty period, it is necessary that the Item is serialized. When this Item is delivered, the delivery date and the expiry period is saved in the Serial Number master. Through the serial number master, you can track the warranty status.
-
Weight UOM: The Unit of Measure for the item. This can be Nos, Kilo, etc. The Weight UoM which you use internally can be different from the purchase UoM.
- Weight Per Unit: The actual weight per unit of the item. Eg: 1 kilo biscuits or 10 biscuits per pack.
- Default Material Request Type: When you create a new Material Request for this item, the field set here will be selected by default in the new Material Request. This is also known as an 'indent'.
- Valuation Method: Select the Valuation Method whether FIFO or Moving Average. Read Item Valuation methods to know more.
- Allow negative stock: When checked the item will be allowed to go negative even if negative stock is disabled from Stock Settings. This is useful if you don't want to enable negative stock on high value items but few select low value items are allowed to go negative for few days.
Automatic Reordering & Stock Intelligence
When the stock of an item dips under a certain quantity, you can set an automatic reorder under 'Auto Reorder' section. This should be enabled in Stock Settings. This will raise a Material Request for the Item. The user with roles Purchase Manager and Stock Manager will be notified when the Material Request is created.
- Check in (group): In which group warehouses to check the quantity of the item.
- Request for: Which warehouse to stock the item reorder.
- Re-order Level: When this quantity is reached, the reorder will be triggered. Re-order level can be determined based on the lead time and the average daily consumption. For example, you can set the reorder level of Motherboard at 10. When only 10 Motherboards are remaining in stock, the system will either automatically create a Material Request in your ERPNext account.
-
Re-order Qty: The number of units to be reordered so that the sum of ordering cost and holding cost is at its minimum. The re-order quantity is based on the 'Minimum Order Qty' specified by the supplier and many other factors.
For example, If reorder level is 100 items, your reorder quantity may not necessarily be 100 items. The Reorder quantity can be greater than or equal to the reorder level. It may depend upon lead time, discount, transportation and average daily consumption.
-
Material Request Type: The Material Request type with which the stock will be reordered. This depends whether you buy the Item, manufacture it yourself or transfer it between Warehouses
The Material Request is created at 12 midnight depending on the set reorder level.
Purchase, Replenishment Details
- Default Purchase Unit of Measure: The default UoM that will be used in Purchase transactions.
- Minimum Order Qty: The minimum quantity required for purchase transactions like Purchase Orders. If set, the system will not let you proceed with the purchase transaction if the item quantity in the purchase transaction is lesser than the quantity set in this field.
-
Safety Stock: “Safety Stock” is used in the report “Itemwise Recommended Reorder Level”. Based on Safety Stock, average daily consumption and the lead time, the system suggests Reorder Level of an item.
Reorder Level = Safety Stock + (Average Daily Consumption * Lead Time)
- Last Purchase Rate: The rate at which you last purchased this item using a Purchase Invoice will be displayed here.
- Is Purchase Item: If unticked, you won't be able to use this item in purchase transactions.
- Is Customer Provided Item: Checked if Item is provided by a customer and received through Stock Entry > Material Receipt. If Checked, Customer field is Mandatory as the default customer for Material Request. To know more visit this page.
-
Lead time days: Lead time days are the number of days between ordering the Item and it to reach the Warehouse.
Batch Management
A set of Items can be manufactured in batches. This is useful for moving the batch and associate an expiry date with a certain batch.
-
Has Batch No: Options for batch number, expiry date, and retaining sample stock will be revealed on ticking this checkbox. You cannot activate this if there is any pre-existing transaction for this item. If this is disabled, you'll have to enter the serial numbers manually for every transaction.
-
Batch Number Series: Prefix that'll be applied to batch numbers. If you set 5x1SCR, then the first batch will be named like 5x1SCR00001 on first transaction/manufacture.
-
Automatically Create New Batch: If the batch number is not mentioned in transactions, then they will be automatically created according to a format like AAAA.00001. If you always want to manually create a batch number for this item, leave this field blank. This setting will override 'Naming Series Prefix' in Stock Settings. Batch numbers can be set to be generated automatically if you manufacture the Items or can be entered manually if it comes from an external manufacturer.
-
Has Expiry Date: If you tick this, the batch number will be created according to the expiry date. The expiry dates can be set in the 'Batch' master.
-
Retain Sample: To retain a minimum number of sample stock of the item. You need to set a Sample Retention Warehouse in Stock Settings for this. To know more, click here.
-
Has Serial No: This is similar to Batch Number Series, it'll be created when you make transactions/manufacture. If you set Serial Number Series as AA, then on the first transaction a serial number like AA00001 will be created.
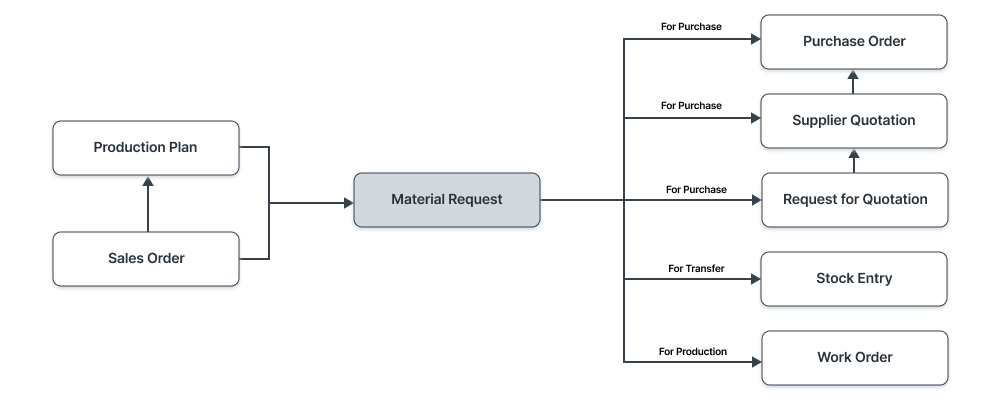
Requisitions for Transfer, Issue, Purchase
The Material Request document is used to track transfers, issues or purchases of items.
A Material Request is a simple document identifying a requirement of a set of Items (products or services) for a particular reason.
A Material Request can have the following purposes:
- Purchase: If the material being requested is to be purchased.
- Material Transfer: If the material being requested is to be shifted from one Warehouse to another.
- Material Issue: If the material being requested is to be Issued for some purpose like manufacturing.
The Stock Levels & The Stock Ledger
Stock Level
Stock Level report list stock item's quantity available in a particular warehouse.
There are multiple reports available you can check for item's stock level.
Stock Projected Quantity Report
You can access this report from 'Stock' > 'Main Report' > 'Stock Projected Quantity'
This report list item wise - warehouse wise stock level of an item considering all the stock transactions. With Actual Quantity of an item, it also provide other details like:
- Actual Qty: Quantity available in the warehouse.
- Requested Qty: Quantity requested for purchase, but not ordered.
- Ordered Qty: Quantity ordered for purchase, but not received.
- Reserved Qty: Quantity ordered for sale, but not delivered.
- Project Qty: Project Quantity is calculated as => Projected Qty = Actual Qty + Planned Qty + Requested Qty + Ordered Qty - Reserved Qty
The projected inventory is used by the planning system to monitor the reorder point and to determine the reorder quantity. The projected Quantity is used by the planning engine to monitor the safety stock levels. These levels are maintained to serve unexpected demands.
Having a tight control of the projected inventory is crucial to determine shortages and to calculate the right order quantity.
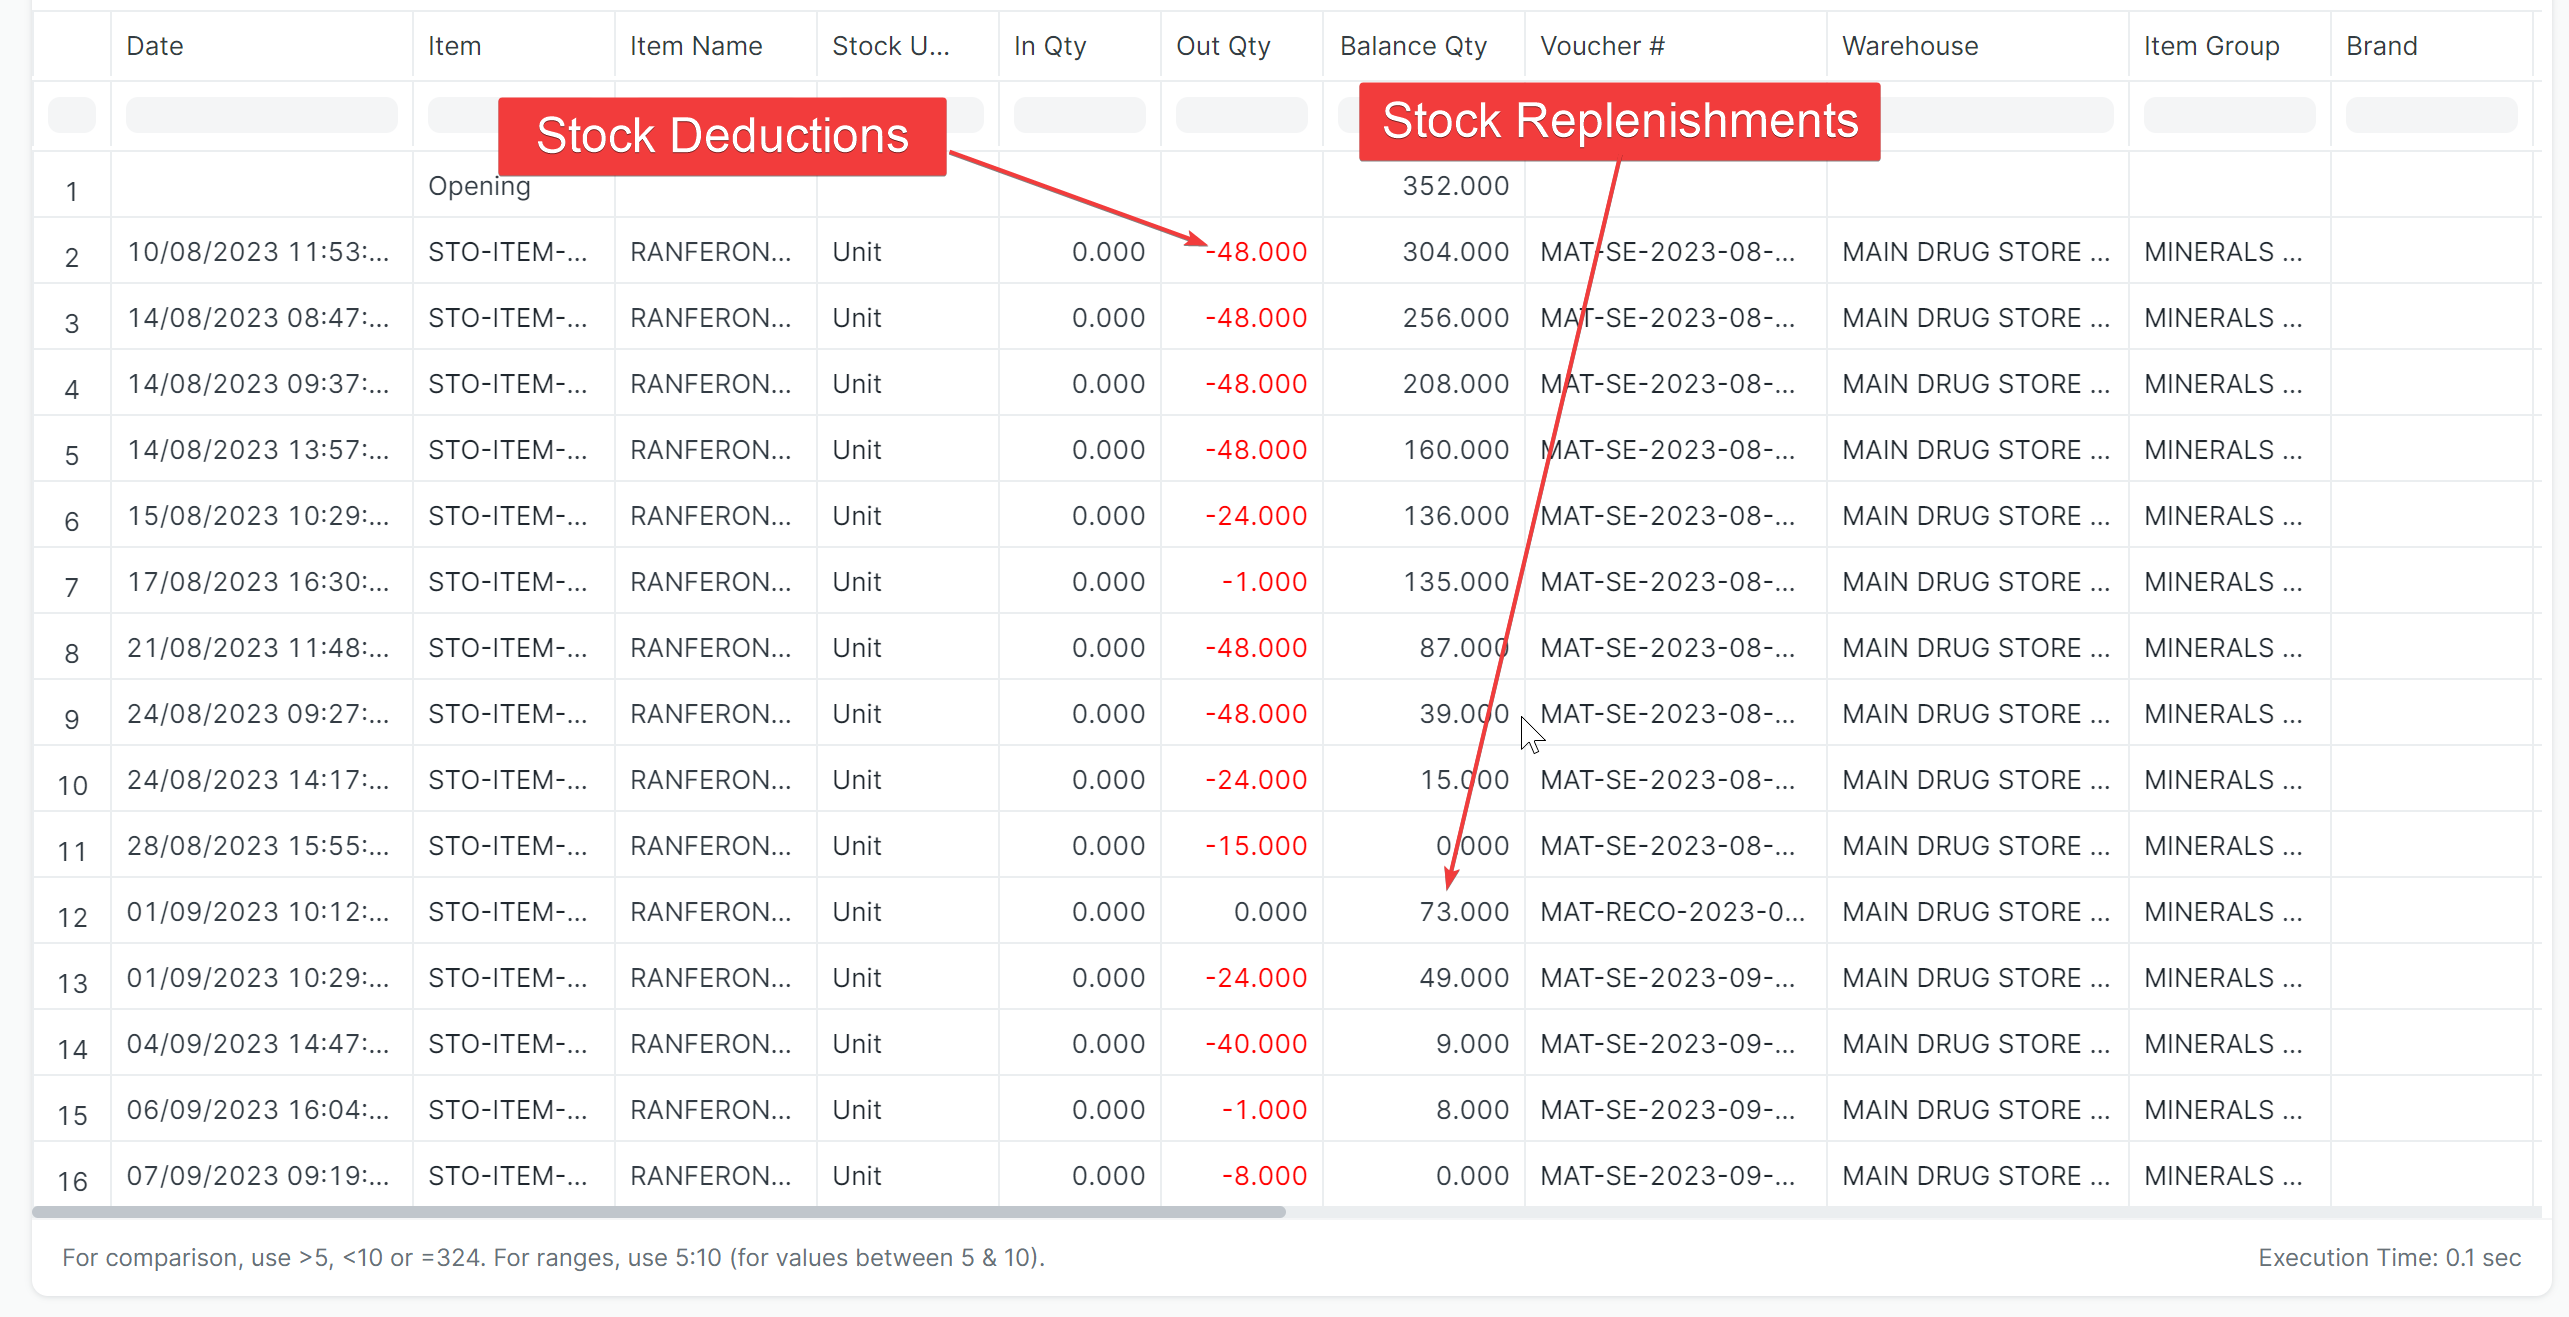
Stock Ledger
A Stock Ledger Report is a detailed record that keeps track of stock movements for the Hospital.
Inward or outward transactions related to Purchasing, Selling, and Stock Transfers are recorded in the Stock Ledger which then is reflected in the Stock Ledger Report.
It reflects the quantity and value of stock issued, received, or transferred along with the stock item and its warehouse/pharmacy/store details.
It can be referred when the Perpetual Inventory system is enabled, as this report reflects the history of all your stock transactions. It presents a more granular view of the stock transactions.
The Stock Ledger Report contains the following attributes:
-
Incoming Rate: It reflects the actual value of the stock at which it was brought under your inventory. It reflects the same value as entered in the Rate field of the document.
-
Balance Value: It represents the total value of the remainder stock in the inventory. It is the product of Valuation Rate and Balance Quantity of a stock item.
-
Valuation Rate: It is calculated based upon the valuation method selected.
Here below is an example of a stock ledger report for a specific item and a specific store/pharmacy in a Hospital
Stock Reconcilliations
The system also provides for a way to reconcille physical stock counts to those that the system says are available. This is a habit that should be avoided unless really necessary. This is because it is expected that stocks will be deducted in realtime based on issueing of the same to patients and other service providers and it will only be replenished apoun requisition or request for transfers.
All stock reconcilliations should be taken with a keen eye to ensure it is not abused. Tiberbu provides a workflow of approval for Stock Reconcilliations.
Accounts / Invoicing (Patient Bill Management)
Accounts Page.
The accounts page functions as a centralized hub for accountants to handle all billing and accounting tasks within the context of a patient. This includes activities such as creating and managing charge sheets, handling cost shares, managing patient bills, overseeing bill credits, managing patient payments, managing insurance schemes, and generating gate passes.
Below, you'll find a more detailed explanation of the functions of each section displayed in tab format on the accounts page;
- In healthcare practice, the cost share tool serves as a means for healthcare practitioners to bill inpatients for various items and consumables that are typically shared within the same ward. The cost share tab exhibits a roster of cost share documents that include the presently chosen patient. It presents essential cost share details such as the count of pending cost-shared items, invoicing status, and workflow status. For more comprehensive information, including the precise cost-shared items, you can click on "Show Details".
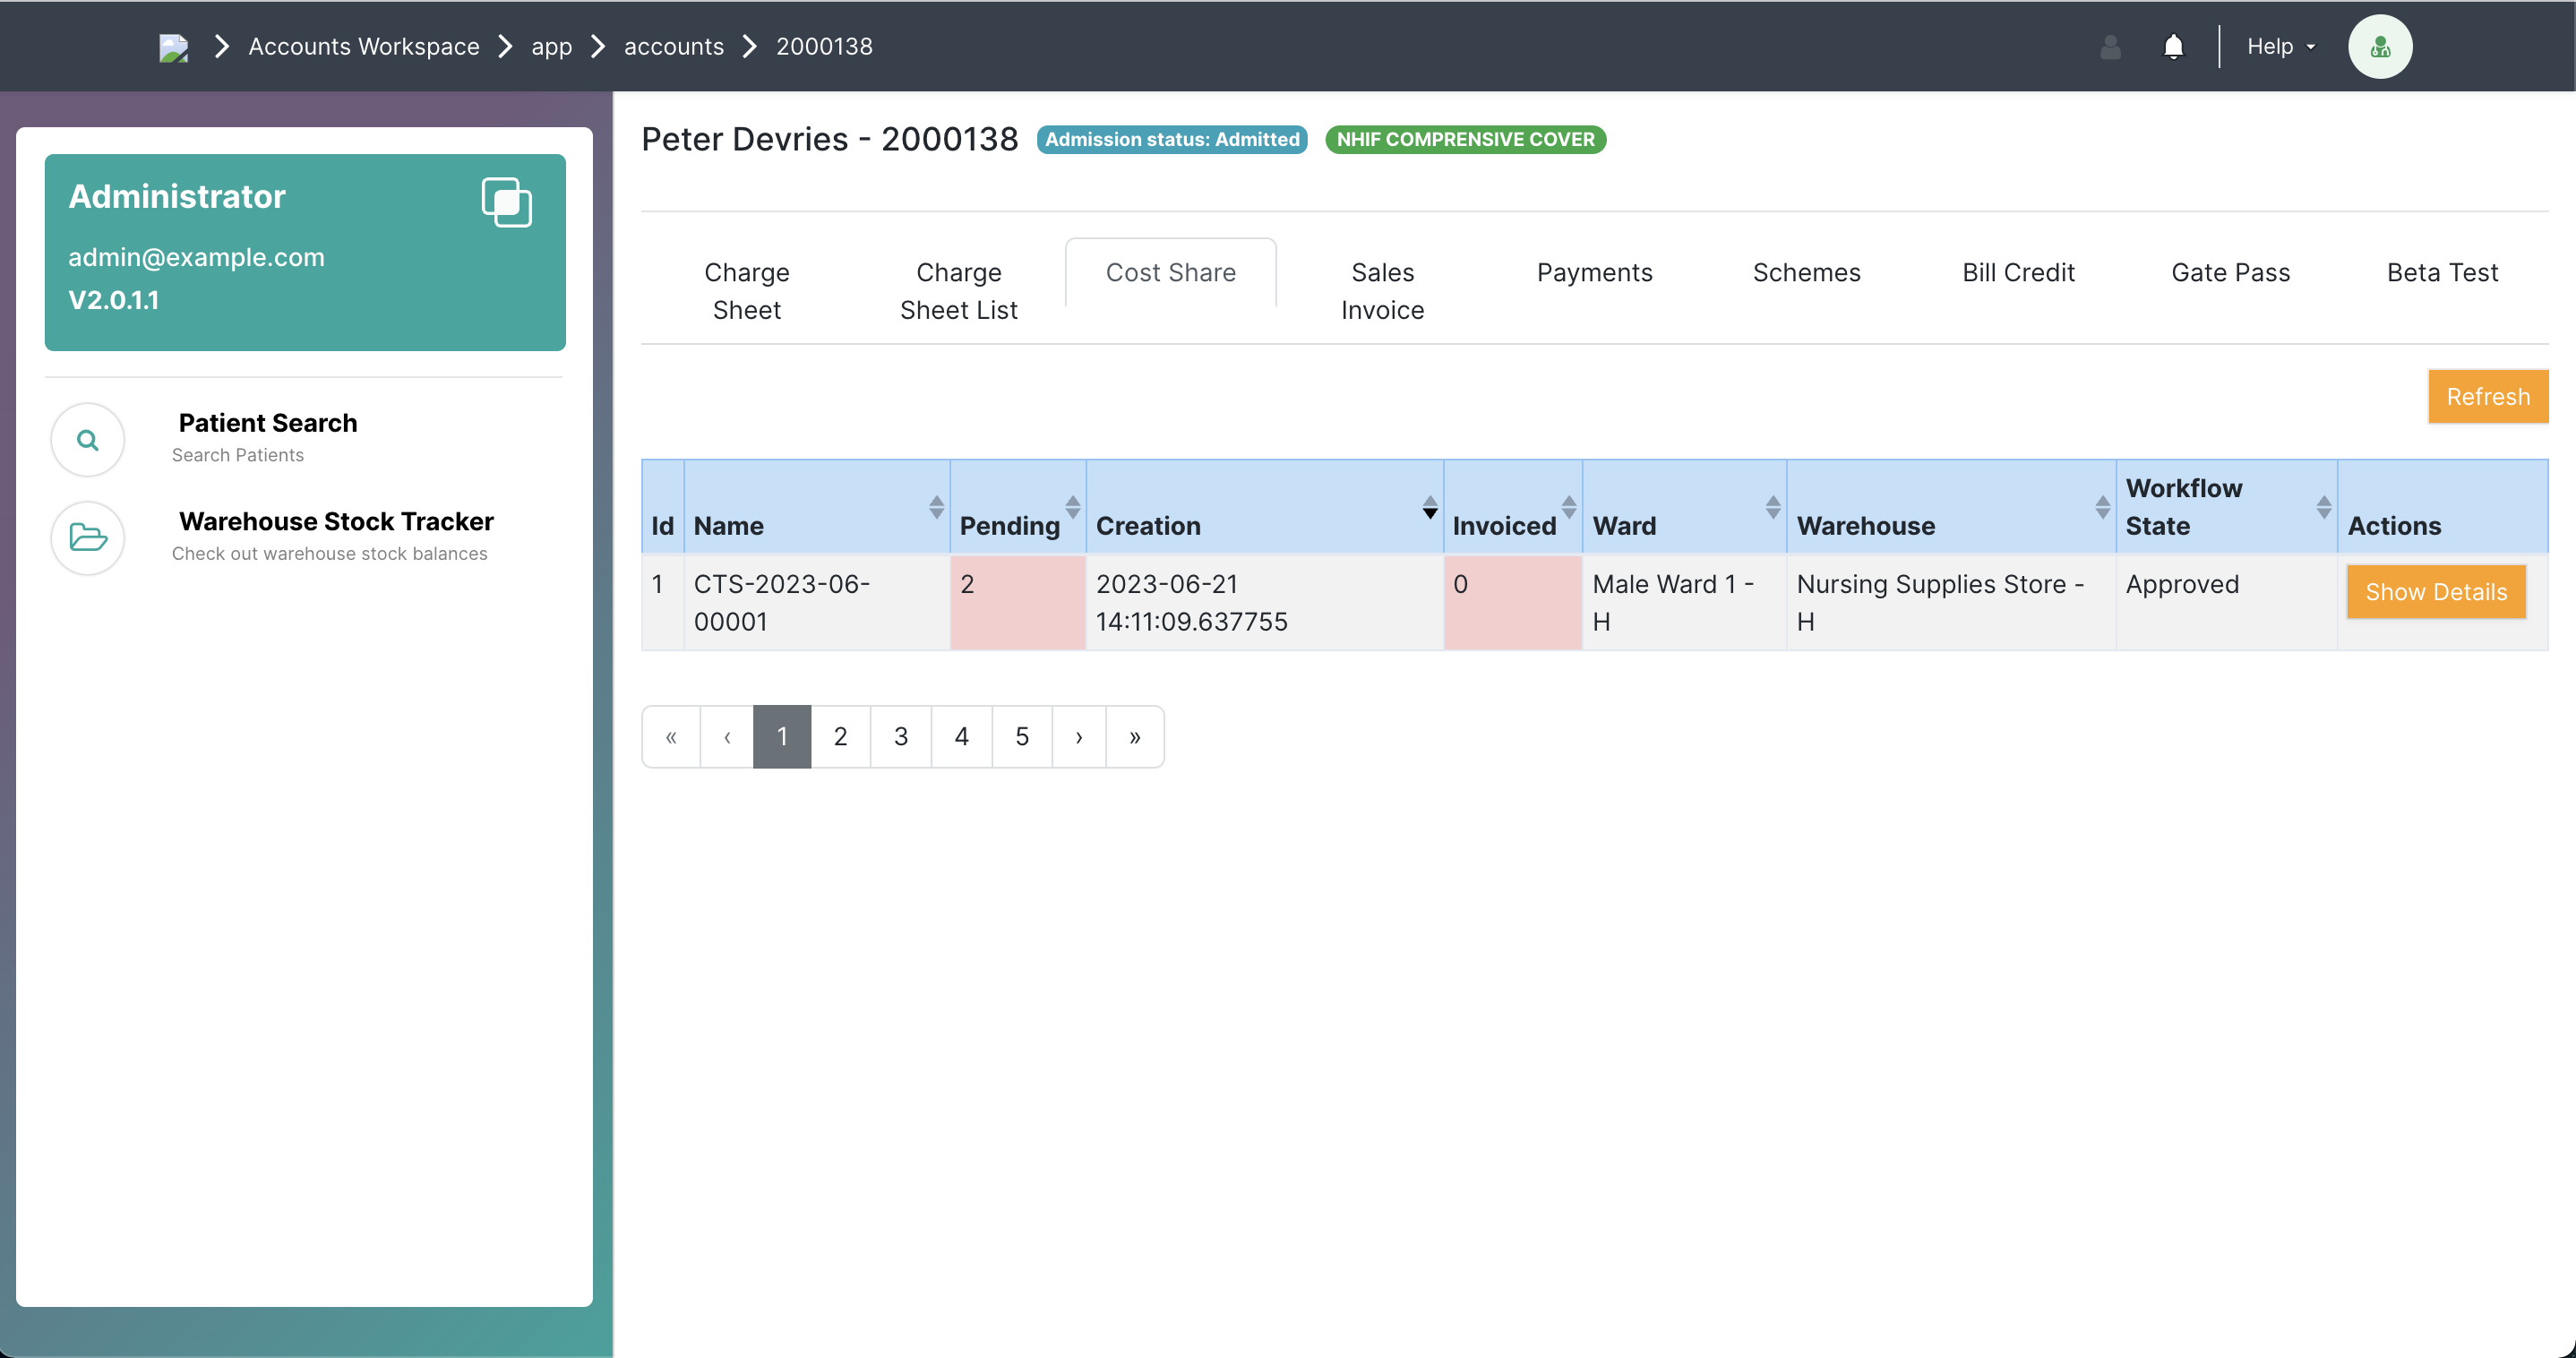
To generate a cost share document, follow these steps:
1. Utilize the search box located in the upper right section of the screen. Type "Cost Share List" and then select "Add New Cost Share.
2. Specify the ward and warehouse from which you wish to bill.
3. In the "Cost Share Items" section, click on "Add Row" and input the item you intend to bill for, along with the quantity.
4. Click the "Reload Patients" button to automatically populate the patient list with those admitted in the selected ward. If you only need to bill one or two specific patients, you can manually add them using the "Add Row" option.
5. Save your entries.
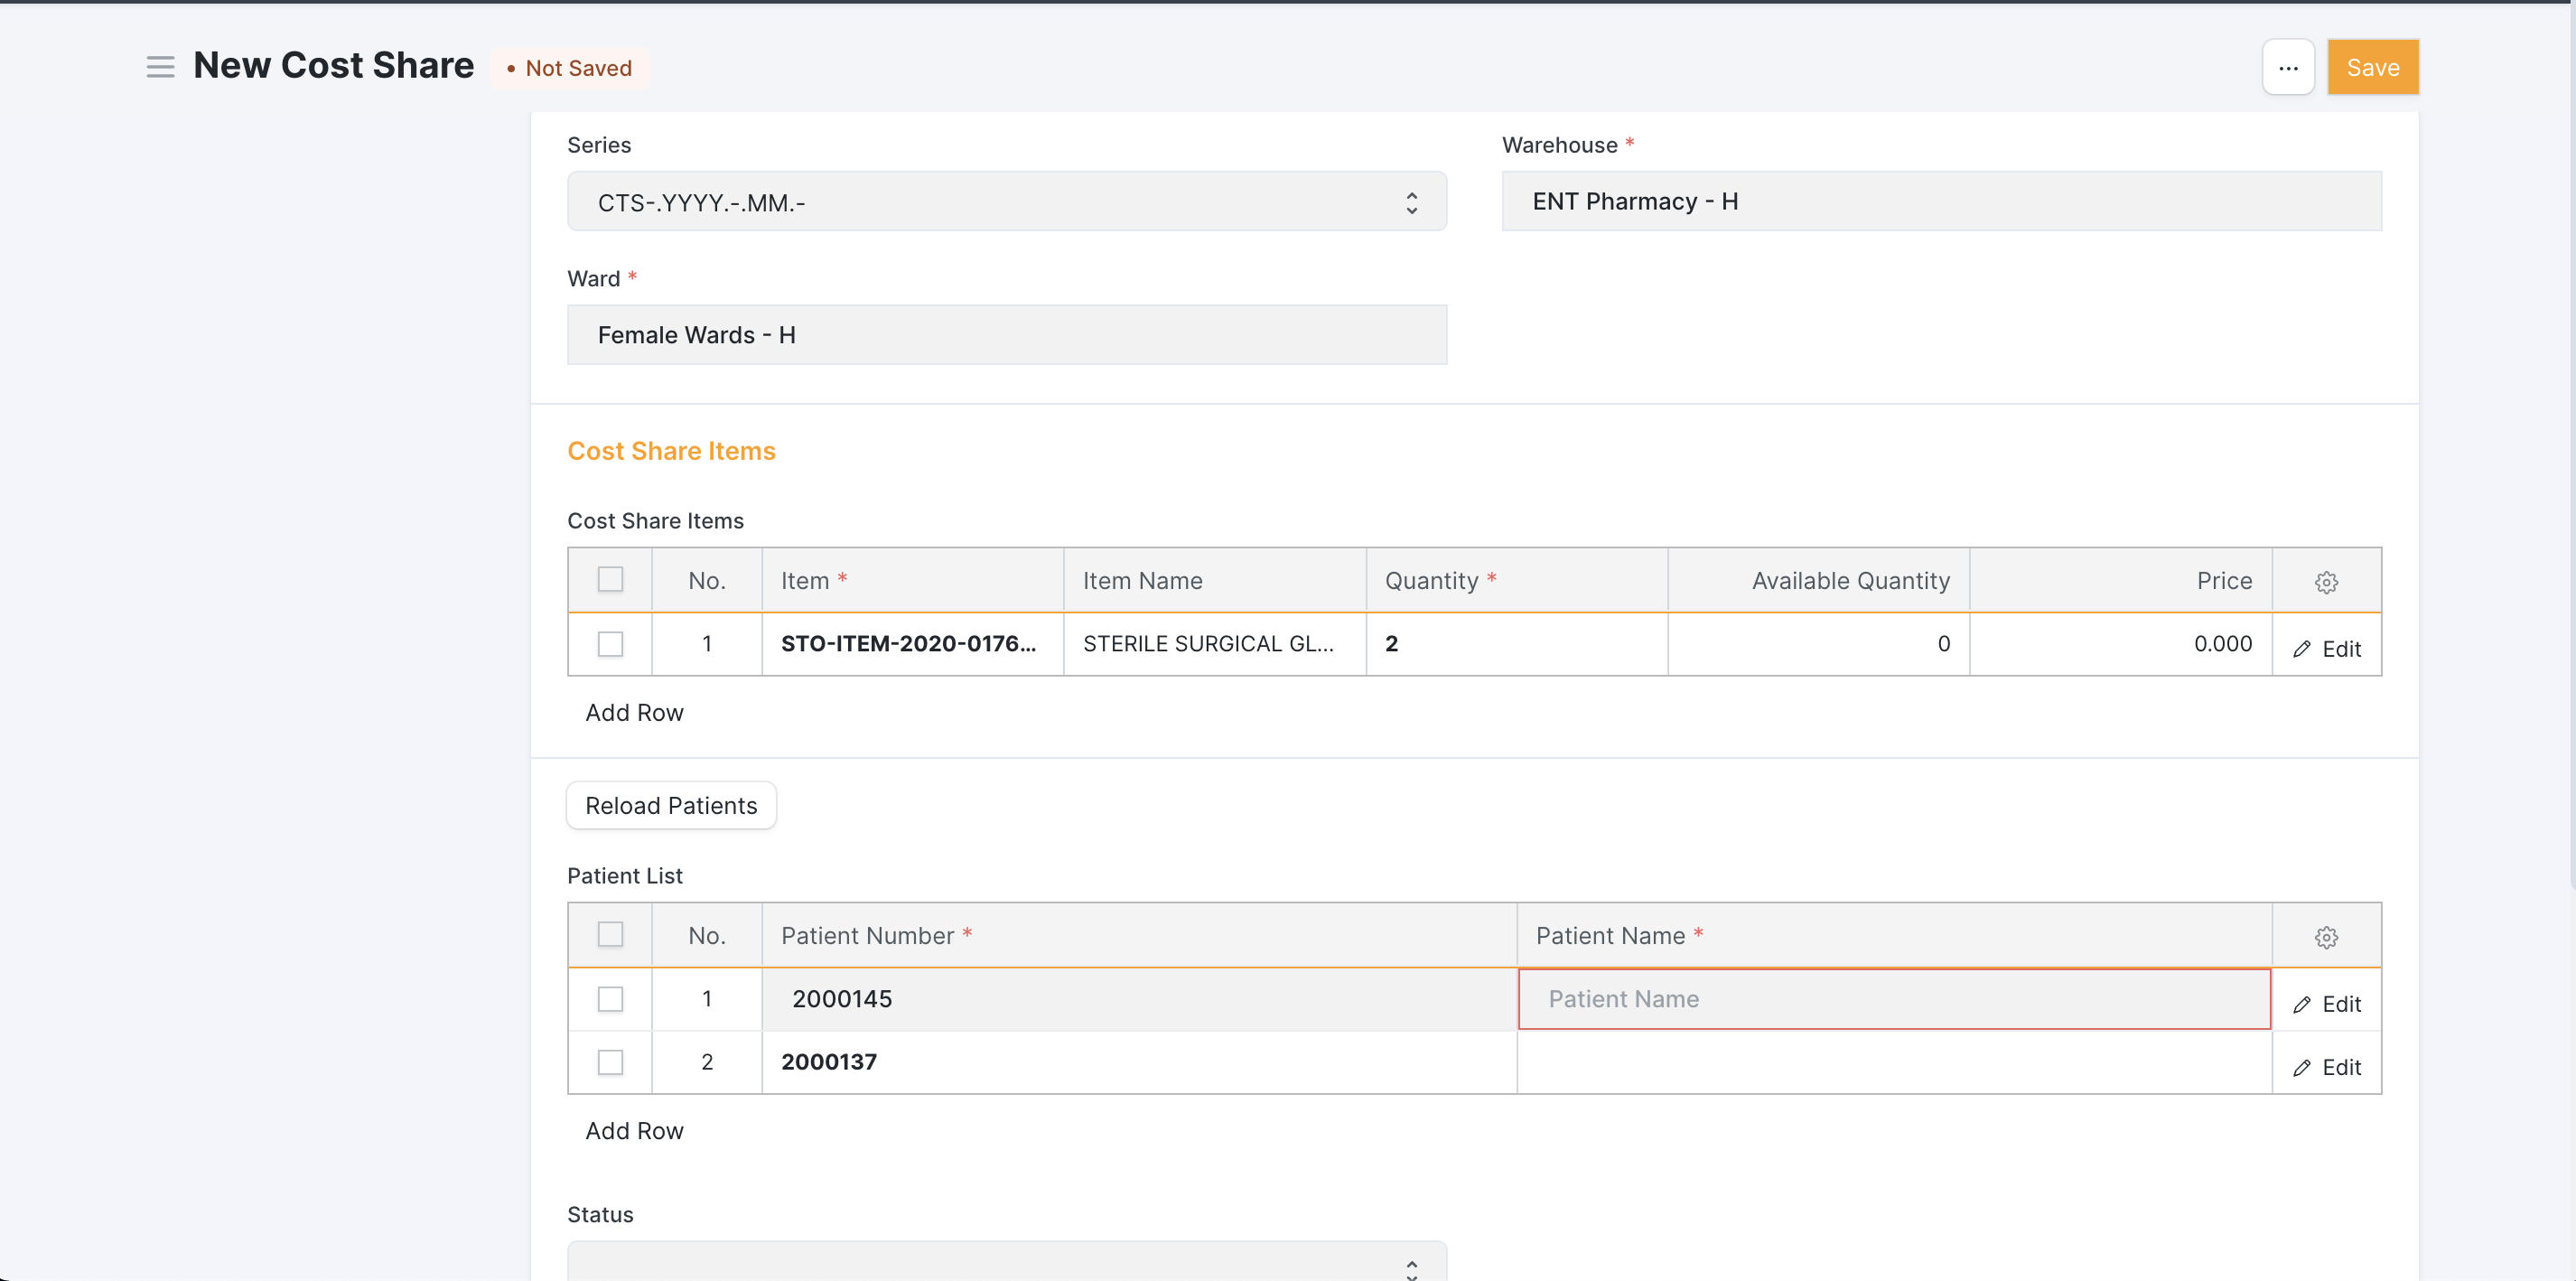
Upon approval of this document, consumables will be deducted from the stocks, and a charge sheet will be generated and shared among the relevant patients.
2. Patient Bill.
- The patient bill serves as a document that represents a comprehensive summary of all charges incurred by a patient. Typically, it combines all the charge sheets generated during an outpatient visit or an admission period. The patient bill is automatically initiated with the creation of the first patient charge sheet in the system, and subsequent charge sheets are appended to this existing patient bill.
- It's important to note that different patient bills are created based on the customer's status and whether they are an inpatient or not. For example, if a patient is initially billed as a cash payer and later as a corporate client, two separate patient bills will be generated to account for these different billing scenarios.
- Upon a patient's discharge from an inpatient status, the patient bill plays a critical role in generating the final bill. Once an accountant has reviewed and verified the bill, they will close the patient bill and proceed to generate the gate pass for the patient
- The patient bill tab provides a list of both current and previous patient bills, offering essential details like customer information, status, posting date, and total amount. Additionally, it offers various actions such as opening and closing the bill, as well as options for viewing and printing.
- At the top of this list, occasional messages will appear when there are uncharged cost shares that should be billed to include them in the patient bill. Accountants will receive prompts to click on "Charge Cost Share" to address this matter.

- When you click "View" on the patient bill list, the complete patient bill will be displayed, encompassing all pertinent information related to the patient's charges.

- In addition to the options to close and reopen the bill, you will also find additional actions such as rebate actions and the ability to recalculate totals.

- Below the contextual patient bill information, you will find a list of all the patient charge sheets associated with the patient bill. These charge sheets collectively contribute to the total amount of the patient bill.
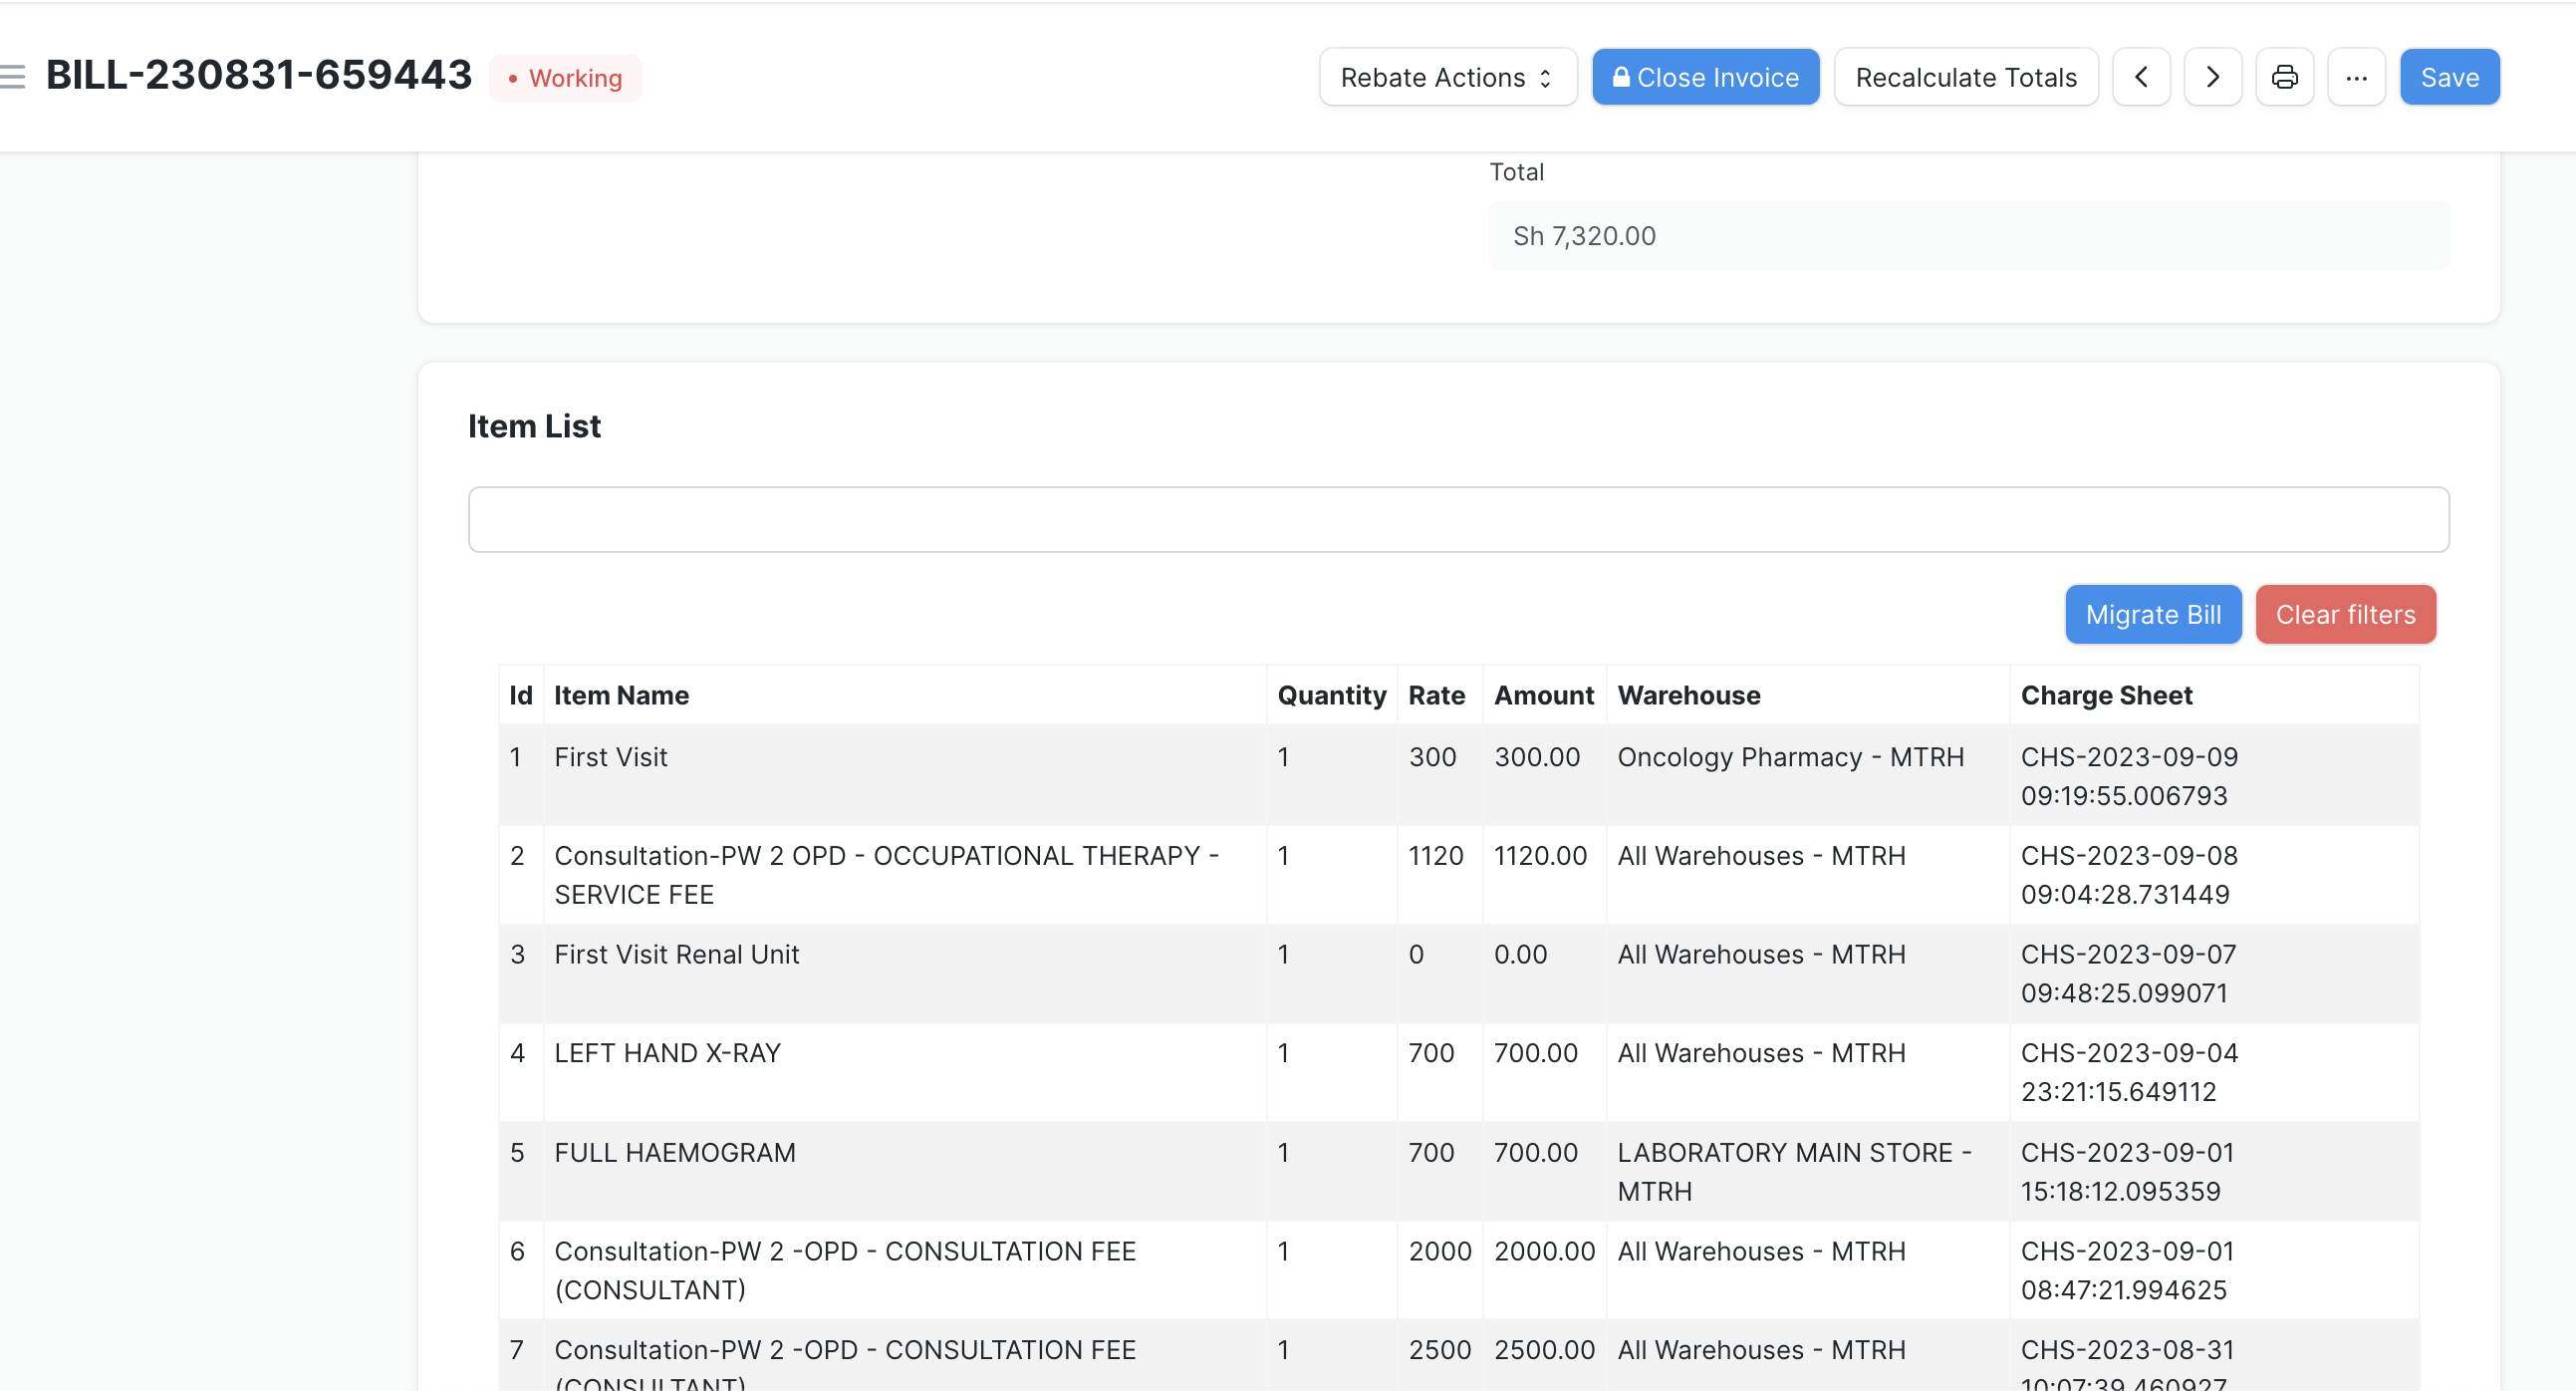
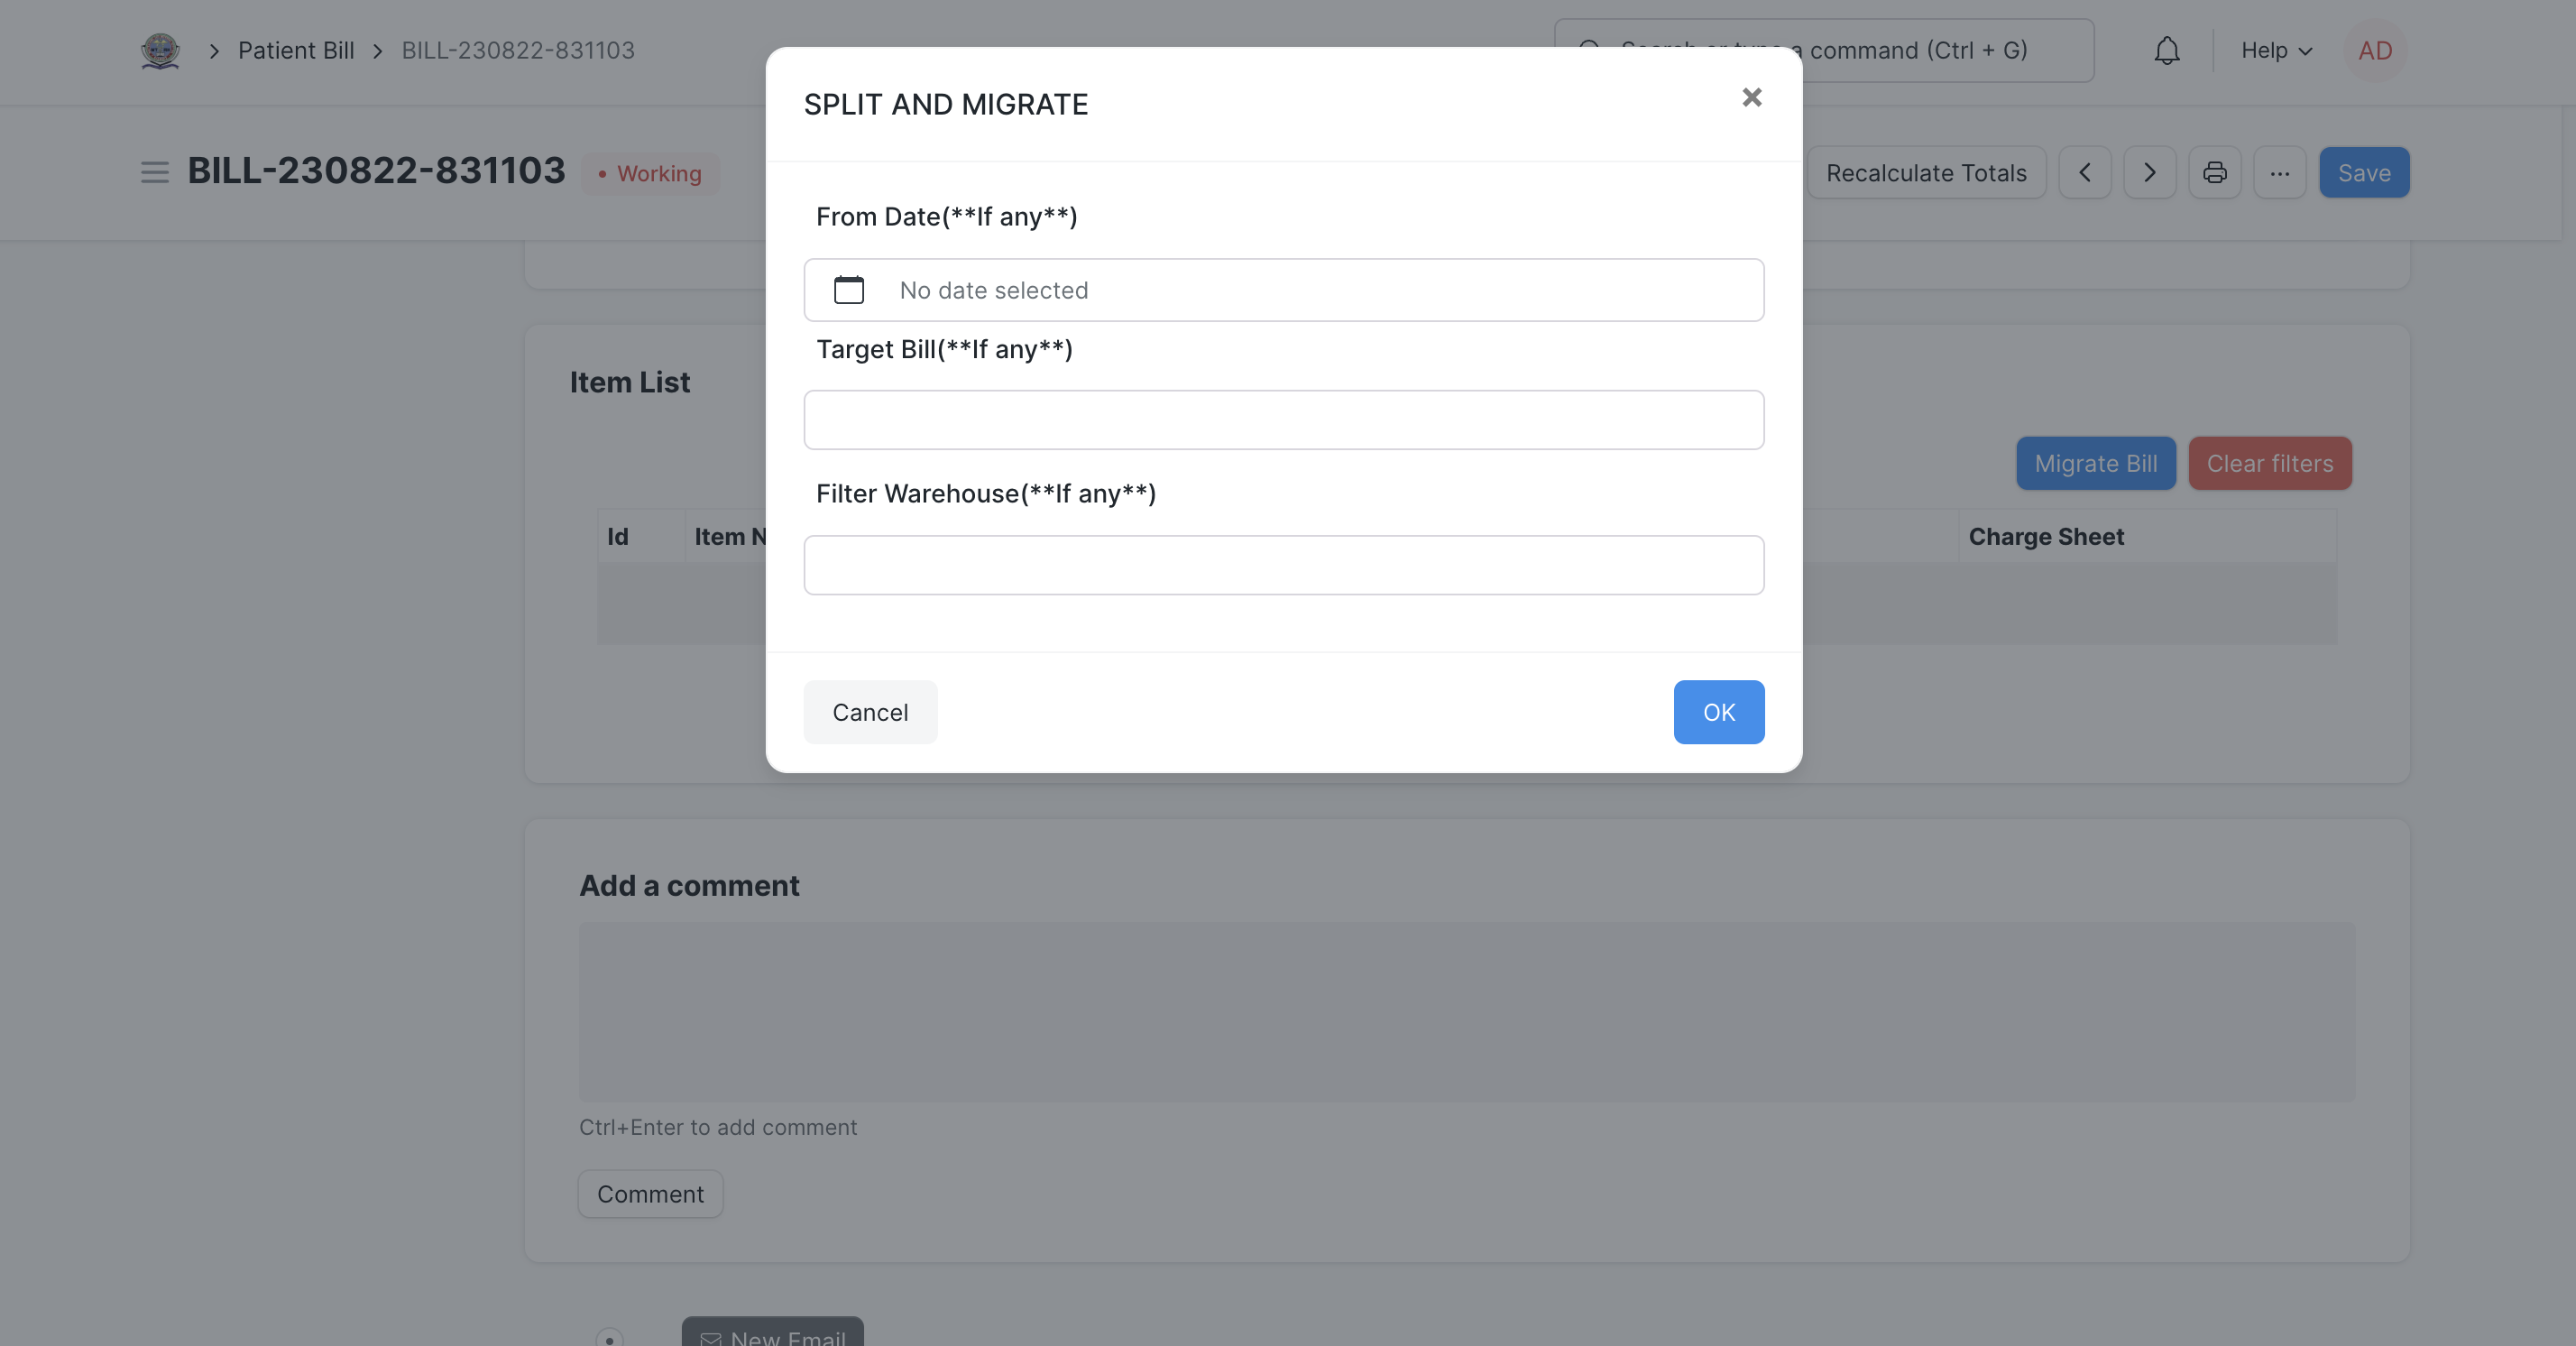
- Accountants are empowered with the capability to transfer these charge sheets from one patient bill to another through the use of the "Migrate" button. The migration process can be performed based on various criteria, including the creation date of the charge sheets and the warehouse. Additionally, accountants can specify the target patient bill for migration. If a specific target is not indicated, a new patient bill will be generated, and the charge sheets meeting the specified criteria will be migrated to this new bill.