Kenya Electronic Medical Records(KenyaEMR+)
- Preliminaries
- Getting Started on KenyaEMR+
- KenyaEMR+ Modules and their Features
- Registration
- Queue Patient Module
- Triage Module
- Outpatient Department (OPD) Module
- Billing Module
- Inventory Module
- Pharmacy Module
- Laboratory Module
- Procedure Room
- Radiology
- InPatient Department
- MCH Triage
- Mother and Child Health Clinic(MCH)
- Delivery Room
- MCH Stores
- Post Abortion Care (PAC) Module
- Pharmacy Module
- Oncology Module
- Morgue Module
- Indicator Reports
Preliminaries
This chapter contains the Table of Contents, Acronyms and Abbreviations and Introduction to the user guide
Table of Contents
Acronyms and Abbreviations
ANC Antenatal Clinic
CPUs County Proximate University
CCC Comprehensive Care
CWC Child Welfare Clinic
EHR Electronic Health Record
EMR Electronic Medical Record
FP Family Planning
HRH Human Resources for Health
HRIOs Health Records Information Officers
ICT Information and Communication Technology
IPD In-Patient Department
KHIS Kenya Health Information System
MCH Mother and Child
MOH Ministry of Health
NGO Non-Governmental Organization
OPD Out-Patient Department
PAC Post Abortion Care
PNC Postnatal clinic
PCN Primary Care Network
SDIP Service delivery implementing partners
Introduction and Background
About KenyaEMR+ User Guide
This user guide provides directions for access and use of KenyaEMR+ system deployed in health facilities in Kenya. It details clinical workflows by a provider using KenyaEMR+ to facilitate efficient service delivery. KenyaEMR+ covers various service points including: registration, triage, Out-Patient Department (OPD), In-Patient Department (IPD), Specialist Clinics and other support services like billing. The guide also details how a user may retrieve various reports from the system for efficient clinical decision making.
Target Users
This user guide targets all users of KenyaEMR+ system including but not limited to the following;
-
Sub- County and county Human Resources for Health (HRH) (including Health Records Information Officers (HRIOs), Medical Superintendents, Doctors, Nurses, Clinical Officers, Pharmacists, Radiologists, Lab technicians)
-
County staff ICT officers, records officers, cashiers, accountants
-
NGOs working in the health industry.
-
Ministry of Health.
HealthIT Project
The HealthIT is a USAID funded digital health mechanism whose overall purpose is to strengthen national policies, strategies, standards and reporting related to Kenya’s Health Information System (KHIS), so as to ultimately support county and national level health service provision. The main aim is to enhance achievements towards evidence-based decision making at both the national and county levels, through the adoption of HIS policies, standards and guidelines. Ultimately this contributes to the achievement of systems interoperability and best practice.
About Kenya EMR
The HealthIT’s implementation strategy is to work with; Kenya Ministry of Health (MOH),County Governments, County Proximate Universities (CPU), Service Delivery Implementing Partners (SDIP) and Digital Health and Strategic Information Partners to deploy, expand, enhance and implement electronic health records with Kenya EMR as the core clinical service module to provide a facility- wide electronic system.
KenyaEMR+is a tailored distribution of OpenMRS that follows the principles of digital development:
-
It is designed with the patient at the center of development
-
Understanding that in the current Kenyan healthcare Ecosystem there are several EHR systems, KenyaEMR+ has implemented data exchange and interoperability standards to allow for interoperability.
-
The system is modular, allowing for scalability
-
KenyaEMR+is based on OpenMRS which an open-source software
-
With OpenMRS being open source, it allows for continuous improvement
KenyaEMR+ platform is a patient centric electronic health record tool that is flexible, interoperable and scalable. It supports facility-wide functions of: clinical management, data management, clinical decision support reporting, lab information system, and inventory, billing and system management.
KenyaEMR+ System Overview
The KenyaEMR+ has 21 modules which facilitate service delivery in a health facility. The functionality of each module is described briefly in the table below. Respective icons for each of the modules as appears on KenyaEMR+ are also displayed.


Organization of KenyaEMR+ User guide
This user guide is organized in four sections below;
Chapter 1: Introduction and Background,
Chapter 2: Getting Started on KenyaEMR+
Chapter 3: KenyaEMR+ modules and their features
Chapter 4: KenyaEMR+ reporting.
Getting Started on KenyaEMR+
Login
Sections below detail how to access and log in into KenyaEMR+
Login Screen Features
KenyaEMR+ Login screen appears as below. Pay attention to the four key features below;
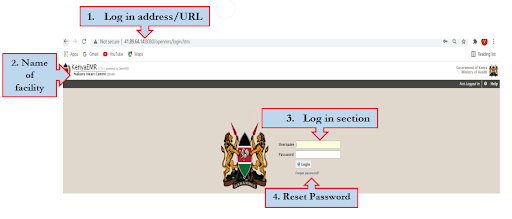
-
Login address/URL - this is the link you will follow or paste on a web browser to open KenyaEMR+ system
-
Name of the facility - the name of your health facility will display here
-
Login section - you will enter your login credentials here
-
Reset password - you will click here to reset/recover your password if you have forgotten
Login steps
To log into the KenyaEMR+ system, follow the steps below;
- Follow the link http://41.89.94.100:8080/openmrs/kenyaemr/userHome.page (HealthIT test environment) or http://localhost:8080/openmrs on a local installation on your browser.
2. Enter your username
3. Enter your password
4. Click on ‘Login’ icon
Once you click the ‘Login’ button the Home page screen will appear.
-
If you do not have login credentials, talk to the KenyaEMR+ champion or facility in-charge in your facility.
-
If you have forgotten your password, click on ‘Forgot password?’ on the Login screen and follow prompts to reset it.
Homepage
This page consists of all the modules available within the system. Each module can be accessed by clicking on its respective icon. Users will be able to only view and access the modules which they have been granted rights to access. The home page screen appears as below only showing modules a user has been granted access to.

KenyaEMR+ Workflow
Editing user profile
Users who have been granted access can edit their own profile and change password by clicking on ‘My Profile’ tab on top right of your screen as shown in the screenshot below;
<insert screenshot>
Once you click on ‘My Profile’ icon, the screen below will appear and it will enable a user do the following by clicking on respective sections;
-
Change password
-
Change secret question
-
Edit name, gender and contact details
<insert screenshot>
Once you complete editing your profile, click on the ‘Home’ icon at the top left of your screen to go back to the modules.
<insert screenshot>
KenyaEMR+ Modules and their Features
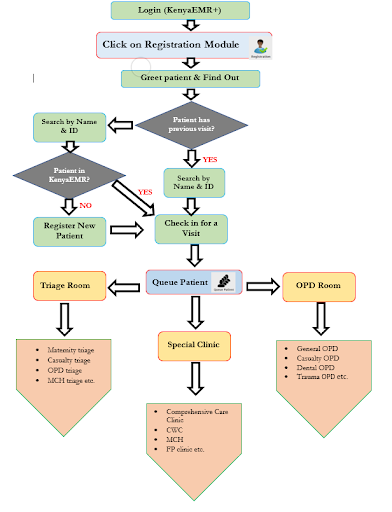
Registration
This module is used to register new patients. It is also used to find details of patients who are already registered in the system.
To access this module, click on the “registration” icon on the ‘Home’ page. Registration icon appears as displayed below.
Go to Appendix 2: Registration Module Workflow to access Registration module flow chart
Registration Module Features
When you click on the registration icon, a window will appear as per the screenshot below. There are four tabs on the registration module which enables a user to;
-
Find or create a patient - enables a user to find a patient already registered in the system or register a new patient
-
View scheduled patients - enables a user to view scheduled patients (patients with appointments)
-
View Active visits - allows a user to view patients currently receiving services in various clinics within a facility
-
View seen patients - allows a user view patients who have visited a facility in a given day whether still receiving a service or have left the facility
The four tabs on registration module are as shown on the screenshot below;
<insert screenshot>
The first step of a patient's journey in a facility begins at registration. First, find if the patient exists in the system, otherwise, create them as new patient.
Finding a Patient in the System
To find an existing patient, click on ‘find or create patient’ on the ‘Registration’ window and a window below will pop up as per screenshot below. You can search a patient by name or system patient ID in the steps below
- Click on find or create patient on the Registration window.
<Insert Screenshot>
2. Type in the patient ID or Name in the search box
<Insert screenshot>
3. The patient's details will appear on the right side of your screen, select the exact patient by clicking on their name
4. On the Patient window that will pop up, click check-in for visit as per screenshot below
<insert screenshot>
This window also allows a user to;
-
Update obstetric information of a patient
-
Add relationships information for the patient
-
Enroll them to HIV, TB, IPT, MCH & Key population services.
5. Select the preferred visit type, then finally submit.
<Insert screenshot>
6. Move to Queue Patient Module on the ‘Home’ screen to queue the patient
Creating a New Patient
To register a new patient follow the steps below;
- Click on ‘find or create patient’ on the ‘Registration Module’ as per screenshot below;
<Insert screenshot>
A new window will appear as per screenshot below.
2. Click on ‘Create New patient’ Tab to register a new patient
<insert screenshot>
A new window will pop providing you with 2 options as per screenshot below
<insert screenshot>
These two options provided to register a new patient will enable a user to;
Option 1: Register New Patient Tab- this tab is used to register a new patient who does not exist in the system
Option 2: Register Existing User to Patient Tab- this tab is used to register a new patient who exists as a user BUT not as a patient in the system. A good example is an employee in a health facility who is registered as a user to offer services to patients but is now seeking health services
Option 1: Register New patient
To register a new patient follow the steps below;
-
Click on ‘register new patient’ icon (Option 1), registration window below will pop up. Input patient information by clicking and typing on spaces provided alongside each information required. All fields marked with an asterisk (*) are mandatory fields.
-
Click create patient at the bottom right of the page to create the patient
<Insert Screenshot>
3. A new window as per screenshot below will pop up. Click on ‘Check in for visit’ Tab
<insert screenshot>
4. Select the preferred visit type, then finally submit.
<insert screenshot>
5. Move to Queue Patient Module on the ‘Home’ screen to queue the patient to respective queue
Option 2: Register existing user to patient
To register an existing user to patient, follow the steps below;
-
Click ‘Register existing user to patient’ icon (Option 2), the filter window below will pop and will enable you to search and pick an existing user.
-
Type in the staff name on the filter space provided and when their name appears, move your mouse pointer and select the user (staff) you want to register.
<insert screenshot>
3. When you select an existing user on the screen above to register as a new patient, then the registration window below will pop up with new user details which are already in the system populated in respective fields. Add any missing details of the patient
<insert screenshot>
4. Click on Save Changes to register existing user to patient
5. A new window as per screenshot below will pop up. Click on ‘Check in for visit’ Tab
<insert screenshot>
6. Then select the preferred visit type, then finally click on submit button.
<insert screenshot>
7. Move to Queue Patient Module on the ‘Home’ screen to queue the patient to respective queue
<insert screenshot>
Scheduled Patient
You can view scheduled patients according to the dates they are scheduled for visits by clicking on respective dates on the calendar. When you click on a date, the names of scheduled patients will display as per screenshot below;
<insert screenshot>
Queue Patient Module
This module provides more information about the patient including the billing details, specified patient category (Paying, non-paying and special schemes), payment categories. In this module a user is able to:
-
Search for patient
-
Enter patient details
-
Queue the patients for different rooms: Triage/OPD/Special Clinic etc
To access this module, click on the “Queue Patient” icon on ‘Home’ screen as displayed below
<insert screenshot>
Queue Patient Module Workflow
Go to Appendix 3: Queue Patient Module Workflow to view Queue Patient module workflow
The figure below illustrates the workflow in the queue patient module.
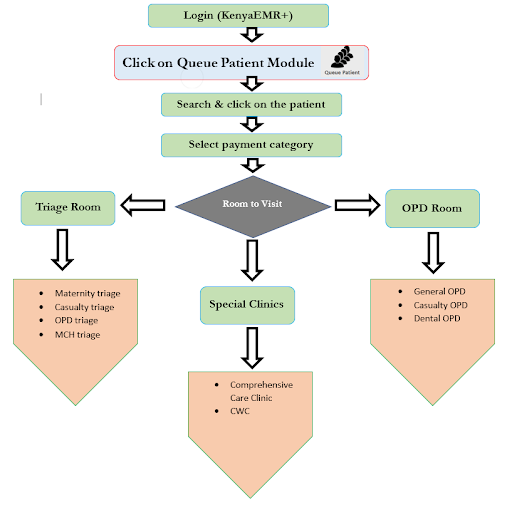
Search a Patient
On clicking the Queue patient icon, a user is able to search a patient by typing the first three characters of the patient name on the “ID or name” text box that is on the left-pane of the screen, This will display a list of possible patients that you are searching for, then click on the patient from the list below.
<insert screenshot>
Queue patients
After selecting the patient, you will be able to queue the patient according to;
-
Patients category
-
Paying category
-
Visit type
-
Room to visit
-
Visit information
By selecting the patient details accordingly, then click on the Green Finish button as per screenshot below;
<insert screenshot>
After selecting the details, click on the green ‘finish’ button on the above screen then a receipt will be displayed as appears below.
Click on the purple ‘print’ button to print the receipt which is issued to the patient.
<insert screenshot>
Triage Module
This module is used to enter the patient’s vital information at the triage section of the facility
It is accessed by clicking the ‘Triage’ icon shown below on the ‘home’ screen.
<insert screenshot>
Triage Queue Page
This page appears when the triage page and from the “Select Queue” drop down menu, select the triage section.
Filter the name of the patient from the queue
<insert screenshot>
A user in the triage section enters the patients’ vital information below:
-
Temperature* - mandatory field
-
Blood pressure
-
Body Mass Index
-
Circumference: MUAC, Chest and Abdomen
-
Room to visit * - mandatory field
Note: All the fields marked * are mandatory
<insert screenshot>
After entering the patients’ vitals, click the finish button in green at the bottom left of your screen.
Note that the ‘Finish’ button will be activated only after filling in all fields marked with an asterisk (*).
The patient will be queued in the OPD queue (respective queue selected under ‘room to visit’) as shown in screenshot below;
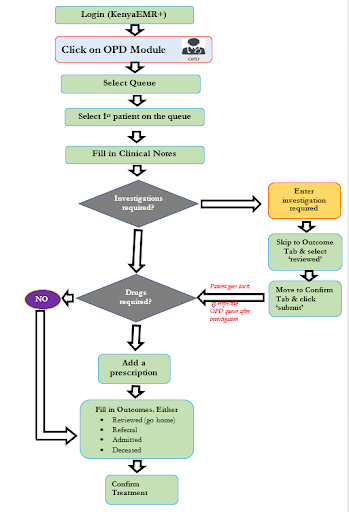
<insert screenshot>Outpatient Department (OPD) Module
The Outpatient Department, interfacing with several departments, is where patient management is done. It is accessed by clicking the ‘OPD’ icon shown below on the ‘home’ screen.
<insert screenshot>
OPD Workflow
The diagram below shows the Out-Patient Department Module Workflow